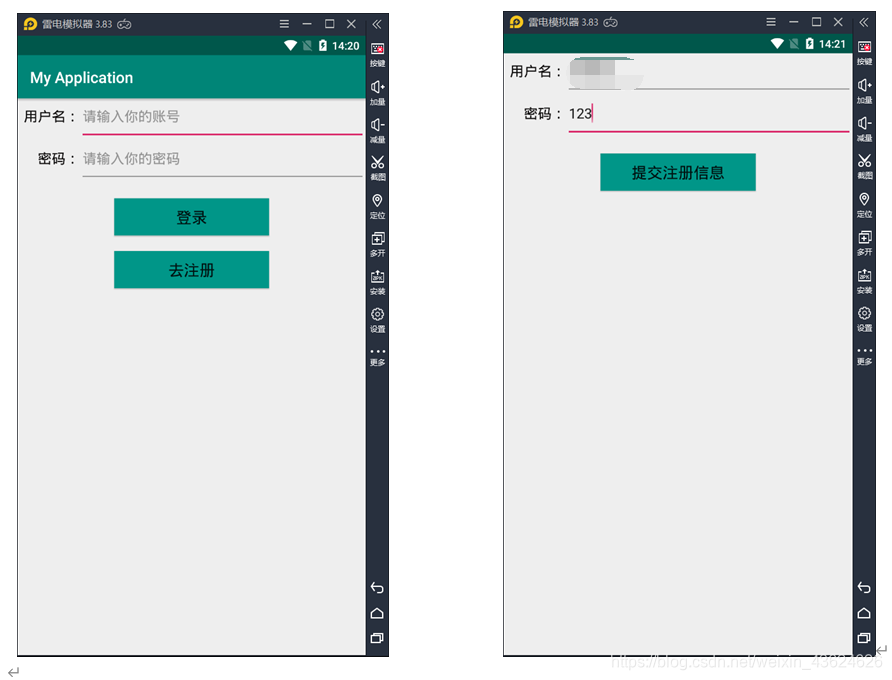
编程实现用户名与密码的存储与调用。 设计用户登录界面、登录成功界面、用户注册界面,用户注册时,将其用户名、密码保存到SharedPreference中,登录时输入用户名、密码,读取SharedPreference,读取不到该用户名提示用户不存在,用户名读取验证通过后,读取用户密码,验证密码是否正确,密码不正确,提示密码不正确,密码验证通过,切换到登录成功界面,显示欢迎提示。 我的大体思路是这样的:分析实验要求知道该案例需要由多个界面组成,并且实现Activity之间的跳转以及实现通过SharedPreference进行数据存取。首先设置三个布局文件作为用户的登录界面、登录成功界面和用户注册界面,还要设置能分别将这三个布局文件转化成 ①分别建立三个布局文件和三个 Activity 文件,activity_main.xml , 下面是程序运行结果截图: 不同的Activity间的SharedPreferences共享问题,就是想能够把在Activity_register.java文件中通过SharedPreferences存储的信息在MainActivity.java提取接收以实现共享。 在Activity_register.java文件中通过 “private SharedPreferences activity_main.xml activity_register.xml activity_login.xml MainActivity.java Activity_register.java Activity_login.java 在本次实验中,利用SharedPreference可以存储少量数据的特征,通过SharedPreference存储实现了用户注册登录以及对登录信息与注册信息进行比对的基本功能。学会了如何实现不同的Activity间的SharedPreferences数据共享。
一、实验原理
1.1实验目标
1.2实验要求
1.3设计思路
View 对象的 Activity(共三个Activity)。
在登录界面上可以实现用户名和密码的输入、登录和注册信息,点击“登录”按钮实现登入操作,点击按钮的同时将输入内容与SharedPreference中的注册数据相比较,如果数据一致,则登录成功,进入成功登入界面,否则提示(浮动显示)“用户名或密码错误”。在登录之前要先进行用户名和密码的注册(就是将输入的用户名和密码存储在SharedPreference中),通过点击“去注册”按钮跳转到注册界面,在注册界面输入要注册的用户名和密码,点击“注册”按钮完成注册,同时浮动显示“注册成功”的信息。二、实验过程
activity_login.xml,activity_register.xml,MainActivity.java
,Activity_login.java ,Activity_register.java
,利用setContentView(R.layout.XXXXXX) 方法关联相应的xml文件,用来显示布局界面。
②在activity_main.xml中使用嵌套线性布局,在LinearLayout
线性布局中嵌套两个LinearLayout布局和两个Button控件,设置android:orientation=“vertical”
让子控件以竖直方向排列,分别在两个子类LinearLayout布局中添加TextView和EditText这两个控件构成输入框部分。
③在MainActivity.java中首先用语句“private SharedPreferences
sp;”定义SharedPreference对象,在下面调用initWidget()函数,在initWidget()函数中配置基本语句,其中使用语句“sp
= getSharedPreferences(“message”, MODE_PRIVATE);”来调用getSharedPreference方法获取SharedPreference的具体实例。用findViewById来关联获取“登录”按钮控件和“去注册”按钮控件,还有获取用户名编辑框和获取密码编辑框。然后在下面设置两个“登录”按钮控件和“去注册”按钮的Button单击事件监听器,基本语句为btn1.setOnClickListener(new
View.OnClickListener(){… …},在 btn1
监听事件中实现的功能是验证输入的用户名和密码是否正确,如果正确跳转到登入成功界面,如果输入的密码和注册的密码不相符则消息提示:“用户名或密码错误”,我用的是if
else语句,输入的结果和已注册信息的对比可以用str1.equals(str2)来比较,如果输入的结果和已注册信息相同则通过Intent和startActivity(intent)来启动登入界面。消息提示可以用“Toast.makeText(getApplicationContext(),
“xxxxx”,Toast.LENGTH_LONG).show();”来浮动显示;在 btn2 监听事件中实现的功能是启动注册界面。
④在activity_ register.xml中的布局和上面提到的activity_main.xml布局类似,就不详细介绍了。
⑤在Activity_register.java文件中也要首先用语句“private SharedPreferences
sp;”定义SharedPreference对象,在下面调用initWidget()函数,在initWidget()函数中配置基本语句,其中使用语句“sp
= getSharedPreferences(“message”, MODE_PRIVATE);”来调用getSharedPreference方法获取SharedPreference的具体实例,这和MainActivity.java类似,这里要确保sp的名字都是“message”,以实现不同的Activity间的preferences共享。然后用“editor.putString(“xxxxx”,
xxxx);”
将用户名和密码写入SharedPreferences中储存,接着用“editor.commit();”提交数据,提交完数据后用“Toast.makeText(getApplicationContext(),“xxxxx”,Toast.LENGTH_LONG).show();”显示”注册信息成功”的消息提示。
⑥在activity_login.xml中的布局文件中简单设置TextView控件,用 android:text=“欢迎!恭喜你登录成功”
显示文本来表明登录成功。
⑦在新建完Activity_login.java文件后不做大的改动,只需用setContentView(R.layout.XXXXXX)
方法进行关联activity_login.xml布局文件即可。三、实验结果


注册的信息以键值对的形式存储在SharedPreferences创建的message.xml文件中,如下所示:


四、实验过程中存在的问题及解决方案
4.1问题
4.2解决方案:
sp;”定义SharedPreferences 对象,通过“sp = getSharedPreferences(“message”,
MODE_PRIVATE);”来调用getSharedPreference方法获取SharedPreference的具体实例,名字是“message”,“SharedPreferences.Editor
editor = sp.edit();”获取编辑器,通过“editor.putString(“username”,
name);”“editor.putString(“password”,
word);”将用户名和密码写入SharedPreferences中储存,最后“editor.commit();
”提交数据。然后在MainActivity.java文件中 同样的用“private SharedPreferences sp;”“sp =
getSharedPreferences(“message”,
MODE_PRIVATE);”,可以通过“sp.getString(“username”,””)”获取到刚才在Activity_register.java文件中储存的数值。五、源代码
5.1布局文件
1. <?xml version="1.0" encoding="utf-8"?> 2. <LinearLayout xmlns:android="https://schemas.android.com/apk/res/android" 3. xmlns:tools="https://schemas.android.com/tools" 4. xmlns:app="https://schemas.android.com/apk/res-auto" 5. android:layout_width="match_parent" 6. android:layout_height="match_parent" 7. android:orientation="vertical" 8. tools:context=".MainActivity"> 9. 10. <LinearLayout 11. android:layout_width="match_parent" 12. android:layout_height="wrap_content" 13. android:orientation="horizontal"> 14. <TextView 15. android:id="@+id/txt_username" 16. android:layout_width="80dp" 17. android:layout_height="wrap_content" 18. android:gravity="right" 19. android:text="用户名:" 20. android:textSize="18sp" 21. android:textColor="#0E0C0C" 22. /> 23. <EditText 24. android:id="@+id/edit_username" 25. android:layout_width="match_parent" 26. android:layout_height="wrap_content" 27. android:paddingBottom="20dp" 28. android:hint="请输入你的账号" 29. /> 30. </LinearLayout> 31. <LinearLayout 32. android:layout_width="match_parent" 33. android:layout_height="wrap_content" 34. android:orientation="horizontal"> 35. <TextView 36. android:id="@+id/txt_password" 37. android:layout_width="80dp" 38. android:layout_height="wrap_content" 39. android:gravity="right" 40. android:text="密码:" 41. android:textSize="18sp" 42. android:textColor="#0E0C0C" /> 43. <EditText 44. android:id="@+id/edit_password" 45. android:layout_width="match_parent" 46. android:layout_height="wrap_content" 47. android:paddingBottom="20dp" 48. android:hint="请输入你的密码" 49. /> 50. </LinearLayout> 51. <Button 52. android:id="@+id/btn_login" 53. android:layout_width="200dp" 54. android:layout_height="wrap_content" 55. android:layout_marginTop="20dp" 56. android:layout_marginBottom="20dp" 57. android:layout_gravity="center" 58. android:text="登录" 59. android:textSize="20sp" 60. android:background="#FF009688" 61. /> 62. <Button 63. android:id="@+id/btn_toregister" 64. android:layout_width="200dp" 65. android:layout_height="wrap_content" 66. android:layout_gravity="center" 67. android:text="去注册" 68. android:textSize="20sp" 69. android:background="#FF009688" 70. /> 71. </LinearLayout> 1. <?xml version="1.0" encoding="utf-8"?> 2. <LinearLayout xmlns:android="https://schemas.android.com/apk/res/android" 3. android:orientation="vertical" android:layout_width="match_parent" 4. android:layout_height="match_parent"> 5. 6. <LinearLayout 7. android:layout_width="match_parent" 8. android:layout_height="wrap_content" 9. android:orientation="horizontal"> 10. <TextView 11. android:id="@+id/txtRegister_username" 12. android:layout_width="80dp" 13. android:layout_height="wrap_content" 14. android:gravity="right" 15. android:text="用户名:" 16. android:textSize="18sp" 17. android:textColor="#0E0C0C" 18. /> 19. <EditText 20. android:id="@+id/editRegister_username" 21. android:layout_width="match_parent" 22. android:layout_height="wrap_content" 23. android:paddingBottom="20dp" 24. android:hint="请输入你的账号" 25. /> 26. </LinearLayout> 27. <LinearLayout 28. android:layout_width="match_parent" 29. android:layout_height="wrap_content" 30. android:orientation="horizontal"> 31. <TextView 32. android:id="@+id/txtRegister_password" 33. android:layout_width="80dp" 34. android:layout_height="wrap_content" 35. android:gravity="right" 36. android:text="密码:" 37. android:textSize="18sp" 38. android:textColor="#0E0C0C" /> 39. <EditText 40. android:id="@+id/editRegister_password" 41. android:layout_width="match_parent" 42. android:layout_height="wrap_content" 43. android:paddingBottom="20dp" 44. android:hint="请输入你的密码" 45. /> 46. </LinearLayout> 47. <Button 48. android:id="@+id/btn_register" 49. android:layout_width="200dp" 50. android:layout_height="wrap_content" 51. android:layout_marginTop="20dp" 52. android:layout_marginBottom="20dp" 53. android:layout_gravity="center" 54. android:text="提交注册信息" 55. android:textSize="20sp" 56. android:background="#FF009688" 57. /> 58. </LinearLayout> 59. 1. <?xml version="1.0" encoding="utf-8"?> 2. <LinearLayout xmlns:android="https://schemas.android.com/apk/res/android" 3. android:orientation="vertical" android:layout_width="match_parent" 4. android:layout_height="match_parent"> 5. 6. <TextView 7. android:layout_width="wrap_content" 8. android:layout_height="wrap_content" 9. android:paddingTop="20dp" 10. android:layout_gravity="center" 11. android:textSize="26sp" 12. android:textColor="#171AD3" 13. android:text="欢迎!恭喜你登录成功" 14. /> 15. </LinearLayout> 1. package com.example.myapplication; 2. 3. import androidx.appcompat.app.AppCompatActivity; 4. 5. import android.content.Context; 6. import android.content.Intent; 7. import android.content.SharedPreferences; 8. import android.os.Bundle; 9. import android.telephony.mbms.MbmsErrors; 10. import android.view.View; 11. import android.widget.Button; 12. import android.widget.EditText; 13. import android.widget.Toast; 14. 15. public class MainActivity extends AppCompatActivity { 16. 17. private SharedPreferences sp; 18. @Override 19. protected void onCreate(Bundle savedInstanceState) { 20. super.onCreate(savedInstanceState); 21. setContentView(R.layout.activity_main); 22. initWidget(); 23. } 24. private void initWidget() { 25. sp = getSharedPreferences("message", MODE_PRIVATE); 26. Button btn1 = (Button) findViewById(R.id.btn_login);//获取 登录 按钮控件 27. Button btn2 = (Button) findViewById(R.id.btn_toregister);//获取 去注册 按钮控件 28. final EditText username = (EditText) findViewById(R.id.edit_username);//获取用户名编辑框 29. final EditText password = (EditText) findViewById(R.id.edit_password);//获取密码编辑框 30. btn1.setOnClickListener(new View.OnClickListener() { 31. @Override 32. public void onClick(View v) { 33. //验证输入的用户名和密码是否正确,如果正确跳转到登入成功界面 34. if(((username.getText().toString()).equals(sp.getString("username","")))&& 35. (((password.getText().toString()).equals(sp.getString("password",""))))){ 36. Intent intent = new Intent(MainActivity.this, Activity_login.class); 37. startActivity(intent); //启动登录界面 38. }else { //如果输入的密码和注册的密码不相符则消息提示:用户名或密码错误 39. Toast.makeText(MainActivity.this,"用户名或密码错误",Toast.LENGTH_LONG).show(); 40. } 41. 42. } 43. }); 44. btn2.setOnClickListener(new View.OnClickListener() { 45. @Override 46. public void onClick(View v) { 47. Intent intent = new Intent(MainActivity.this, Activity_register.class); 48. startActivity(intent);//启动注册界面 49. } 50. }); 51. 52. } 53. } 1. package com.example.myapplication; 2. 3. import android.app.Activity; 4. import android.content.Context; 5. import android.content.SharedPreferences; 6. import android.os.Bundle; 7. import android.view.View; 8. import android.widget.Button; 9. import android.widget.EditText; 10. import android.widget.Toast; 11. 12. public class Activity_register extends Activity { 13. private SharedPreferences sp; 14. 15. protected void onCreate(Bundle savedInstanceState) { 16. super.onCreate(savedInstanceState); 17. setContentView(R.layout.activity_register); 18. init(); 19. } 20. private void init() { 21. sp = getSharedPreferences("message", MODE_PRIVATE); 22. final EditText username = (EditText) findViewById(R.id.editRegister_username);//获取用户名编辑框 23. final EditText password = (EditText) findViewById(R.id.editRegister_password);//获取密码编辑框 24. Button btn = (Button) findViewById(R.id.btn_register); 25. btn.setOnClickListener(new View.OnClickListener() { 26. @Override 27. public void onClick(View v) { 28. SharedPreferences.Editor editor = sp.edit(); 29. String name = username.getText().toString(); 30. String word = password.getText().toString(); 31. editor.putString("username", name);//将用户名写入SharedPreferences中储存 32. editor.putString("password", word);//将密码写入SharedPreferences中储存 33. editor.commit(); //提交数据 34. Toast.makeText(Activity_register.this,"注册信息成功",Toast.LENGTH_LONG).show(); 35. } 36. }); 37. } 38. } 1. package com.example.myapplication; 2. 3. import android.app.Activity; 4. import android.os.Bundle; 5. 6. public class Activity_login extends Activity { 7. protected void onCreate(Bundle savedInstanceState) { 8. super.onCreate(savedInstanceState); 9. setContentView(R.layout.activity_login); 10. } 11. } 六、实验总结
本网页所有视频内容由 imoviebox边看边下-网页视频下载, iurlBox网页地址收藏管理器 下载并得到。
ImovieBox网页视频下载器 下载地址: ImovieBox网页视频下载器-最新版本下载
本文章由: imapbox邮箱云存储,邮箱网盘,ImageBox 图片批量下载器,网页图片批量下载专家,网页图片批量下载器,获取到文章图片,imoviebox网页视频批量下载器,下载视频内容,为您提供.
阅读和此文章类似的: 全球云计算
 官方软件产品操作指南 (170)