save()方法把当前状态的一份拷贝压入到一个保存图像状态的栈中。这就允许您临时地改变图像状态,然后,通过调用 restore() rotate() 方法根据原点旋转当前的绘图。 translate(x,y); 方法设定原点的指令之后我就就概括为原点。 beginPath() 方法开始一条路径,或重置当前的路径。 stroke() 方法会实际地绘制出通过 moveTo() 和 lineTo() clearRect(x,y,width,height)方法清空给定矩形内的指定像素。 globalCompositeOperation arc(x,y,r,sAngle,eAngle,counterclockwise);画圆的方法 x 圆的中心的 x 坐标。 y 圆的中心的 y 坐标。 r 圆的半径。 sAngle 起始角,以弧度计。(弧的圆形的三点钟位置是 0 度)。 fillStyle 接下来就开始操作!! 然后开始搭建背景内容 为了减少冗余我就单独地把save里的东西拿了出来 可以看到月球也改变了方位也就是说原点的位置也发生了改变可以说说明几点问题 基于以上的结论就可以给地球添加上动画月球就会跟着地球旋转了。
需要运用到的关于canvas的一些代码
来恢复以前的值。
可是要注意,当前路径和当前位置并非图形状态的一部分,并且不会由这个方法保存。(以上均为w3chool里的介绍,但是这里我个人感觉有点问题下面会讲)
方法定义的路径。默认颜色是黑色。(也可以当做结束当前画的图形的一个指令画完一个图形也就是在beginPath()
之后一定要加要不然会出现奇怪的效果)
属性设置或返回如何将一个源(新的)图像绘制到目标(已有)的图像上。destination-over 在源图像上方显示目标图像。
eAngle 结束角,以弧度计。 counterclockwise 可选。规定应该逆时针还是顺时针绘图。 False = 顺时针,true逆时针。
strokeStyle
fill()等方法就此略过<body> <canvas id="" width="500" height="500"></canvas> <script type="text/javascript" charset="utf-8"> var ctx = document.querySelector('canvas').getContext('2d'); ctx.globalCompositeOperation = 'destination-over'; //让新的图案覆盖原来的团,按照从下网上的顺序 setInterval(function () { ctx.clearRect(0,0,500,500); //运用定时器来实现动画效果,每次都先清空画布 //这里开始写代码咯 },60) </script> </body>` <body> <canvas id="" width="500" height="500"></canvas> <script type="text/javascript" charset="utf-8"> var ctx = document.querySelector('canvas').getContext('2d'); ctx.globalCompositeOperation = 'destination-over';//让新的图案覆盖原来的团,按照从下网上的顺序 setInterval(function () { ctx.clearRect(0,0,500,500);//运用定时器来实现动画效果,每次都先清空画布 ctx.beginPath();//开始新的绘制 ctx.arc(250, 250, 200, 0, Math.PI * 2, true);//以250,250的中心为原点画一个半径为200的圆圈当做太阳系的轨道 ctx.strokeStyle='red';// ctx.stroke();//结束这次一次绘制 ctx.beginPath();//开始新的一次绘制 ctx.arc(250, 250, 30, 0, Math.PI * 2, true);//在中心画了个圆 ctx.fillStyle='red';//中心填充的颜色是红色 ctx.strokeStyle='red';//边框的颜色是红色色 ctx.fill();//开始填充红色颜色 ctx.stroke();//结束这一次绘制 },60) </script> </body> 
如图所示,接下里开始添加上蓝蓝的地球<body> <canvas id="" width="500" height="500"></canvas> <script type="text/javascript" charset="utf-8"> var ctx = document.querySelector('canvas').getContext('2d'); ctx.globalCompositeOperation = 'destination-over'; setInterval(function () { ctx.clearRect(0,0,500,500);//运用定时器来实现动画效果,每次都先清空画布 ctx.save(); //为了不影响背景,也是为了更好地使用rotae //这里要用save来保存设置也是开辟一个新的空间,独立于背景 ctx.beginPath();//开始绘制 ctx.translate(250,250);//原来的原点坐标默认为0,0要将原点坐标设置为250,250才能让rotate绕着中心旋转 ctx.rotate(0); ctx.translate(200,0);//这个translate在250,250的基础 // 上往右又移动了200停留在轨道上不会影响上面rotate //,只影响下面画出来的蓝色地球 ctx.fillStyle='blue'; ctx.strokeStyle='blue'; ctx.arc(0, 0, 30, 0, Math.PI * 2, true);//画蓝色的地球 ctx.fill(); ctx.stroke(); ctx.restore(); ctx.beginPath();//开始新的一次绘制 ctx.arc(250, 250, 30, 0, Math.PI * 2, true);//在中心画了个圆 ctx.fillStyle='red';//中心填充的颜色是红色 ctx.strokeStyle='red';//边框的颜色是红色色 ctx.fill();//开始填充红色颜色 ctx.stroke();//结束这一次绘制 ctx.beginPath();//开始新的绘制 ctx.arc(250, 250, 200, 0, Math.PI * 2, true); //以250,250的中心为原点画一个半径为200的圆圈当做太阳系的轨道 ctx.strokeStyle='red';// ctx.stroke();//结束这次一次绘制 },60) </script> </body> 
这时候为了更好理解原点的坐标我先不加旋转的动画,下面代码中我就加上月球<body> <canvas id="" width="600" height="600"></canvas> <script type="text/javascript" charset="utf-8"> var ctx = document.querySelector('canvas').getContext('2d'); ctx.globalCompositeOperation = 'destination-over'; setInterval(function () { ctx.clearRect(0,0,500,500);//运用定时器来实现动画效果,每次都先清空画布 ctx.save();//为了不影响背景,也是为了更好地使用rotae //这里要用save来保存设置也是开辟一个新的空间,独立于背景 ctx.beginPath();//开始绘制 ctx.translate(250,250);//原来的原点坐标默认为0,0 //要将原点坐标设置为250,250才能让rotate绕着中心旋转 ctx.rotate(0);//0度 ctx.translate(200,0); //这个translate在250,250的基础上往右又移动了200停留在轨道上 //不会影响上面rotate, // 只影响下面画出来的蓝色地球 ctx.fillStyle='blue'; ctx.strokeStyle='blue'; ctx.arc(0, 0, 30, 0, Math.PI * 2, true); //画蓝色的地球这里的想x,y是按照translate的定位来设置的 // 这里的x,y就是450,250的位置 ctx.fill(); ctx.stroke(); ctx.save();//再用save这个是实现公转的关键 ctx.beginPath(); ctx.rotate(0);//0度 ctx.translate(50,0); //这个translate是按照上一个translate的坐标来定位的 //所以现在的translate的定位为550,250的位置 ctx.fillStyle='green'; ctx.strokeStyle='green'; ctx.arc(0, 0, 10, 0, Math.PI * 2, true); //根据translate定位的原点什么都不动的情况下月球的位置为550,250 ctx.fill(); ctx.stroke(); ctx.restore();//把月球代码包起来形成嵌套 ctx.restore(); ctx.beginPath();//开始新的一次绘制 ctx.arc(250, 250, 30, 0, Math.PI * 2, true);//在中心画了个圆 ctx.fillStyle='red';//中心填充的颜色是红色 ctx.strokeStyle='red';//边框的颜色是红色色 ctx.fill();//开始填充红色颜色 ctx.stroke();//结束这一次绘制 ctx.beginPath();//开始新的绘制 ctx.arc(250, 250, 200, 0, Math.PI * 2, true); //以250,250的中心为原点画一个半径为200的圆圈当做太阳系的轨道 ctx.strokeStyle='red';// ctx.stroke();//结束这次一次绘制 },60) </script> </body> 
再根据rotate的值都设为了0,再参考一张图
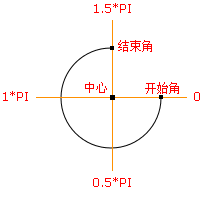
集合原点的位置我们可以很好地推出上面的情况是如何出来的接下来我改变地球球的旋转角度试一试`
ctx.save();//为了不影响背景,也是为了更好地使用rotae这里要用save来保存设置也是开辟一个新的空间,独立于背景 ctx.beginPath();//开始绘制 ctx.translate(250,250);//原来的原点坐标默认为0,0要将原点坐标设置为250,250才能让rotate绕着中心旋转 ctx.rotate(90*Math.PI/180);//旋转了90度 ctx.translate(200,0);//这个translate在250,250的基础上往右又移动了200停留在轨道上不会影响上面rotate, // 只影响下面画出来的蓝色地球 ctx.fillStyle='blue'; ctx.strokeStyle='blue'; ctx.arc(0, 0, 30, 0, Math.PI * 2, true); //画蓝色的地球这里的想x,y是按照translate的定位来设置的 // 这里的x,y就是450,250的位置 ctx.fill(); ctx.stroke(); ctx.save();//再用save这个是实现公转的关键 ctx.beginPath(); ctx.rotate(0);//0度 ctx.translate(50,0);//这个translate是按照上一个translate的坐标来定位的 //所以现在的translate的定位为550,250的位置 ctx.fillStyle='green'; ctx.strokeStyle='green'; ctx.arc(0, 0, 10, 0, Math.PI * 2, true);//根据translate定位的原点什么都不动的情况下月球的位置为550,250 ctx.fill(); ctx.stroke(); ctx.restore();//把月球代码包起来形成嵌套 ctx.restore();
可以看到我只将角度改成了90度按理说只有地球会移动到下面去可事实是如下

– rotae会改变原点位置
– save嵌套,里边的save旋转的中心就是外边的原点位置
– 角度也是相对的在地球0度的情况下,月球的0度在地球的右边也就是外边,地球90度的情况下,月球的0度在地球的下边边也是外边。
– save会保存上一层的原点坐标与w3chool定义出了冲突。
<!DOCTYPE html> <html lang="en"> <head> <meta charset="UTF-8"> <title>Title</title> </head> <body> <canvas id="" width="600" height="600"></canvas> <script type="text/javascript" charset="utf-8"> var ctx = document.querySelector('canvas').getContext('2d'); ctx.globalCompositeOperation = 'destination-over'; setInterval(function () { ctx.clearRect(0,0,600,600);//运用定时器来实现动画效果,每次都先清空画布 ctx.save();//为了不影响背景,也是为了更好地使用rotae这里要用save来保存设置也是开辟一个新的空间,独立于背景 ctx.beginPath();//开始绘制 ctx.translate(250,250);//原来的原点坐标默认为0,0要将原点坐标设置为250,250才能让rotate绕着中心旋转 var time = new Date(); //新建一个日期类用来控制旋转 //rotate是按照上一个translate的定位来旋转的 //所以这个rotate的旋转定位就是250,250也就是图像中心 ctx.rotate(((2 * Math.PI) / 60) * time.getSeconds() //获取秒来控制大致的移动速度可以减小分母或者增大分母来控制速度的快慢 + ((2 * Math.PI) / 60000) * time.getMilliseconds()); + //获取毫秒让动画更加圆润,不卡顿 ctx.translate(200,0);//这个translate在250,250的基础上往右又移动了200停留在轨道上不会影响上面rotate, // 只影响下面画出来的蓝色地球 ctx.fillStyle='blue'; ctx.strokeStyle='blue'; ctx.arc(0, 0, 30, 0, Math.PI * 2, true); //画蓝色的地球这里的想x,y是按照translate的定位来设置的 // 这里的x,y就是450,250的位置 ctx.fill(); ctx.stroke(); ctx.save();//再用save这个是实现公转的关键 ctx.beginPath(); ctx.rotate(0);//0度 ctx.translate(50,0);//这个translate是按照上一个translate的坐标来定位的 //所以现在的translate的定位为550,250的位置 ctx.fillStyle='green'; ctx.strokeStyle='green'; ctx.arc(0, 0, 10, 0, Math.PI * 2, true);//根据translate定位的原点 //什么都不动的情况下月球的位置为550,250 ctx.fill(); ctx.stroke(); ctx.restore();//把月球代码包起来形成嵌套 ctx.restore(); ctx.beginPath();//开始新的一次绘制 ctx.arc(250, 250, 30, 0, Math.PI * 2, true);//在中心画了个圆 ctx.fillStyle='red';//中心填充的颜色是红色 ctx.strokeStyle='red';//边框的颜色是红色色 ctx.fill();//开始填充红色颜色 ctx.stroke();//结束这一次绘制 ctx.beginPath();//开始新的绘制 ctx.arc(250, 250, 200, 0, Math.PI * 2, true);//以250,250的中心为原点画一个半径为200的圆圈当做太阳系的轨道 ctx.strokeStyle='red';// ctx.stroke();//结束这次一次绘制 },60) </script> </body> </html> 
那我们再给月球添加上动画效果就完成了!!!!
<!DOCTYPE html> <html lang="en"> <head> <meta charset="UTF-8"> <title>Title</title> </head> <body> <canvas id="" width="600" height="600"></canvas> <script type="text/javascript" charset="utf-8"> var ctx = document.querySelector('canvas').getContext('2d'); ctx.globalCompositeOperation = 'destination-over'; setInterval(function () { ctx.clearRect(0,0,600,600);//运用定时器来实现动画效果,每次都先清空画布 ctx.save();//为了不影响背景,也是为了更好地使用rotae这里要用save来保存设置也是开辟一个新的空间,独立于背景 ctx.beginPath();//开始绘制 ctx.translate(250,250);//原来的原点坐标默认为0,0要将原点坐标设置为250,250才能让rotate绕着中心旋转 var time = new Date(); //新建一个日期类用来控制旋转 //rotate是按照上一个translate的定位来旋转的所以这个rotate的旋转定位就是250,250也就是图像中心 ctx.rotate(((2 * Math.PI) / 60) * time.getSeconds() //获取秒来控制大致的移动速度可以减小分母或者增大分母来控制速度的快慢 + ((2 * Math.PI) / 60000) * time.getMilliseconds());//获取毫秒让动画更加圆润,不卡顿 ctx.translate(200,0);//这个translate在250,250的基础上往右又移动了200停留在轨道上不会影响上面rotate, // 只影响下面画出来的蓝色地球 ctx.fillStyle='blue'; ctx.strokeStyle='blue'; ctx.arc(0, 0, 30, 0, Math.PI * 2, true); //画蓝色的地球这里的想x,y是按照translate的定位来设置的 // 这里的x,y就是450,250的位置 ctx.fill(); ctx.stroke(); ctx.save();//再用save这个是实现公转的关键 ctx.beginPath(); var time = new Date(); //新建一个日期类用来控制旋转 //这里的rotate旋转的中心是按照上一层save的原点, //上一层的原点在改变所以月球的旋转的中心也会改变 ctx.rotate(((2 * Math.PI) / 6) * time.getSeconds() //获取秒来控制大致的移动速度可以减小分母或者增大分母来控制速度的快慢 + ((2 * Math.PI) / 6000) * time.getMilliseconds());//获取毫秒让动画更加圆润,不卡顿 ctx.translate(50,0);//这个translate是按照上一个translate的坐标来定位的 //所以现在的translate的定位为550,250的位置 ctx.fillStyle='green'; ctx.strokeStyle='green'; ctx.arc(0, 0, 10, 0, Math.PI * 2, true); //根据translate定位的原点什么都不动的情况下月球的位置为550,250 ctx.fill(); ctx.stroke(); ctx.restore();//把月球代码包起来形成嵌套 ctx.restore(); ctx.beginPath();//开始新的一次绘制 ctx.arc(250, 250, 30, 0, Math.PI * 2, true);//在中心画了个太阳 ctx.fillStyle='red';//中心填充的颜色是红色 ctx.strokeStyle='red';//边框的颜色是红色色 ctx.fill();//开始填充红色颜色 ctx.stroke();//结束这一次绘制 ctx.beginPath();//开始新的绘制 ctx.arc(250, 250, 200, 0, Math.PI * 2, true); //以250,250的中心为原点画一个半径为200的圆圈当做太阳系的轨道 ctx.strokeStyle='red';// ctx.stroke();//结束这次一次绘制 },60) </script> </body> </html> 
也可以做些骚操作,比如再给月球来一个旋转的卫星形成三个save的嵌套,这里我就不做过多演示了。如果这边博客能帮上一点忙得那就请点个赞把^ – ^
本网页所有视频内容由 imoviebox边看边下-网页视频下载, iurlBox网页地址收藏管理器 下载并得到。
ImovieBox网页视频下载器 下载地址: ImovieBox网页视频下载器-最新版本下载
本文章由: imapbox邮箱云存储,邮箱网盘,ImageBox 图片批量下载器,网页图片批量下载专家,网页图片批量下载器,获取到文章图片,imoviebox网页视频批量下载器,下载视频内容,为您提供.
阅读和此文章类似的: 全球云计算
 官方软件产品操作指南 (170)


