插入模式 命令模式 在阿里云Ubuntu镜像里面复制配置信息之后,将sources.list里面的文本覆盖 首先查看一下百度的IP地址 可以通过vim命令直接修改hosts文件 可以看到有两个默认的域名解析 查看DNS IPv4方式设置位手动,填入相应信息,应用即可 添加一个路由 创建一个.sh脚本 写入以下内容 执行./test.sh,屏幕输出为: 由此可见,在#!/bin/sh的情况下,source不成功,不会运行source后面的代码。修改test2.sh脚本的第一行,变为#!/bin/bash,再次执行./test2.sh,屏幕输出为: 由此可见,在#!/bin/bash的情况下,虽然source不成功,但是还是运行了source后面的echo语句,尝试运行了一下sh ./test.sh,这次屏幕输出为: 表示虽然脚本中指定了#!/bin/bash,但是如果使用sh 方式运行,如果source不成功,也不会运行source后面的代码 每个进程有着相应的PID,用pgrep命令查看某个进程的PID,使用kill (PID)命令杀死对应的进程 (未完)
Linux操作系统基本使用
puyalee@puyalee-virtual-machine:~$ halt //立刻关机 puyalee@puyalee-virtual-machine:~$ poweroff //立刻关机 puyalee@puyalee-virtual-machine:~$ shutdown //立刻关机 puyalee@puyalee-virtual-machine:~$ shutdown -h 10 //定时关机:n分钟后关机
puyalee@puyalee-virtual-machine:~$ firefox
deb 是 Unix 系统(其实主要是 Linux )下的安装包,以vscode为例,在官网下载好deb安装包
 我下载download文件夹里,所以进入该路径,然后使用dpkg命令安装
puyalee@puyalee-virtual-machine:~$ cd download puyalee@puyalee-virtual-machine:~/download$ sudo dpkg -i code_1.45.1-1589445302_amd64.deb
安装之后直接输入code即可puyalee@puyalee-virtual-machine:~/download$ code 
Vim 是一个文本编辑器,与Windows系统里的记事本没有本质区别,它专门被设计用来写代码,当然也可以用来写普通的文本
Vim有三种模式:普通模式、插入模式、命令模式,引用@51CTO的一张图片来说明三种模式的切换,严格区别大小写
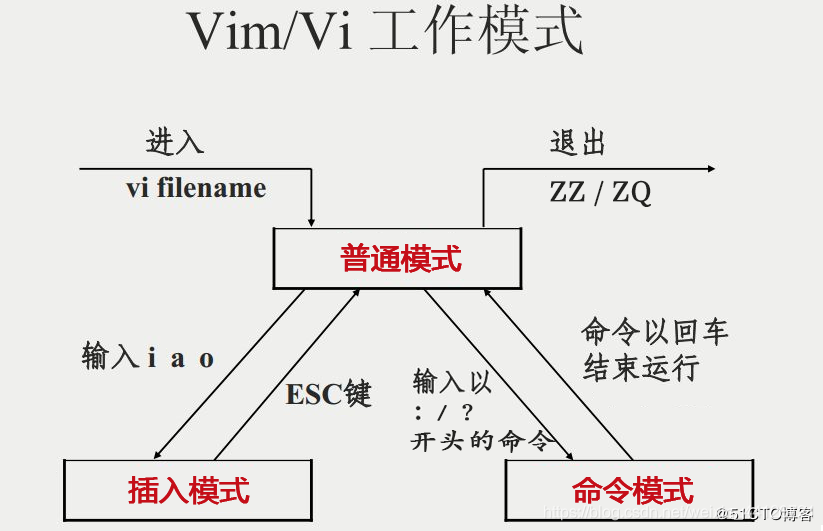 普通模式
普通模式x //每按一次,删除光标所在位置的后面一个字符。 nx //删除光标所在位置的后面n个字符。 X //大写的X,每按一次,删除光标所在位置的前面一个字符。 nX //删除光标所在位置的前面n个字符。 dd //删除光标所在行 ndd //删除从光标所在行开始,向下的n行 yy //复制光标所在行 nyy //复制从光标所在行开始,向下的n行 p(小写) //粘贴剪贴板中的数据,从光标所在行的下一行开始 P(大写) //粘贴剪贴板中的数据,从光标所在行的上一行开始 i //在光标位置插入 a //在光标的下一个位置插入 o //在光标所在行的下一行处插入新行 //esc退出插入模式至普通模式 :wq //保存文件并退出 :q! //不保存文件退出 ZZ //保存并退出 ZQ //不保存退出 :w [filename] //另存为名为filename文件 /string //向下搜索字符串“string” ?string //向上搜索字符串“string” //esc退出命令模式至普通模式
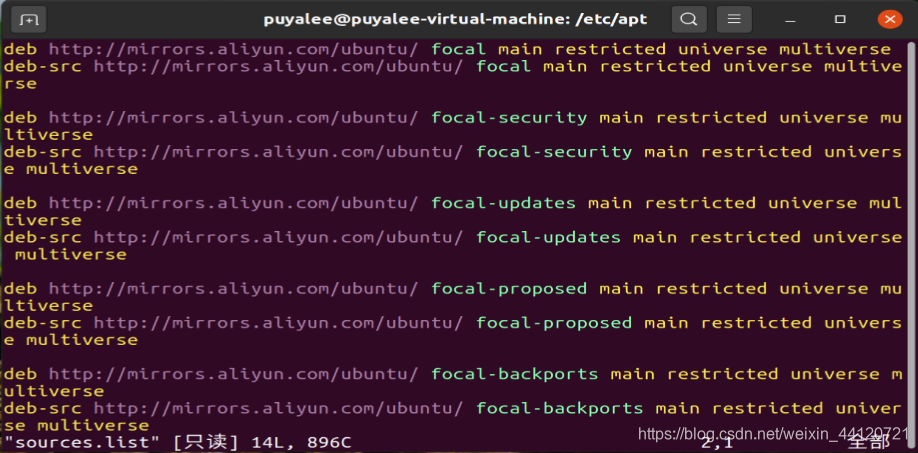
这里将更新源从Ubuntu官网更改至阿里云Ubuntu更新源puyalee@puyalee-virtual-machine:~$ cd /etc/apt puyalee@puyalee-virtual-machine:/etc/apt$ ls apt.conf.d preferences.d sources.list.d trusted.gpg.d auth.conf.d sources.list sources.list.save puyalee@puyalee-virtual-machine:/etc/apt$ vim sources.list //编辑源文件
 保存退出之后在更新一下源文件
puyalee@puyalee-virtual-machine:~$ sudo apt-get update
hosts文件在etc目录下,修改它需要管理员权限puyalee@puyalee-virtual-machine:~$ sudo su //进入管理员模式 [sudo] puyalee 的密码: root@puyalee-virtual-machine:/home/puyalee# cd /etc //进入etc目录 root@puyalee-virtual-machine:/etc# ls //查看当前目录下的文件(只列出部分) acpi host.conf popularity-contest.conf adduser.conf hostid ppp alsa hostname printcap alternatives hosts profile root@puyalee-virtual-machine:/home/puyalee# ping baidu.com PING baidu.com (39.156.69.79) 56(84) bytes of data. ^C --- baidu.com ping statistics --- 4 packets transmitted, 0 received, 100% packet loss, time 3073ms root@puyalee-virtual-machine:/etc# vim hosts
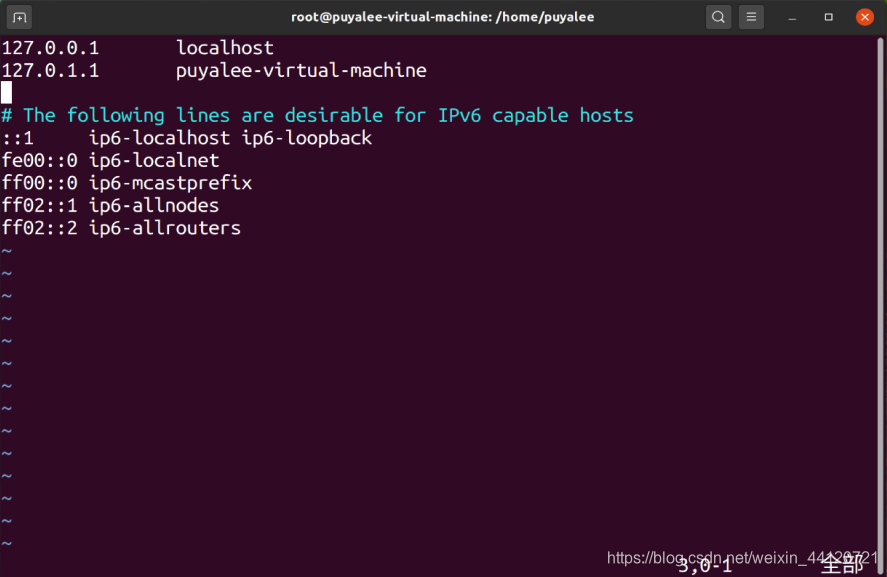 进入插入模式,修改百度的IP地址,保存退出
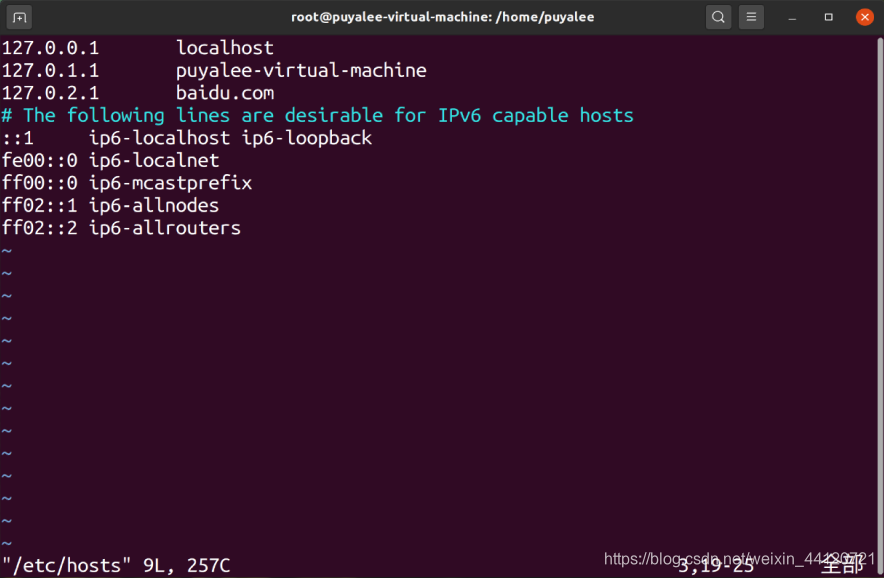 再次查看百度的IP,发现已经变成了修改之后的
root@puyalee-virtual-machine:/home/puyalee# ping baidu.com PING baidu.com (127.0.2.1) 56(84) bytes of data. 64 bytes from baidu.com (127.0.2.1): icmp_seq=1 ttl=64 time=0.022 ms 64 bytes from baidu.com (127.0.2.1): icmp_seq=2 ttl=64 time=0.030 ms 64 bytes from baidu.com (127.0.2.1): icmp_seq=3 ttl=64 time=0.034 ms ^C --- baidu.com ping statistics --- 3 packets transmitted, 3 received, 0% packet loss, time 2043ms
使用find命令查找puyalee@puyalee-virtual-machine:~$ find -name hello //精确查找文件位置 ./test/hello ./.local/share/Trash/files/hello puyalee@puyalee-virtual-machine:~$ find -name *.txt //查找后缀位txt的文件 ./.mozilla/firefox/96s07p7o.default-release/SiteSecurityServiceState.txt ./.mozilla/firefox/96s07p7o.default-release/AlternateServices.txt ./.mozilla/firefox/96s07p7o.default-release/TRRBlacklist.txt ./.mozilla/firefox/96s07p7o.default-release/SecurityPreloadState.txt ./.mozilla/firefox/96s07p7o.default-release/pkcs11.txt ./.pki/nssdb/pkcs11.txt puyalee@puyalee-virtual-machine:~$ find -name hello* //查找以hello开头的文件 ./test/hello.o ./test/hello.asm ./test/hello ./.local/share/Trash/info/hello.asm.trashinfo ./.local/share/Trash/info/hello.o.trashinfo ./.local/share/Trash/info/hello.trashinfo ./.local/share/Trash/files/hello.o ./.local/share/Trash/files/hello.asm ./.local/share/Trash/files/hello
首先使用ifconfig -a命令查看本机的IPpuyalee@puyalee-virtual-machine:~$ ifconfig -a ens33: flags=4163<UP,BROADCAST,RUNNING,MULTICAST> mtu 1500 inet 192.168.50.128 netmask 255.255.255.0 broadcast 192.168.50.255 //依次是IP地址、子网掩码和网关 inet6 fe80::8917:819c:c5b1:8e48 prefixlen 64 scopeid 0x20<link> ether 00:0c:29:65:da:92 txqueuelen 1000 (以太网) RX packets 13643 bytes 6119223 (6.1 MB) RX errors 0 dropped 0 overruns 0 frame 0 TX packets 9797 bytes 1145086 (1.1 MB) TX errors 0 dropped 0 overruns 0 carrier 0 collisions 0 lo: flags=73<UP,LOOPBACK,RUNNING> mtu 65536 inet 127.0.0.1 netmask 255.0.0.0 inet6 ::1 prefixlen 128 scopeid 0x10<host> loop txqueuelen 1000 (本地环回) RX packets 3999 bytes 376399 (376.3 KB) RX errors 0 dropped 0 overruns 0 frame 0 TX packets 3999 bytes 376399 (376.3 KB) TX errors 0 dropped 0 overruns 0 carrier 0 collisions 0 puyalee@puyalee-virtual-machine:~$ vim /etc/resolv.conf //查看resolv.conf文件里面的dns # This file is managed by man:systemd-resolved(8). Do not edit. # # This is a dynamic resolv.conf file for connecting local clients to the # internal DNS stub resolver of systemd-resolved. This file lists all # configured search domains. # # Run "resolvectl status" to see details about the uplink DNS servers # currently in use. # # Third party programs must not access this file directly, but only through the # symlink at /etc/resolv.conf. To manage man:resolv.conf(5) in a different way, # replace this symlink by a static file or a different symlink. # # See man:systemd-resolved.service(8) for details about the supported modes of # operation for /etc/resolv.conf. nameserver 127.0.0.53 options edns0 search localdomain ~ "/etc/resolv.conf" [只读] 19L, 727C 1,1 全部
 (一定是哪里出了问题,配置完之后,网络连接中断了)
查看当前路由puyalee@puyalee-virtual-machine:~$ route -n //查看当前路由 内核 IP 路由表 目标 网关 子网掩码 标志 跃点 引用 使用 接口 0.0.0.0 192.168.50.2 0.0.0.0 UG 100 0 0 ens33 169.254.0.0 0.0.0.0 255.255.0.0 U 1000 0 0 ens33 192.168.50.0 0.0.0.0 255.255.255.0 U 100 0 0 ens33

再次查看路由(为什么多出来两个,还没搞明白,可能添加方式不对)puyalee@puyalee-virtual-machine:~$ route -n 内核 IP 路由表 目标 网关 子网掩码 标志 跃点 引用 使用 接口 0.0.0.0 192.158.50.128 0.0.0.0 UG 20100 0 0 ens33 169.254.0.0 0.0.0.0 255.255.0.0 U 1000 0 0 ens33 192.158.50.128 0.0.0.0 255.255.255.255 UH 20100 0 0 ens33 192.168.0.0 0.0.0.0 255.255.255.0 U 100 0 0 ens33 192.168.50.0 0.0.0.0 255.255.255.0 U 100 0 0 ens33
puyalee@puyalee-virtual-machine:~$ cat /etc/shells //查看系统中安装的shell # /etc/shells: valid login shells /bin/sh /bin/bash /usr/bin/bash /bin/rbash /usr/bin/rbash /bin/dash /usr/bin/dash puyalee@puyalee-virtual-machine:~$ touch test2.sh
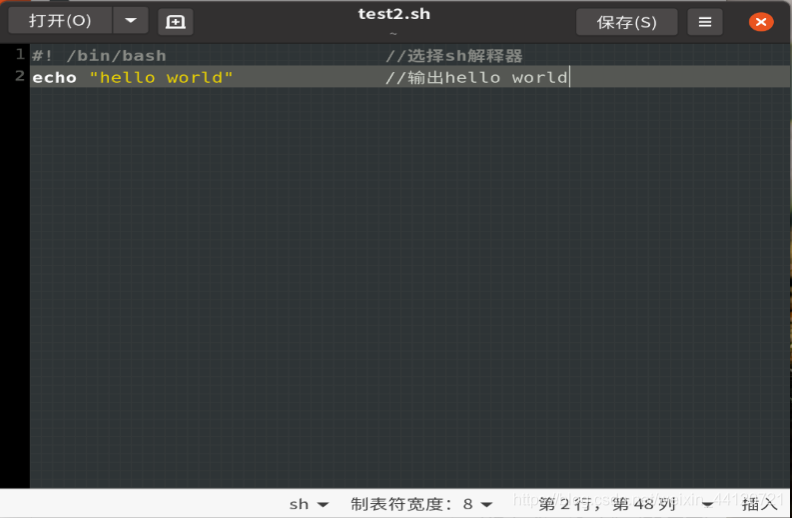 调用脚本test2.sh
puyalee@puyalee-virtual-machine:~$ bash test2.sh hello world
在shell脚本的开头往往有一句话来定义使用哪种sh解释器来解释脚本,目前研发送测的shell脚本中主要有以下两种方式:
(1) #!/bin/sh
(2) #!/bin/bash
在test2.sh内写入一下内容:#!/bin/sh source pcy.sh #pcy.sh并不存在 echo hello world ./test2.sh: line 2: pcy.sh: No such file or directory ./test2.sh: line 2: pcy.sh: No such file or directory hello world ./test.sh: line 2: pcy.sh: No such file or directory
使用ps aux命令查看当前所有正在运行的进程puyalee@puyalee-virtual-machine:~$ ps aux //查看正在所有进行的进程,只列出部分 USER PID %CPU %MEM VSZ RSS TTY STAT START TIME COMMAND root 1 0.0 0.5 167728 11356 ? Ss 14:48 0:01 /sbin/init sp root 2 0.0 0.0 0 0 ? S 14:48 0:00 [kthreadd] root 3 0.0 0.0 0 0 ? I< 14:48 0:00 [rcu_gp] root 4 0.0 0.0 0 0 ? I< 14:48 0:00 [rcu_par_gp] root 6 0.0 0.0 0 0 ? I< 14:48 0:00 [kworker/0:0H root 9 0.0 0.0 0 0 ? I< 14:48 0:00 [mm_percpu_wq root 10 0.0 0.0 0 0 ? S 14:48 0:00 [ksoftirqd/0] puyalee@puyalee-virtual-machine:~$ pgrep vim //查看vim的PID 3062 puyalee@puyalee-virtual-machine:~$ kill 3062 //杀死vim这个进程
本网页所有视频内容由 imoviebox边看边下-网页视频下载, iurlBox网页地址收藏管理器 下载并得到。
ImovieBox网页视频下载器 下载地址: ImovieBox网页视频下载器-最新版本下载
本文章由: imapbox邮箱云存储,邮箱网盘,ImageBox 图片批量下载器,网页图片批量下载专家,网页图片批量下载器,获取到文章图片,imoviebox网页视频批量下载器,下载视频内容,为您提供.
阅读和此文章类似的: 全球云计算
 官方软件产品操作指南 (170)


