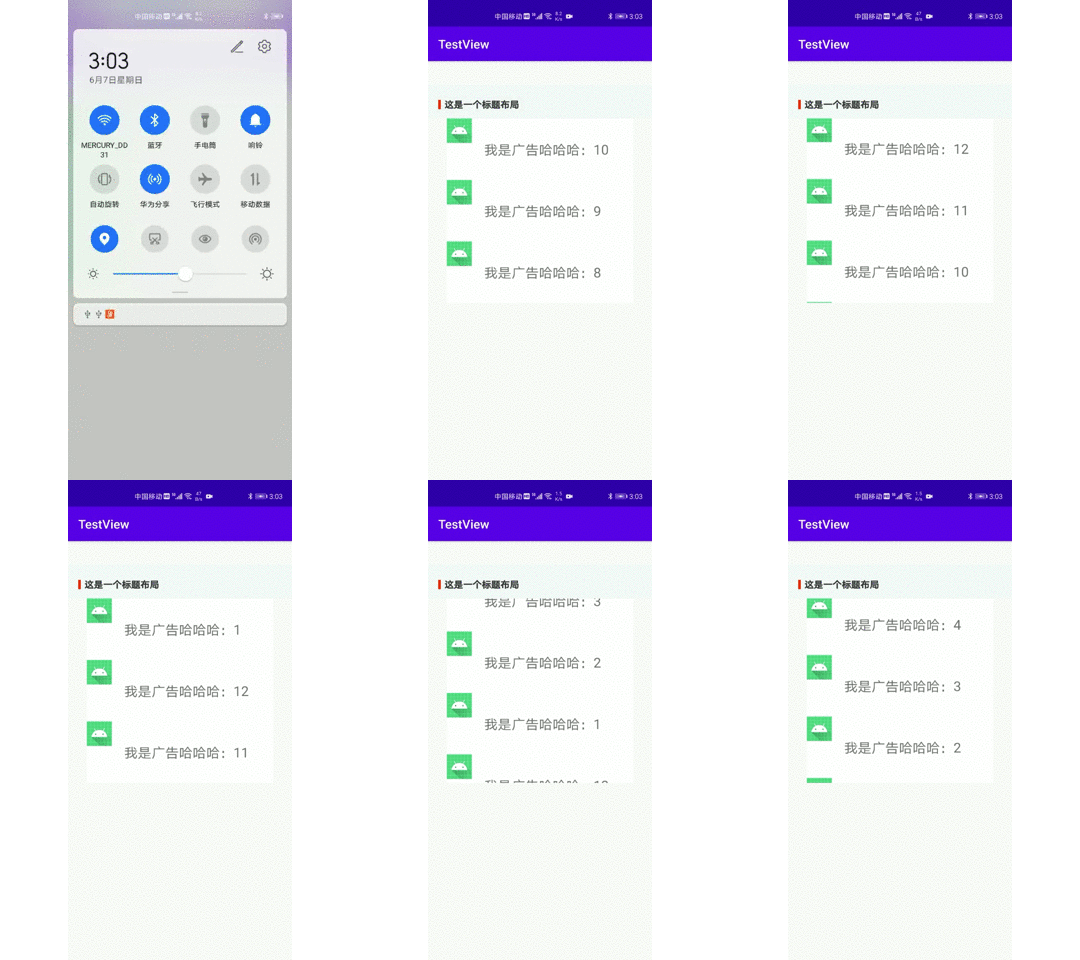
上一篇用Scrollview实现了垂直循环滚动的View, 本篇博客我们使用NestScrollView来实现相同的效果,效果如下图底部滚动的用户评论部分 滚动的方法确定了,那么最关键的如何实现循环的效果呢?这里通过滚动到顶部后重制数据,并且直接滚动到底部,再继续滚动的方式,具体实现如下: 用到的文件都在上面了,最后,看一下效果图,gif录制效果不是很理想 Thinks!
自定义View:循环垂直滚动的NestScrollView
前沿
参考链接:
自定义View:循环垂直滚动的Recyclerview
实现思路分析
实现源码如下,可以直接拷贝运行查看效果
package com.hdp.testvie import android.content.Context import android.os.Handler import android.os.Message import android.util.AttributeSet import android.util.Log import android.view.MotionEvent import android.view.View import android.view.ViewGroup import android.widget.LinearLayout import androidx.annotation.LayoutRes import androidx.core.widget.NestedScrollView import java.lang.ref.WeakReference import kotlin.math.min import kotlin.properties.Delegates class AutoScrollView @JvmOverloads constructor( context: Context, attrs: AttributeSet? = null, defStyleAttr: Int = 0 ) : NestedScrollView(context, attrs, defStyleAttr) { companion object { val TAG = "ScrollView" private val MESSAGE_SCROLL = 10010 } private var mPageSize by Delegates.notNull<Int>() //显示几个 private var mItemCount by Delegates.notNull<Int>() //scrollView包含的元素总数 var mContentParentLayout: LinearLayout private var mData = mutableListOf<Any>() private var mLastDataPosition = 0 //最后显示数据的位置 private lateinit var mItemBuilder: ItemBuilder private var mItemLayoutId by Delegates.notNull<Int>() //item布局id private var itemHeight: Int = 100 private var maxScrollHeight: Int = 600 private var mLoopHandler: LoopHandler? = null class LoopHandler(autoScrollView: AutoScrollView) : Handler() { var weakreferedces: WeakReference<AutoScrollView>? = null init { weakreferedces = WeakReference(autoScrollView) } override fun handleMessage(msg: Message) { val autoScrollView = weakreferedces?.get() if (autoScrollView != null) { when (msg.what) { MESSAGE_SCROLL -> { val scrollY = autoScrollView.scrollY if (scrollY == 0) { //到顶部了 autoScrollView.resetOnScrollToTop() //移动到底部 autoScrollView.scrollTo(0, autoScrollView.maxScrollHeight) //重新添加数据 autoScrollView.resetOnScrollToBottom() postDelayed({ sendEmptyMessage(MESSAGE_SCROLL) }, 60) } else { autoScrollView.smoothScrollBy(0, -autoScrollView.itemHeight) postDelayed({ sendEmptyMessage(MESSAGE_SCROLL) }, 3000) } } } } } } override fun onTouchEvent(ev: MotionEvent?) = true init { val typedArray = context.obtainStyledAttributes(attrs, R.styleable.AutoScrollView) mPageSize = typedArray.getInt(R.styleable.AutoScrollView_page_size, 2) mContentParentLayout = LinearLayout(context) mContentParentLayout.orientation = LinearLayout.VERTICAL; mContentParentLayout.layoutParams = ViewGroup.LayoutParams(-1, -1) typedArray.recycle() addView(mContentParentLayout) mLoopHandler = LoopHandler(this) } fun setData(data: List<Any>, itemBuilder: ItemBuilder, @LayoutRes itemLayoutId: Int) { mData.clear() mData.addAll(data) mItemBuilder = itemBuilder mItemLayoutId = itemLayoutId val containerHeight = measuredHeight itemHeight = containerHeight / mPageSize mItemCount = min(mData.size, mPageSize * 2) maxScrollHeight = mItemCount * itemHeight //添加Item initItems() //滚动到底部 mLoopHandler?.postDelayed({ scrollTo(0, maxScrollHeight) }, 50) //开始循环 if (mItemCount == mPageSize * 2) { mLoopHandler?.postDelayed( { mLoopHandler?.sendEmptyMessage(MESSAGE_SCROLL) }, 3000 ) } } private fun initItems() { val layoutParams = LinearLayout.LayoutParams(-1, itemHeight) for (i in 0 until mItemCount) { mLastDataPosition = i Log.e(TAG, "init showPosition=$mLastDataPosition") val itemLayout = View.inflate(context, mItemLayoutId, null) mContentParentLayout.addView(itemLayout, 0, layoutParams) mItemBuilder.buildItem(itemLayout, mData[i]) //设置tag itemLayout.tag = mData[i] } } /** * 滚动到顶部时候,将顶部pageSize条数据设置到底部 */ @Suppress("UNCHECKED_CAST") private fun resetOnScrollToTop() { //将顶部数据设置到底部 for (i in 0 until mPageSize) { val topView = mContentParentLayout.getChildAt(i) val topData = topView.tag val lastView = mContentParentLayout.getChildAt(mPageSize + i) mItemBuilder.buildItem(lastView, topData) lastView.tag = topData } } /** * 快速滚动到底部后,重置pageSize之上的所有数据 */ private fun resetOnScrollToBottom() { for (i in mItemCount - mPageSize - 1 downTo 0) { val itemView = mContentParentLayout.getChildAt(i) mLastDataPosition = (mLastDataPosition + 1) % mData.size mItemBuilder.buildItem(itemView, mData[mLastDataPosition]) itemView.tag = mData[mLastDataPosition] } } /** * 构建每个ite项 */ interface ItemBuilder { fun buildItem(itemView: View, data: Any) } override fun fling(velocityY: Int) { super.fling(velocityY / 1000) } override fun onDetachedFromWindow() { super.onDetachedFromWindow() mLoopHandler?.removeCallbacksAndMessages(null) } } 善后处理
override fun onTouchEvent(ev: MotionEvent?) = true
当视图从窗口移除的时候,我们需要停止Handler发送消息 override fun onDetachedFromWindow() { super.onDetachedFromWindow() mLoopHandler?.removeCallbacksAndMessages(null) }
在布局文件使用
<com.hdp.testvie.AutoScrollView android:id="@+id/auto_scroll" android:layout_width="300dp" app:page_size="3" android:layout_height="300dp" android:background="@color/colorAccent" /> item文件flip_item.xml
<?xml version="1.0" encoding="utf-8"?> <LinearLayout xmlns:android="https://schemas.android.com/apk/res/android" android:layout_width="match_parent" android:layout_height="100dp" android:orientation="horizontal"> <LinearLayout android:layout_width="match_parent" android:layout_height="100dp" android:background="@android:color/white" android:orientation="horizontal"> <ImageView android:id="@+id/iv_item" android:layout_width="40dp" android:layout_height="40dp" android:src="@mipmap/ic_launcher" /> <TextView android:id="@+id/tv_item" android:layout_width="wrap_content" android:layout_height="wrap_content" android:layout_gravity="center" android:layout_marginLeft="20dp" android:text="我是广告" android:textSize="22sp" /> </LinearLayout> </LinearLayout> 自定义Style 文件
<declare-styleable name="AutoScrollView"> <attr name="page_size" format="integer" /> </declare-styleable> 在Activity中设置数据
auto_scroll.post { var scrollData = mutableListOf<String>() for (i in 1..12) { scrollData.add("$i") } auto_scroll.setData( data = scrollData, itemBuilder = object : AutoScrollView.ItemBuilder { override fun buildItem(itemView: View, data: Any) { val tv = itemView.findViewById<TextView>(R.id.tv_item) val iv = itemView.findViewById<ImageView>(R.id.iv_item) tv.text = "我是广告哈哈哈:$data" } }, itemLayoutId = R.layout.flip_item ) } 
注意点:
AutoScrollView需要设置一个固定的总高度,总高度=一个Item的高度*pageSize,笔者这里一个Item的高度是100,需要显示3个,即pageSize设置成3,故总高度设置成300,
本网页所有视频内容由 imoviebox边看边下-网页视频下载, iurlBox网页地址收藏管理器 下载并得到。
ImovieBox网页视频下载器 下载地址: ImovieBox网页视频下载器-最新版本下载
本文章由: imapbox邮箱云存储,邮箱网盘,ImageBox 图片批量下载器,网页图片批量下载专家,网页图片批量下载器,获取到文章图片,imoviebox网页视频批量下载器,下载视频内容,为您提供.
阅读和此文章类似的: 全球云计算
 官方软件产品操作指南 (170)