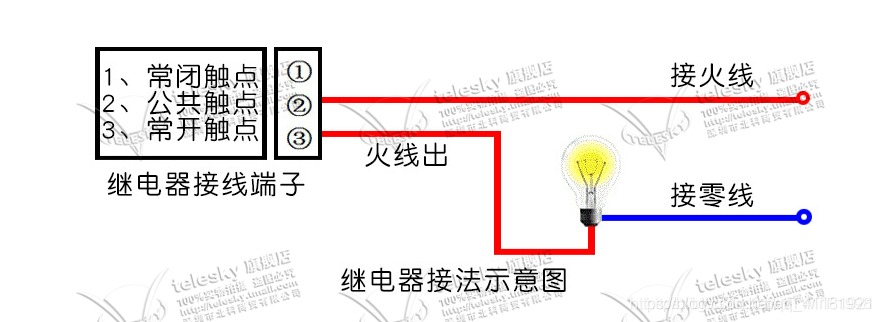
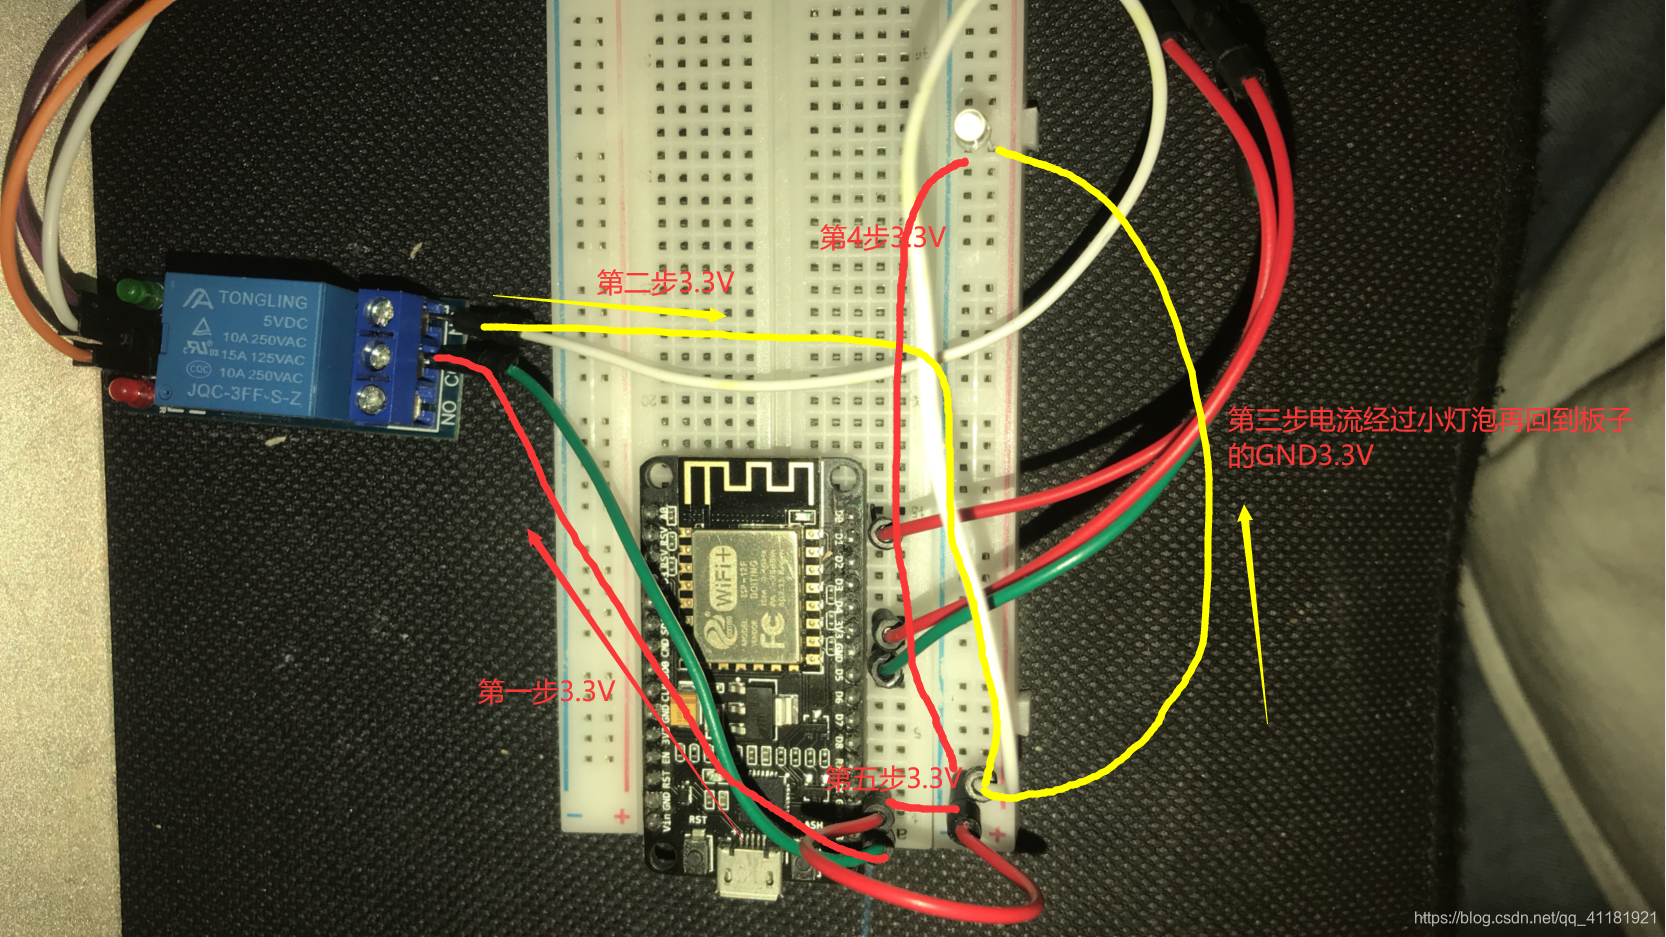
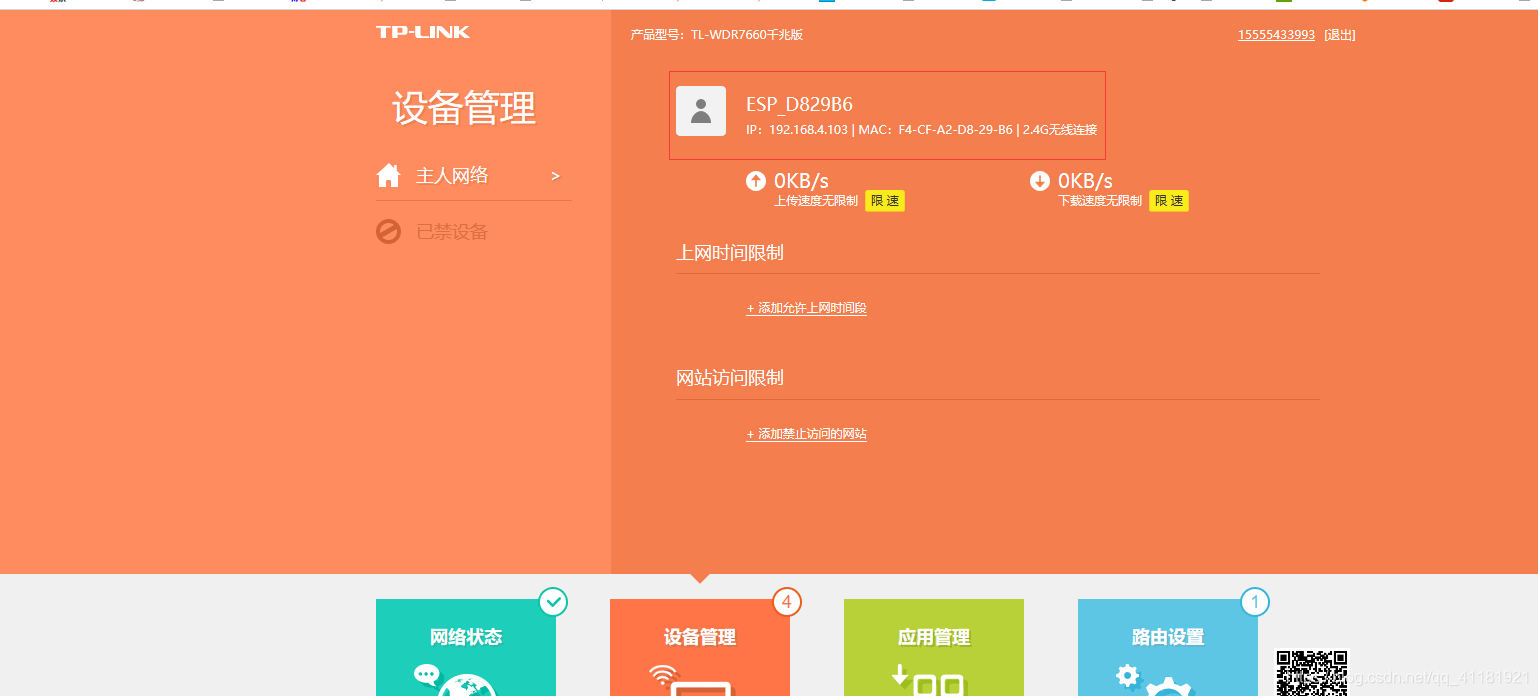
通过Nodemcu+ESP8266通过网页去控制继电器以及灯泡。 操作系统: windows10 1.继电器上的VCCVCC可以理解为正极接入,连接板子上的3V33V3是3.3V供电,将继电器上的GNDGND是负极,连接板子上的GND,将继电器上的ININ可理解为信号控制,连接板子上的D1,接线法看图。 公共触点:COM 继电器接线图: 1.打开Arduino-文件-首选项,开发板管理填https://arduino.esp8266.com/stable/package_esp8266com_index.json 点击Arduino的上传 在路由器管理中已经可以看见ESP8266的ip了 不可把开发板上的接口直接去接上家庭电器,因为家庭电器220V,板子承受不了,若要接家庭电器,请在继电器上接,红线接COM,零线接NC。
一,教程目的
二,实验环境
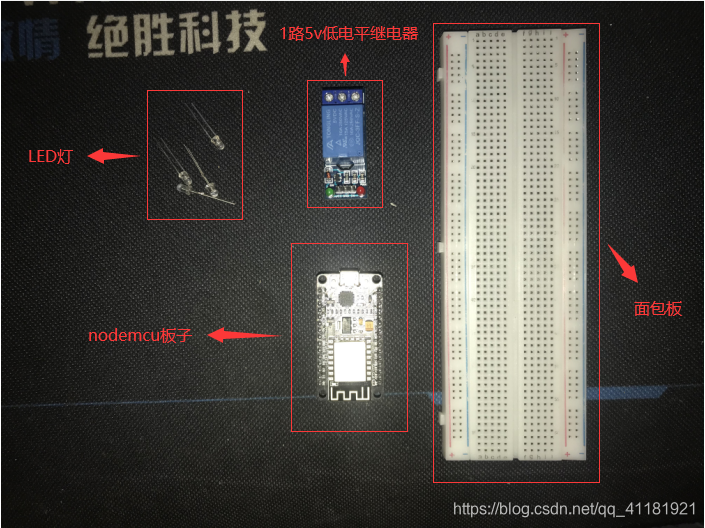
硬件: ESP8266开发板 x1(CP2102)需要下载CP2102驱动点我下载
继电器: 1路5V低电平触发 x1
面包板: 随便都行
杜邦线若干: 一般买面包板送线三,物品清单
四,硬件连接
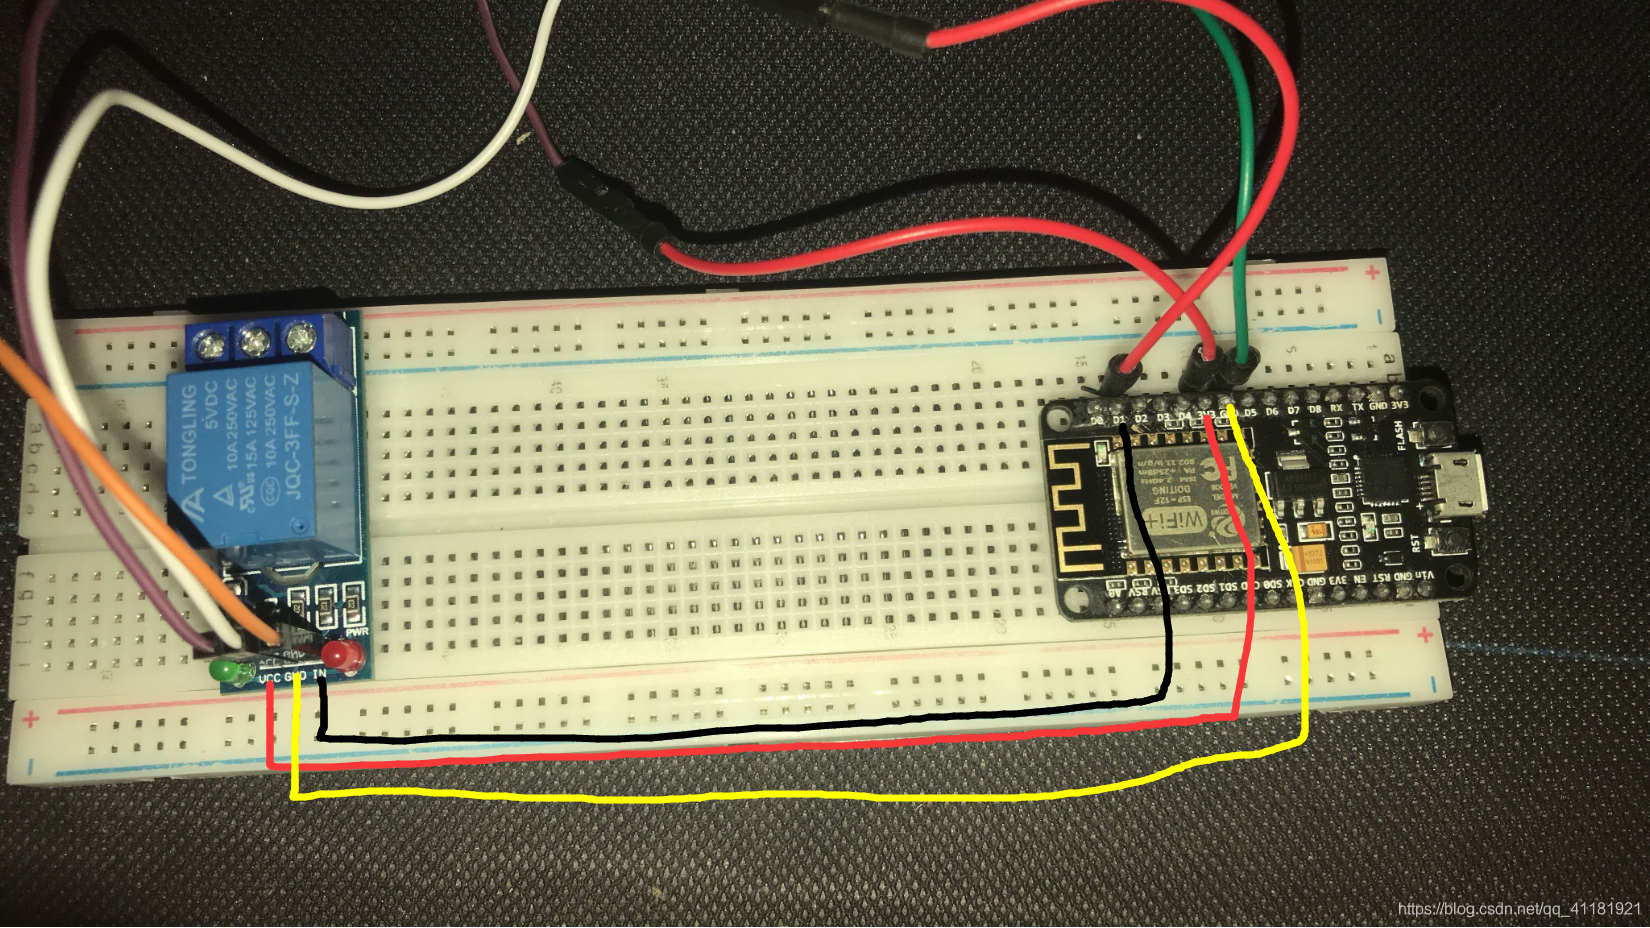
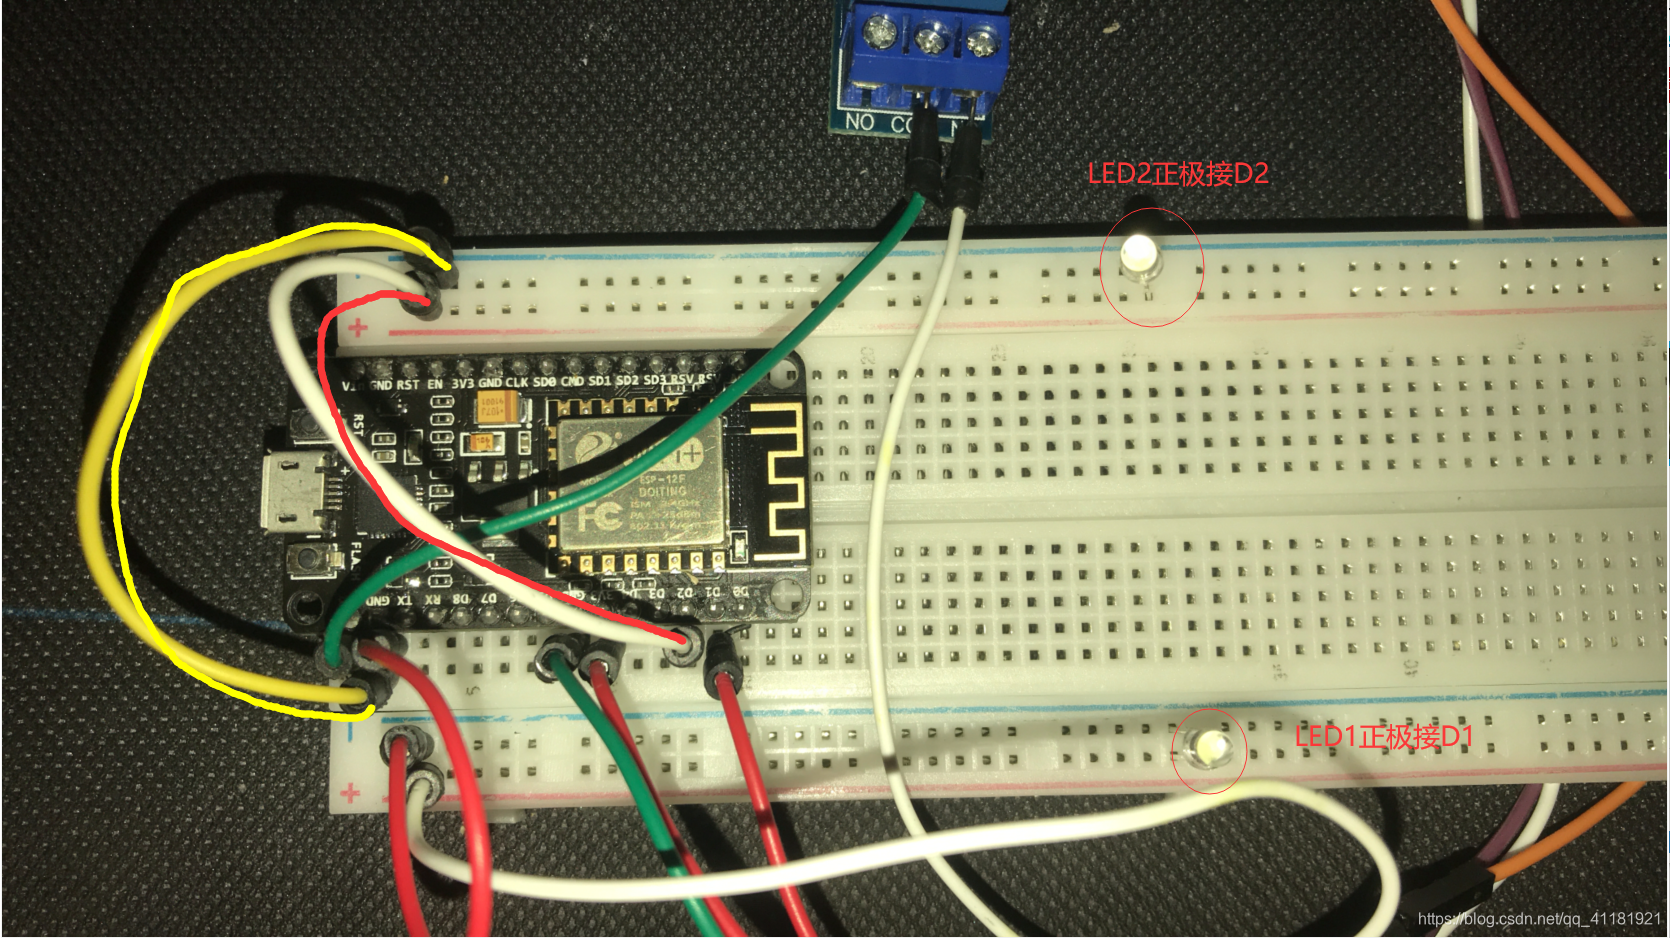
2.将继电器上的COM,连接板子上其他3V3口,将继电器上的NC连接LED灯上的正极(如果要控制家用电器,请将COM接火线NC接零线,如果要在之间加电器请在零线上加)再将板子上的GND接LED的负极,接线法看图。
常开触点:NC
请勿接错
不懂面包板的朋友请看面包板后面就懂面包板怎么用了
3.将第二个小灯泡的正极接板子的D2,负极接板子的GND,接线法看图。
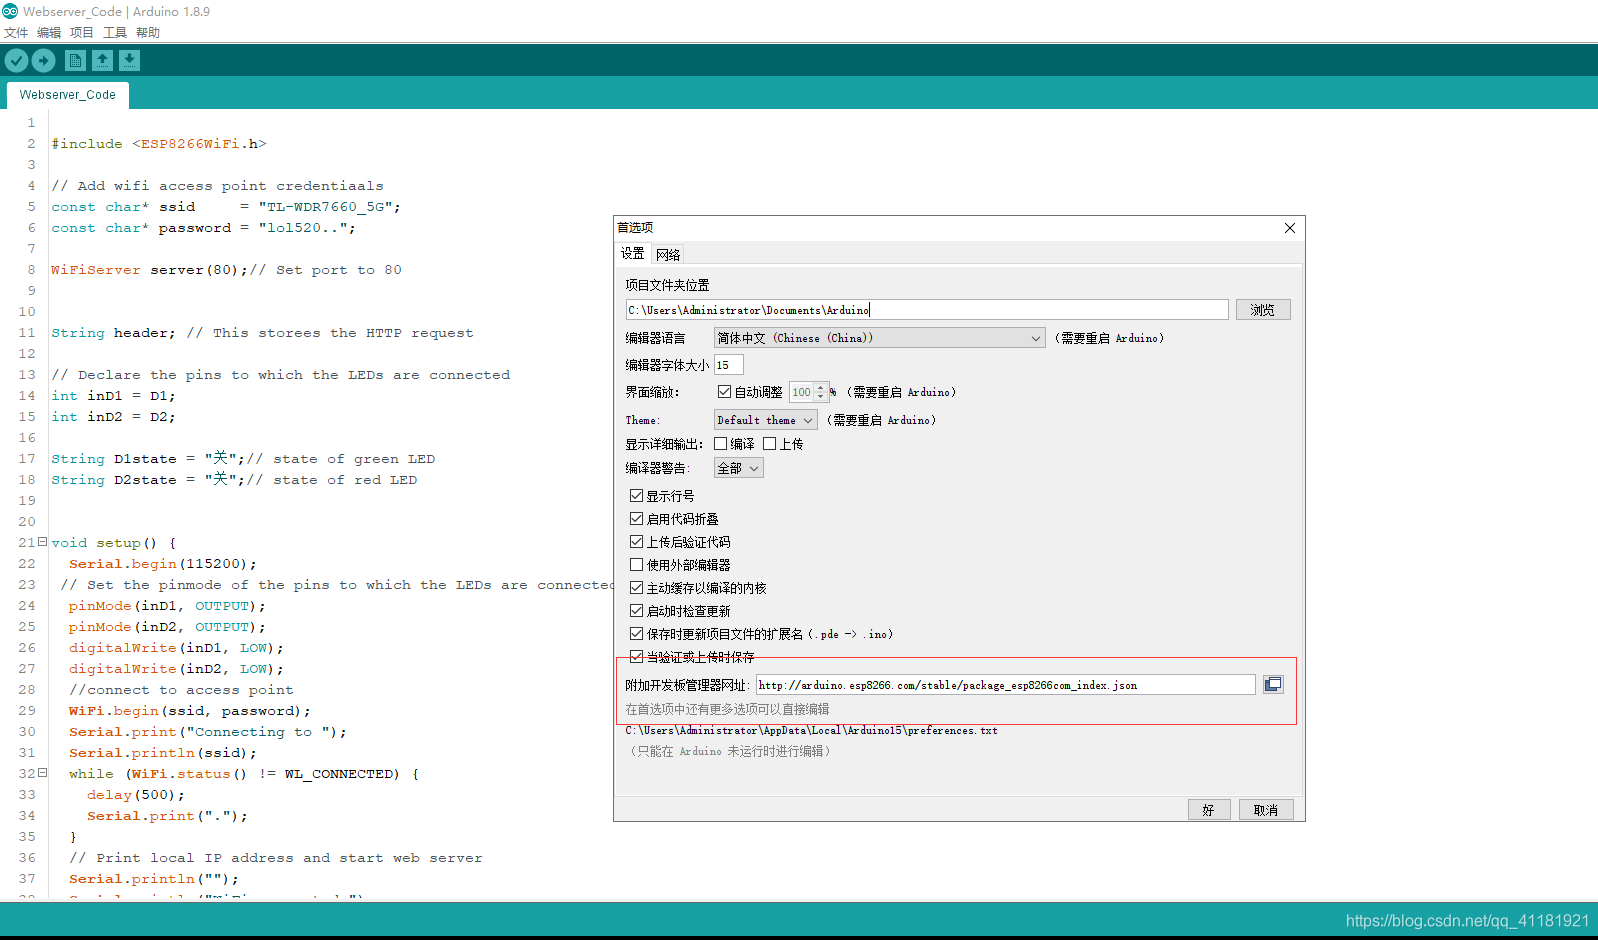
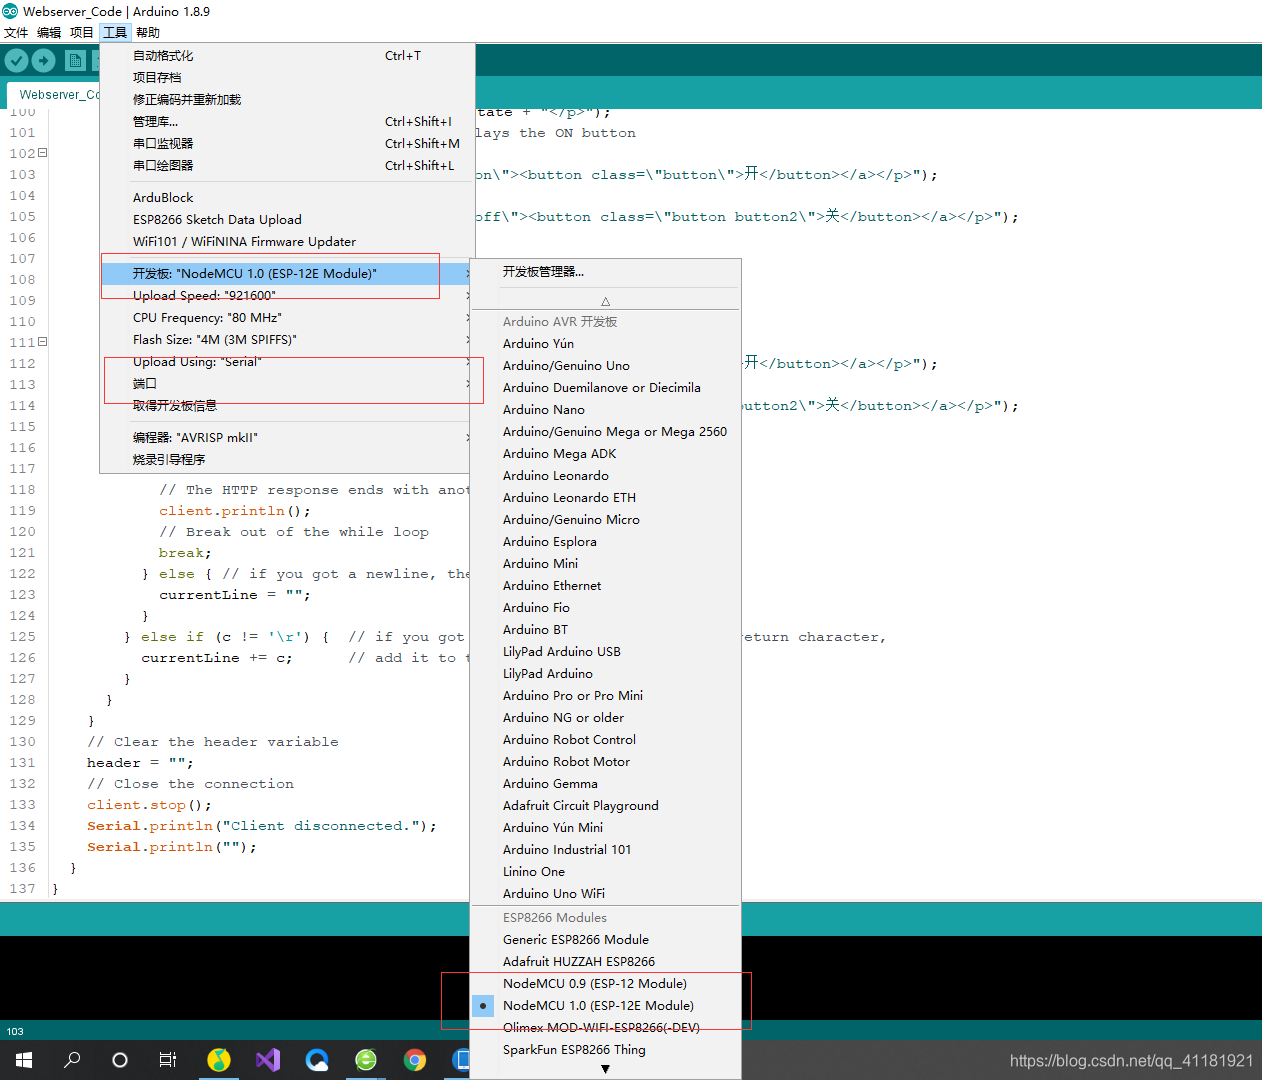
五,Arduino的esp8266的配置
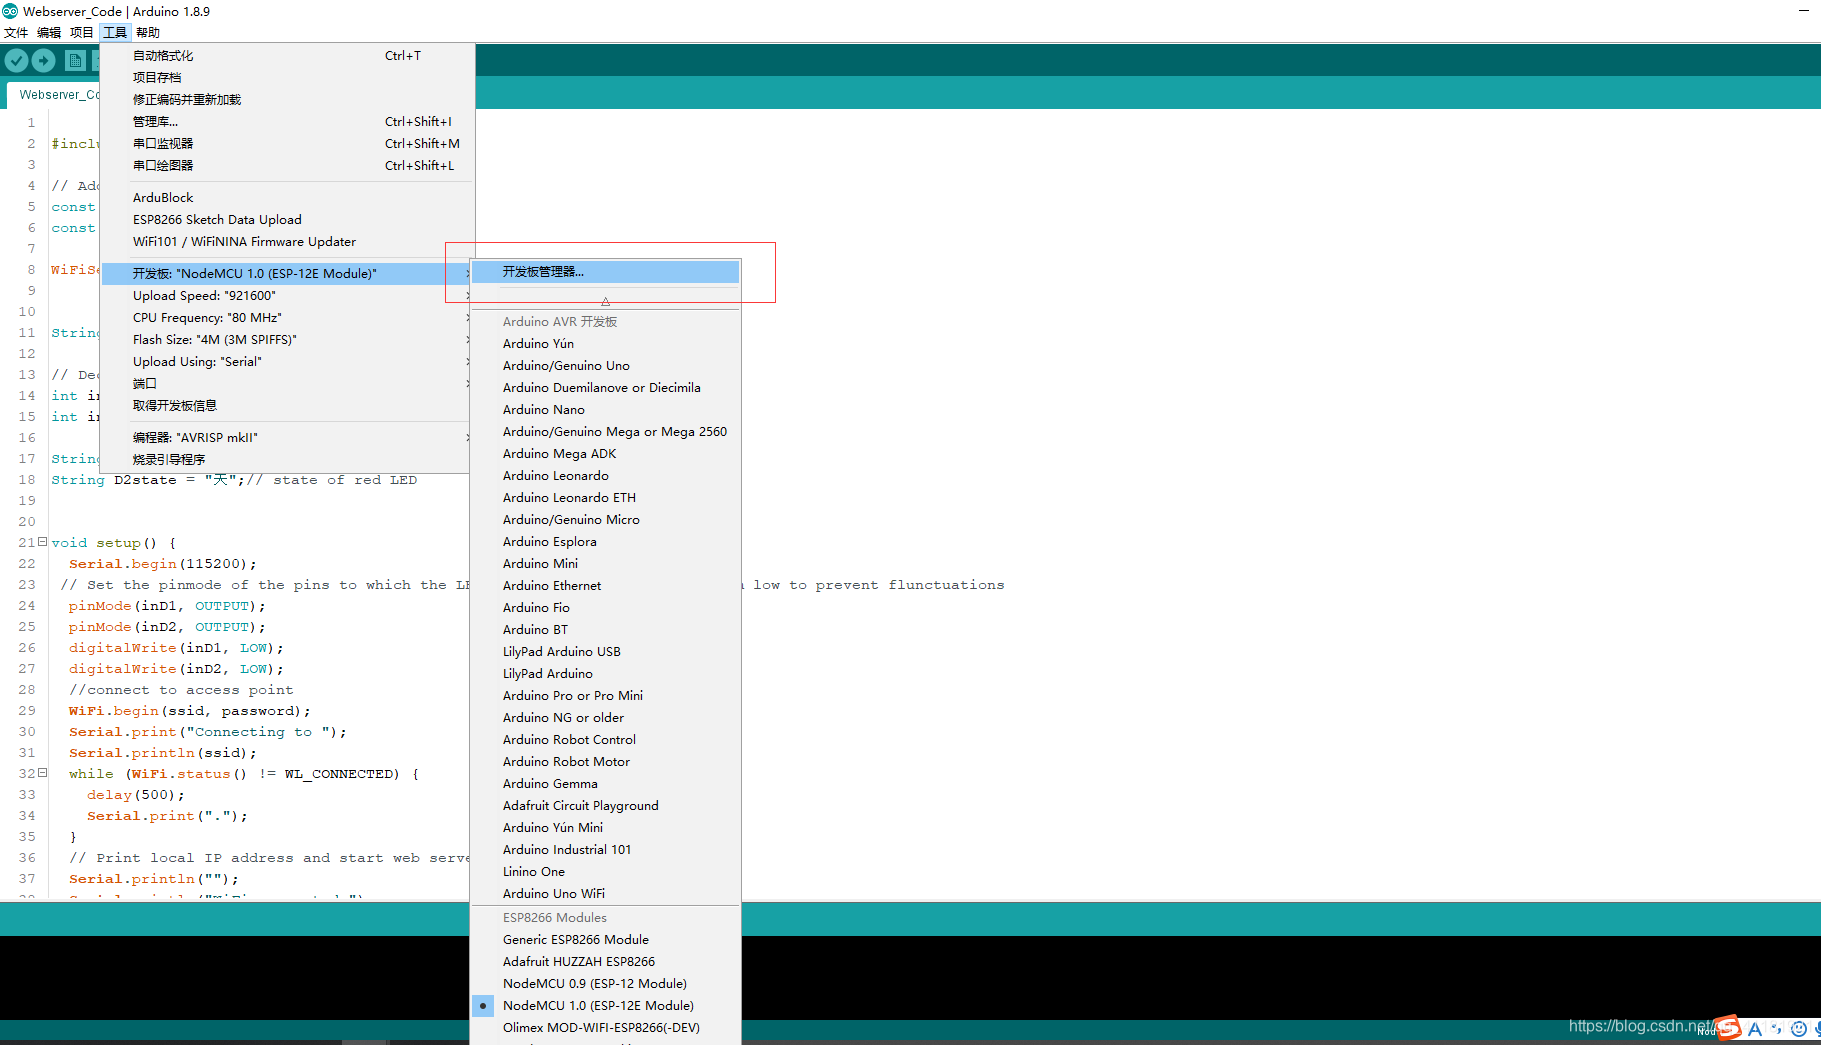
2.工具-开发板-开发板管理
搜索esp8266
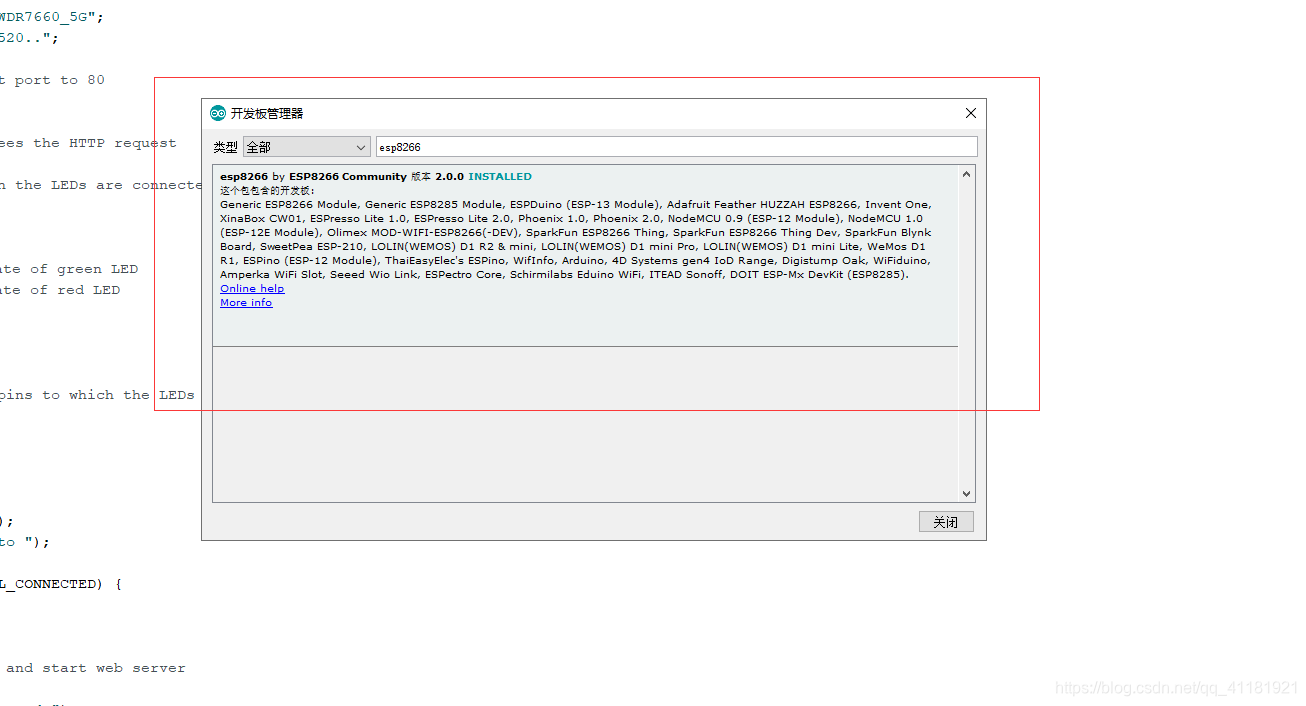
安装上去
六,开始写代码
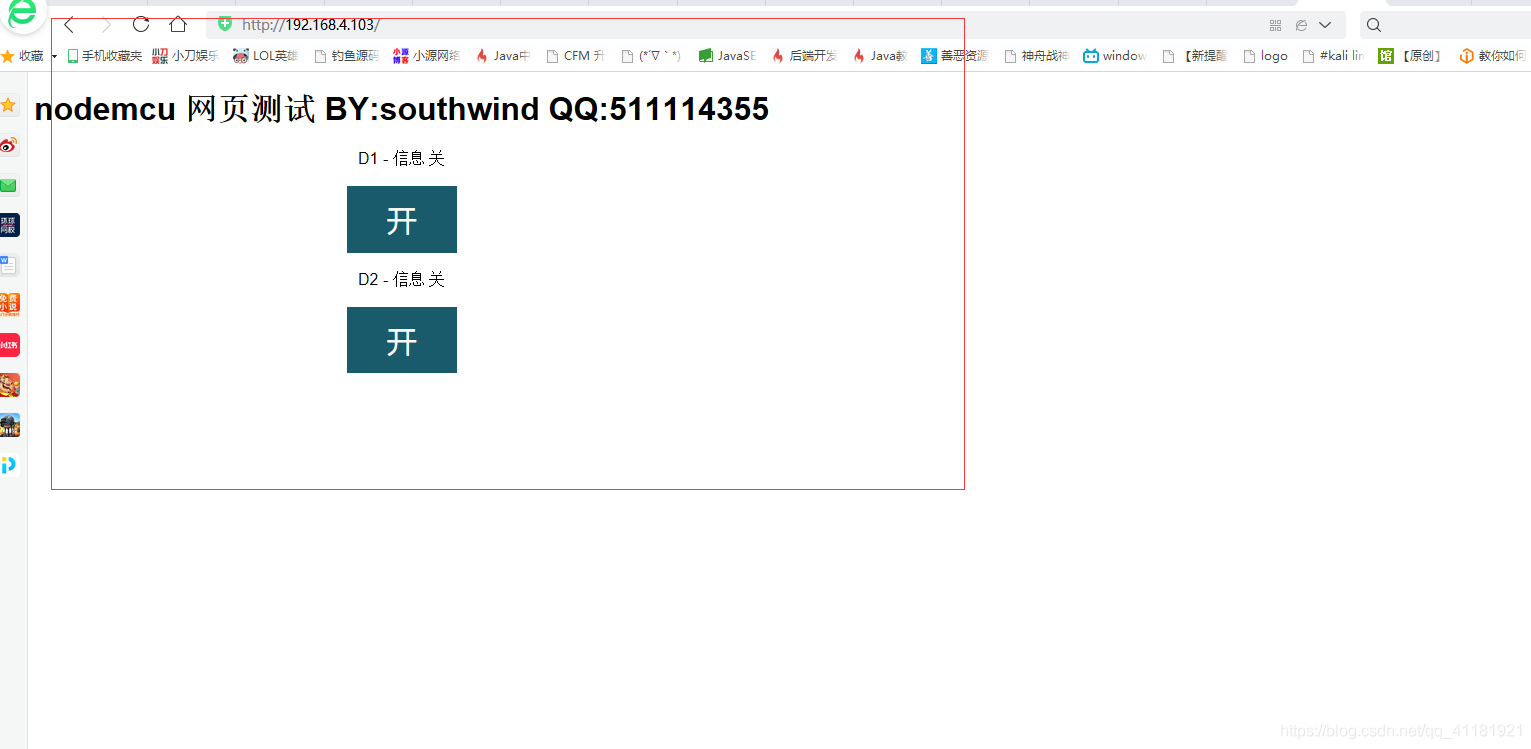
#include <ESP8266WiFi.h> // Add wifi access point credentiaals const char* ssid = "这里填你家WIFI名称"; const char* password = "这里填你家WIFI密码"; WiFiServer server(80);// Set port to 80 String header; // This storees the HTTP request // Declare the pins to which the LEDs are connected int inD1 = D1; int inD2 = D2; String D1state = "关";// state of green LED String D2state = "关";// state of red LED void setup() { Serial.begin(115200); // Set the pinmode of the pins to which the LEDs are connected and turn them low to prevent flunctuations pinMode(inD1, OUTPUT); pinMode(inD2, OUTPUT); digitalWrite(inD1, LOW); digitalWrite(inD2, LOW); //connect to access point WiFi.begin(ssid, password); Serial.print("Connecting to "); Serial.println(ssid); while (WiFi.status() != WL_CONNECTED) { delay(500); Serial.print("."); } // Print local IP address and start web server Serial.println(""); Serial.println("WiFi connected."); Serial.println("IP address: "); Serial.println(WiFi.localIP());// this will display the Ip address of the Pi which should be entered into your browser server.begin(); } void loop(){ WiFiClient client = server.available(); // Listen for incoming clients if (client) { // If a new client connects, String currentLine = ""; // make a String to hold incoming data from the client while (client.connected()) { // loop while the client's connected if (client.available()) { // if there's bytes to read from the client, char c = client.read(); // read a byte, then Serial.write(c); // print it out the serial monitor header += c; if (c == 'n') { // if the byte is a newline character // if the current line is blank, you got two newline characters in a row. // that's the end of the client HTTP request, so send a response: if (currentLine.length() == 0) { // HTTP headers always start with a response code (e.g. HTTP/1.1 200 OK) // and a content-type so the client knows what's coming, then a blank line: client.println("HTTP/1.1 200 OK"); client.println("Content-type:text/html"); client.println("Connection: close"); client.println(); // turns the GPIOs on and off if (header.indexOf("GET /D1/on") >= 0) { Serial.println("D1 开"); D1state = "开"; digitalWrite(inD1, HIGH); } else if (header.indexOf("GET /D1/off") >= 0) { Serial.println("D1 关"); D1state = "关"; digitalWrite(inD1, LOW); } else if (header.indexOf("GET /D2/on") >= 0) { Serial.println("D2 开"); D2state = "开"; digitalWrite(inD2, HIGH); } else if (header.indexOf("GET /D2/off") >= 0) { Serial.println("D2 关"); D2state = "关"; digitalWrite(inD2, LOW); } // Display the HTML web page client.println("<!DOCTYPE html><html>"); client.println("<head><meta name="viewport" content="width=device-width,initial-scale=1" charset="utf-8">"); client.println("<link rel="icon" href="data:,">"); // CSS to style the on/off buttons // Feel free to change the background-color and font-size attributes to fit your preferences client.println("<style>html { font-family: Helvetica; display: inline-block; margin: 0px auto; text-align: center;}"); client.println(".button { background-color: #195B6A; border: none; color: white; padding: 16px 40px;"); client.println("text-decoration: none; font-size: 30px; margin: 2px; cursor: pointer;}"); client.println(".button2 {background-color: #77878A;}</style></head>"); // Web Page Heading client.println("<body><h1>nodemcu 网页测试 BY:southwind QQ:511114355</h1>"); // Display current state, and ON/OFF buttons for GPIO 5 client.println("<p>D1 - 信息 " + D1state + "</p>"); // If the green LED is off, it displays the ON button if (D1state == "关") { client.println("<p><a href="/D1/on"><button class="button">开</button></a></p>"); } else { client.println("<p><a href="/D1/off"><button class="button button2">关</button></a></p>"); } // Display current state, and ON/OFF buttons for GPIO 4 client.println("<p>D2 - 信息 " + D2state + "</p>"); // If the red LED is off, it displays the ON button if (D2state == "关") { client.println("<p><a href="/D2/on"><button class="button">开</button></a></p>"); } else { client.println("<p><a href="/D2/off"><button class="button button2">关</button></a></p>"); } client.println("</body></html>"); // The HTTP response ends with another blank line client.println(); // Break out of the while loop break; } else { // if you got a newline, then clear currentLine currentLine = ""; } } else if (c != 'r') { // if you got anything else but a carriage return character, currentLine += c; // add it to the end of the currentLine } } } // Clear the header variable header = ""; // Close the connection client.stop(); Serial.println("Client disconnected."); Serial.println(""); } } 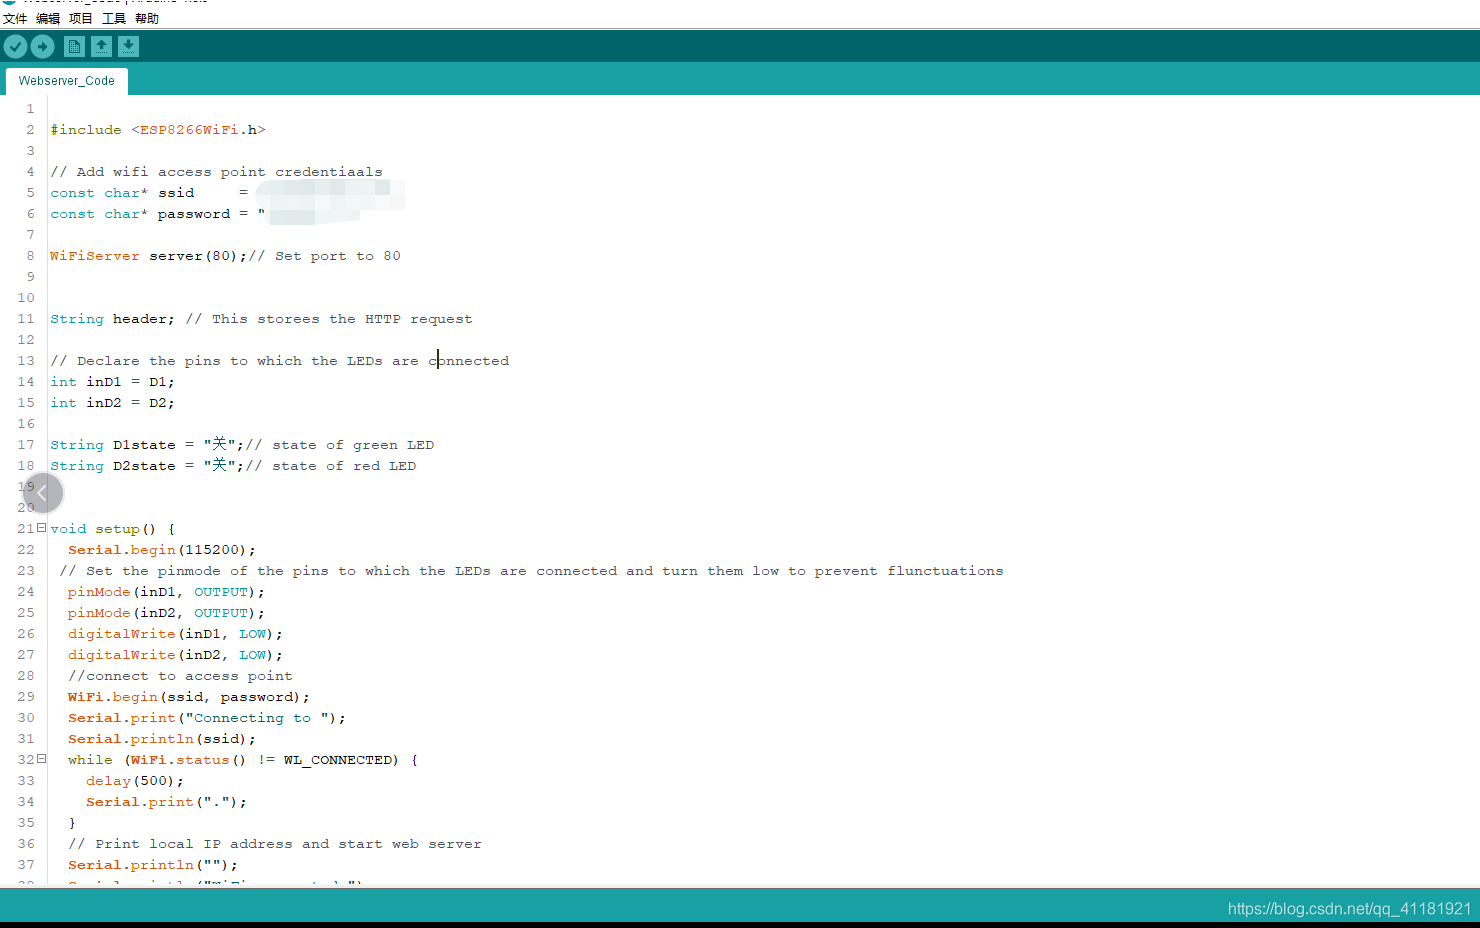
七,烧录进开发板
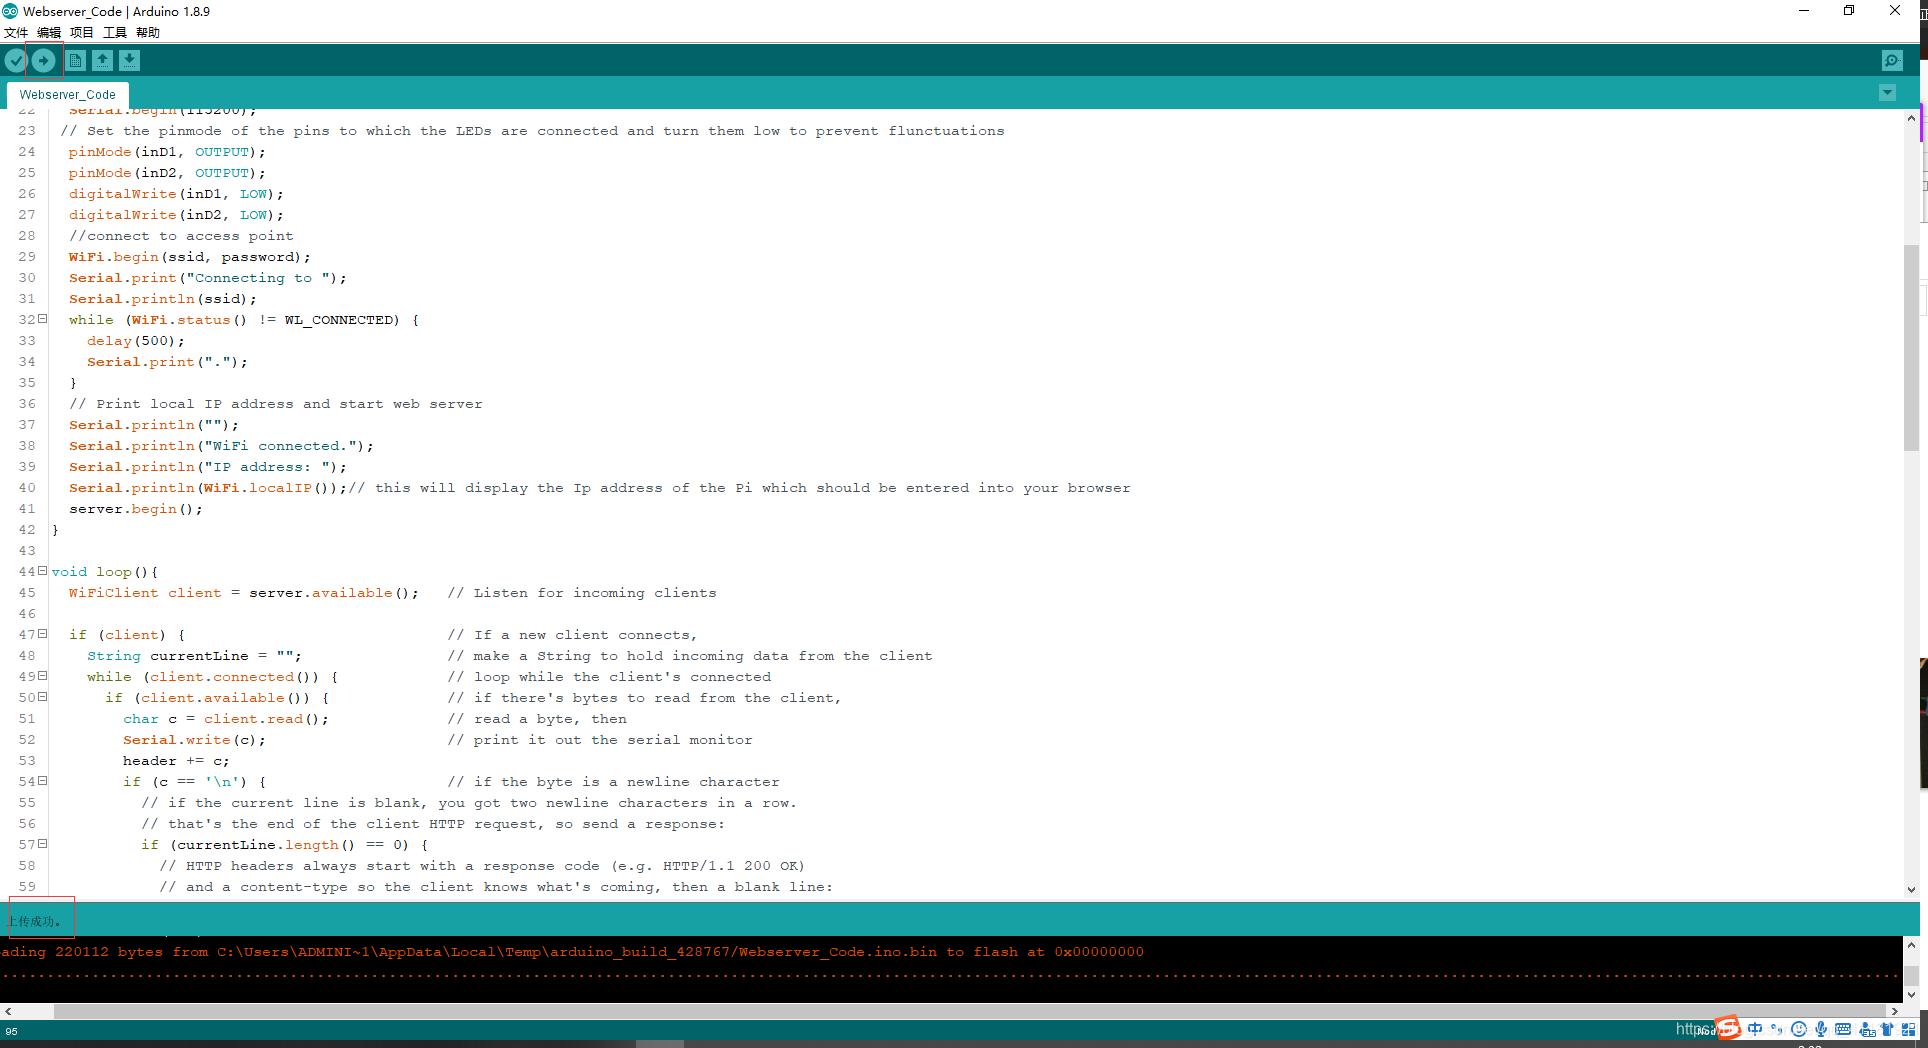
代码上传完后访问esp8266的IP八,效果演示
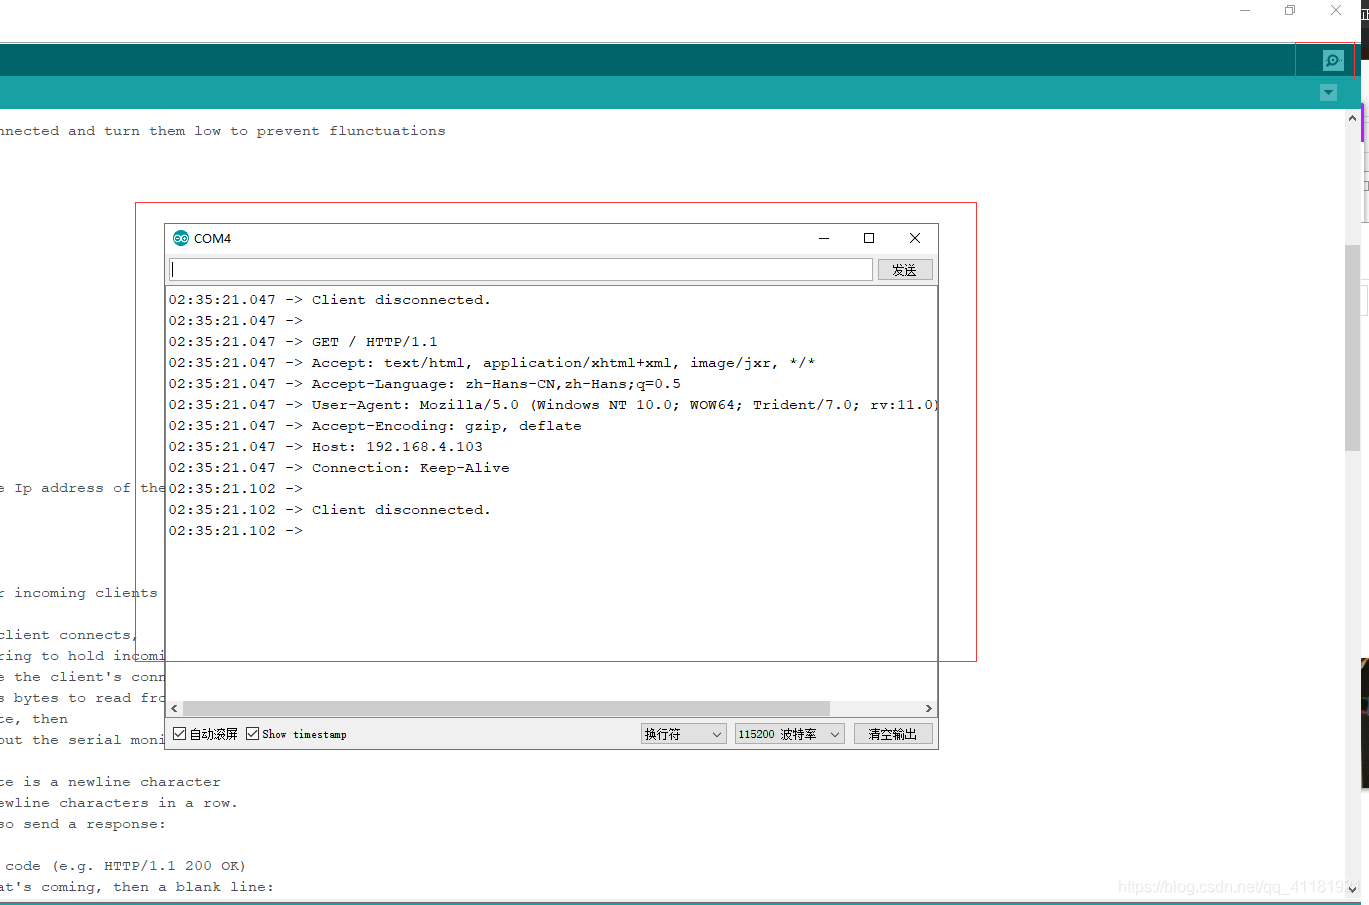
我们在浏览器中输入:192.168.4.103,并打开串口监视器查看信息
我们看看Arduino的串口监视器
我们去打开D1上的继电器看看效果
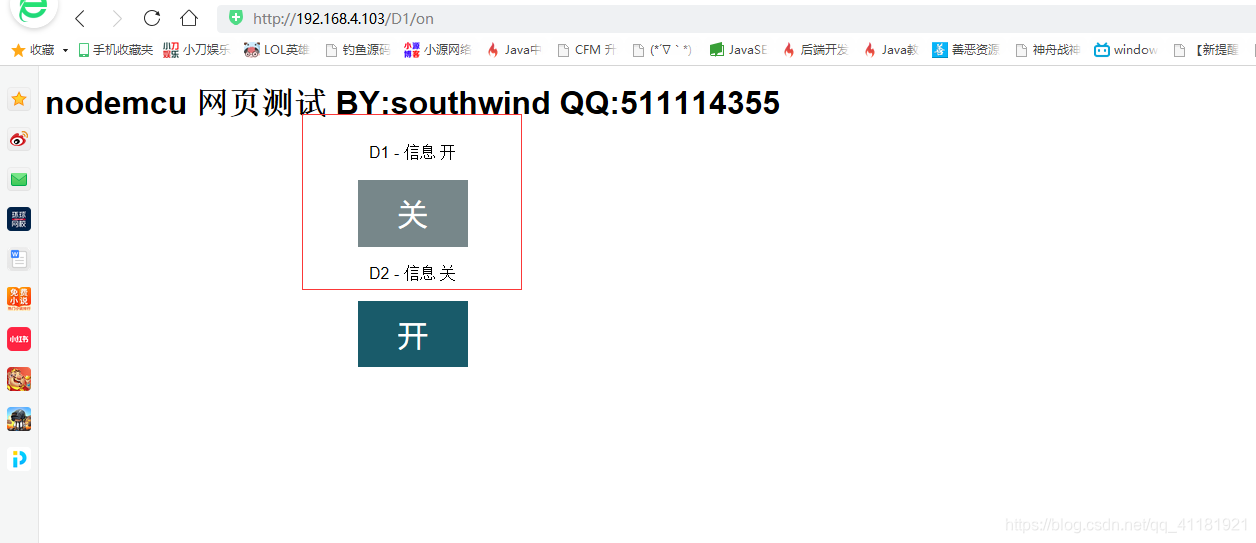
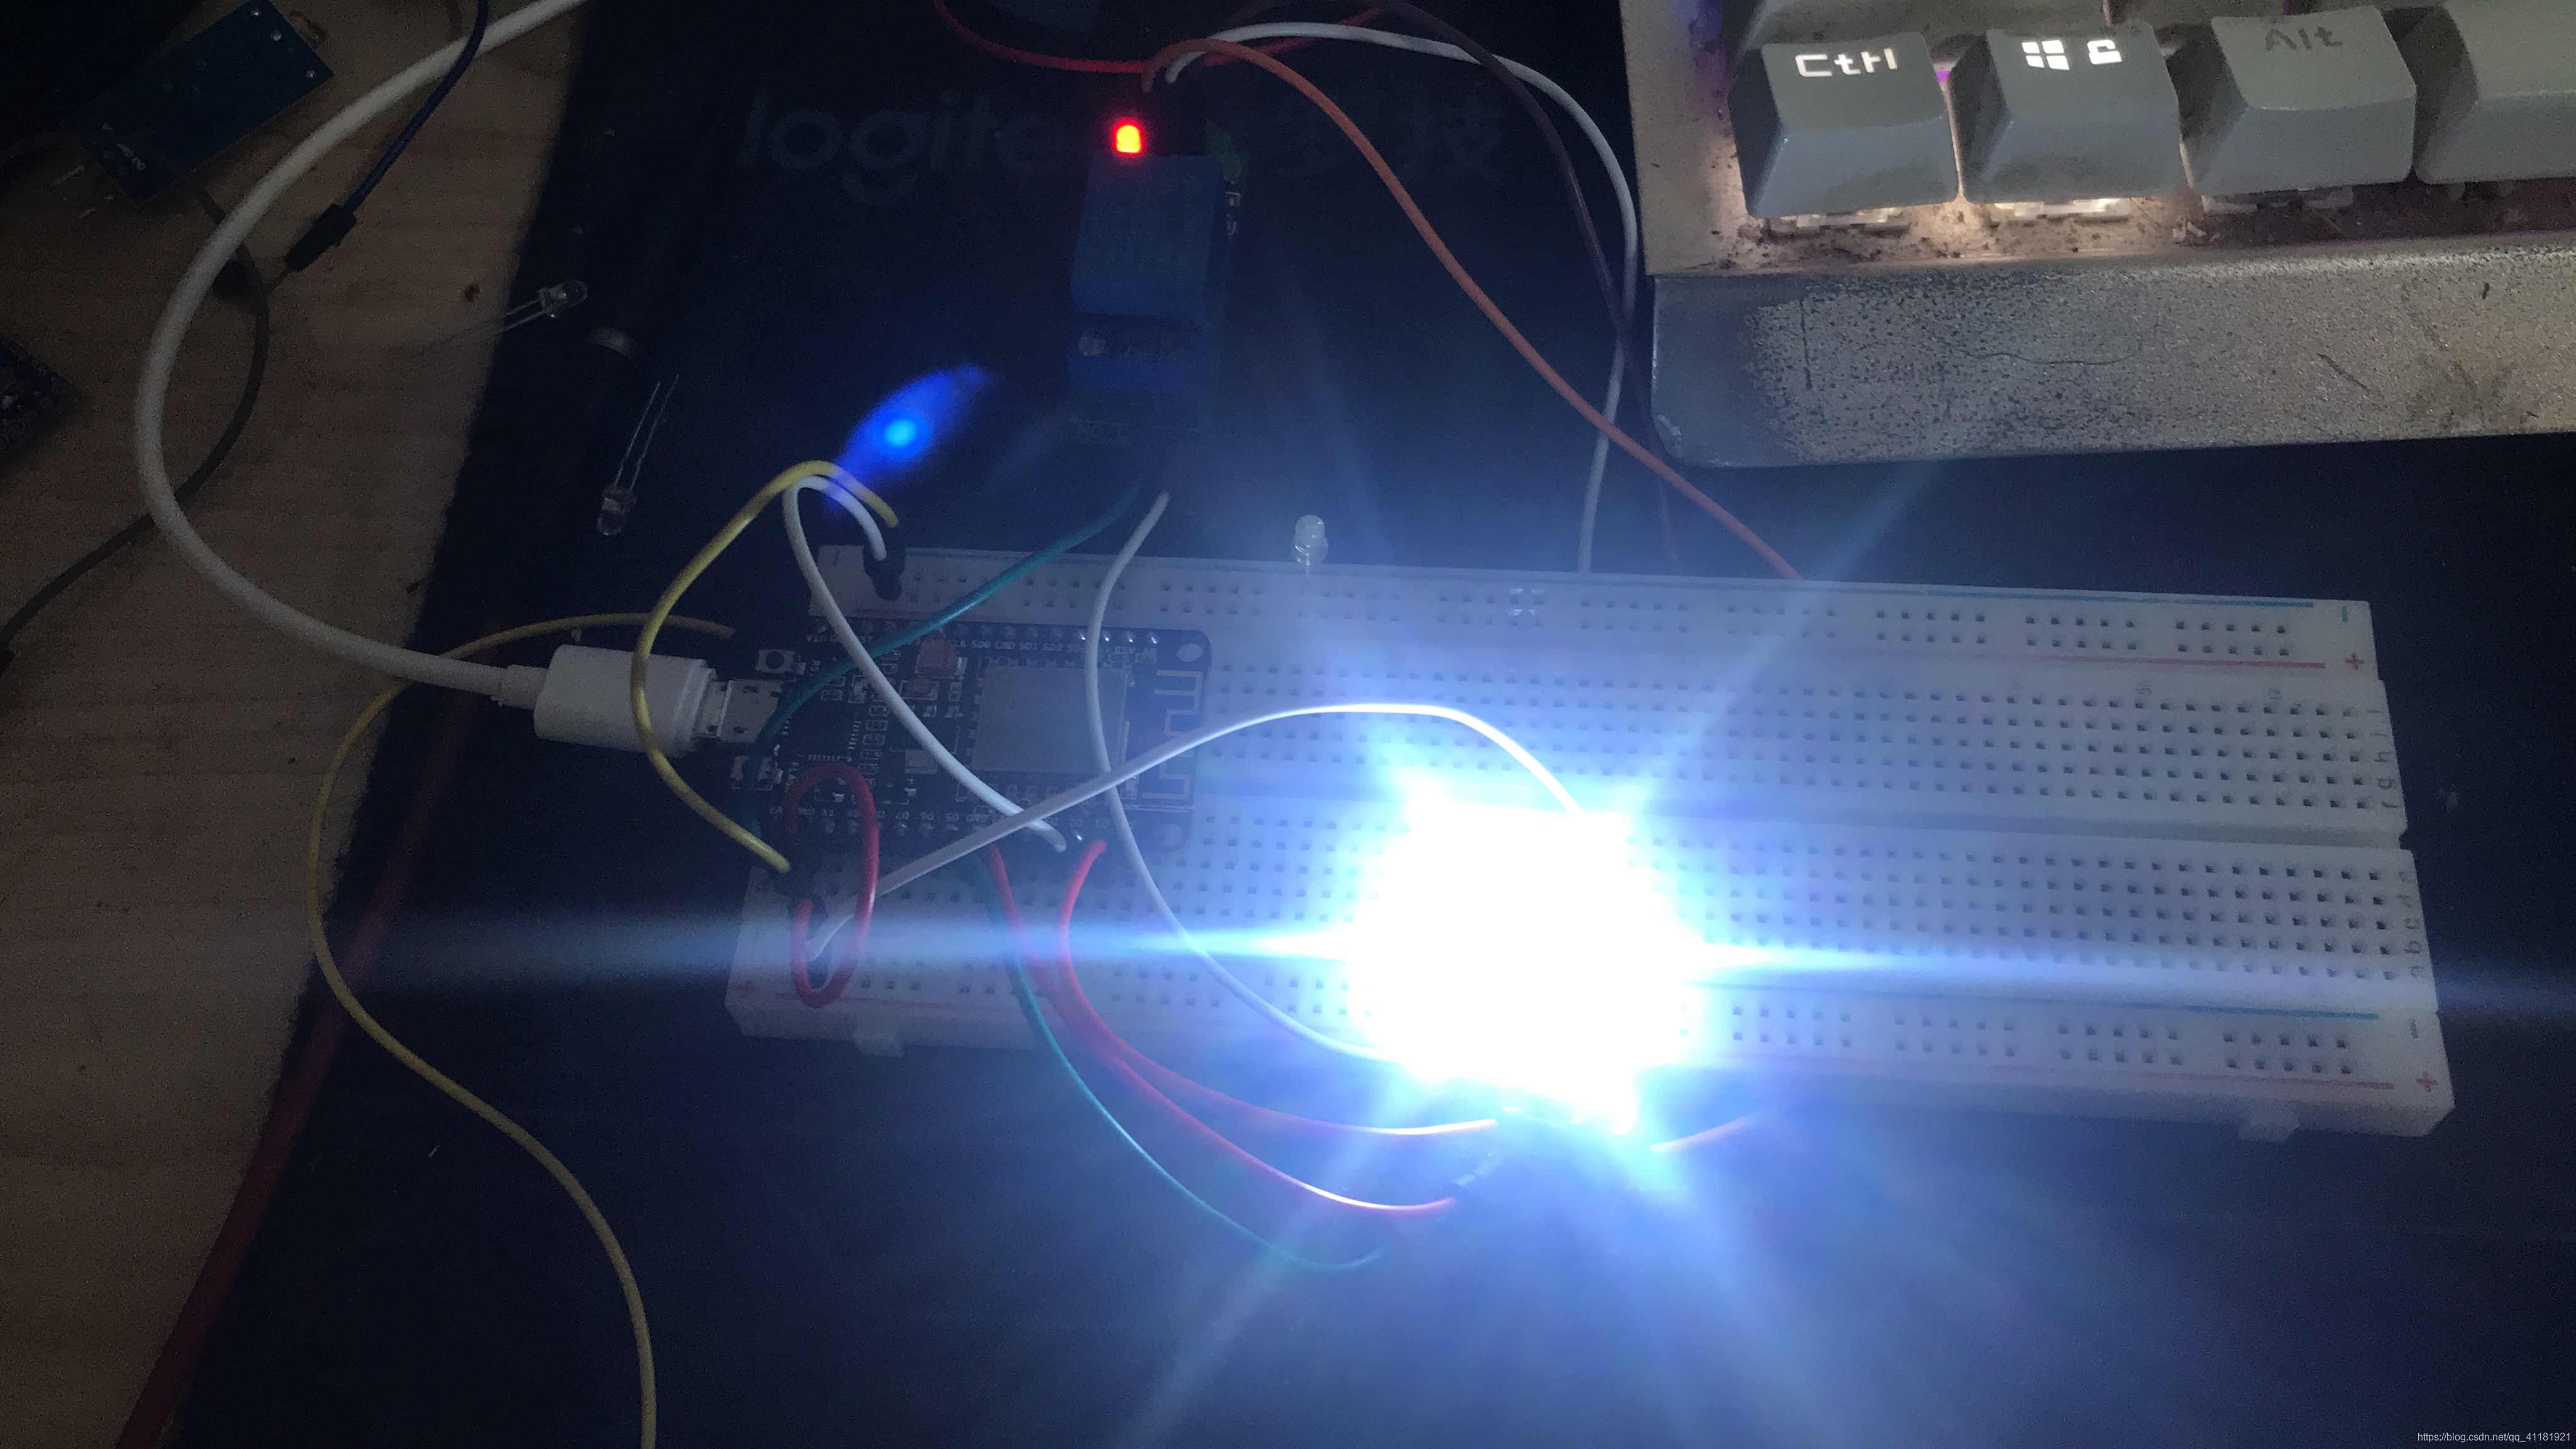
LED可以正常亮起,我们吧D2口上的LED也打开
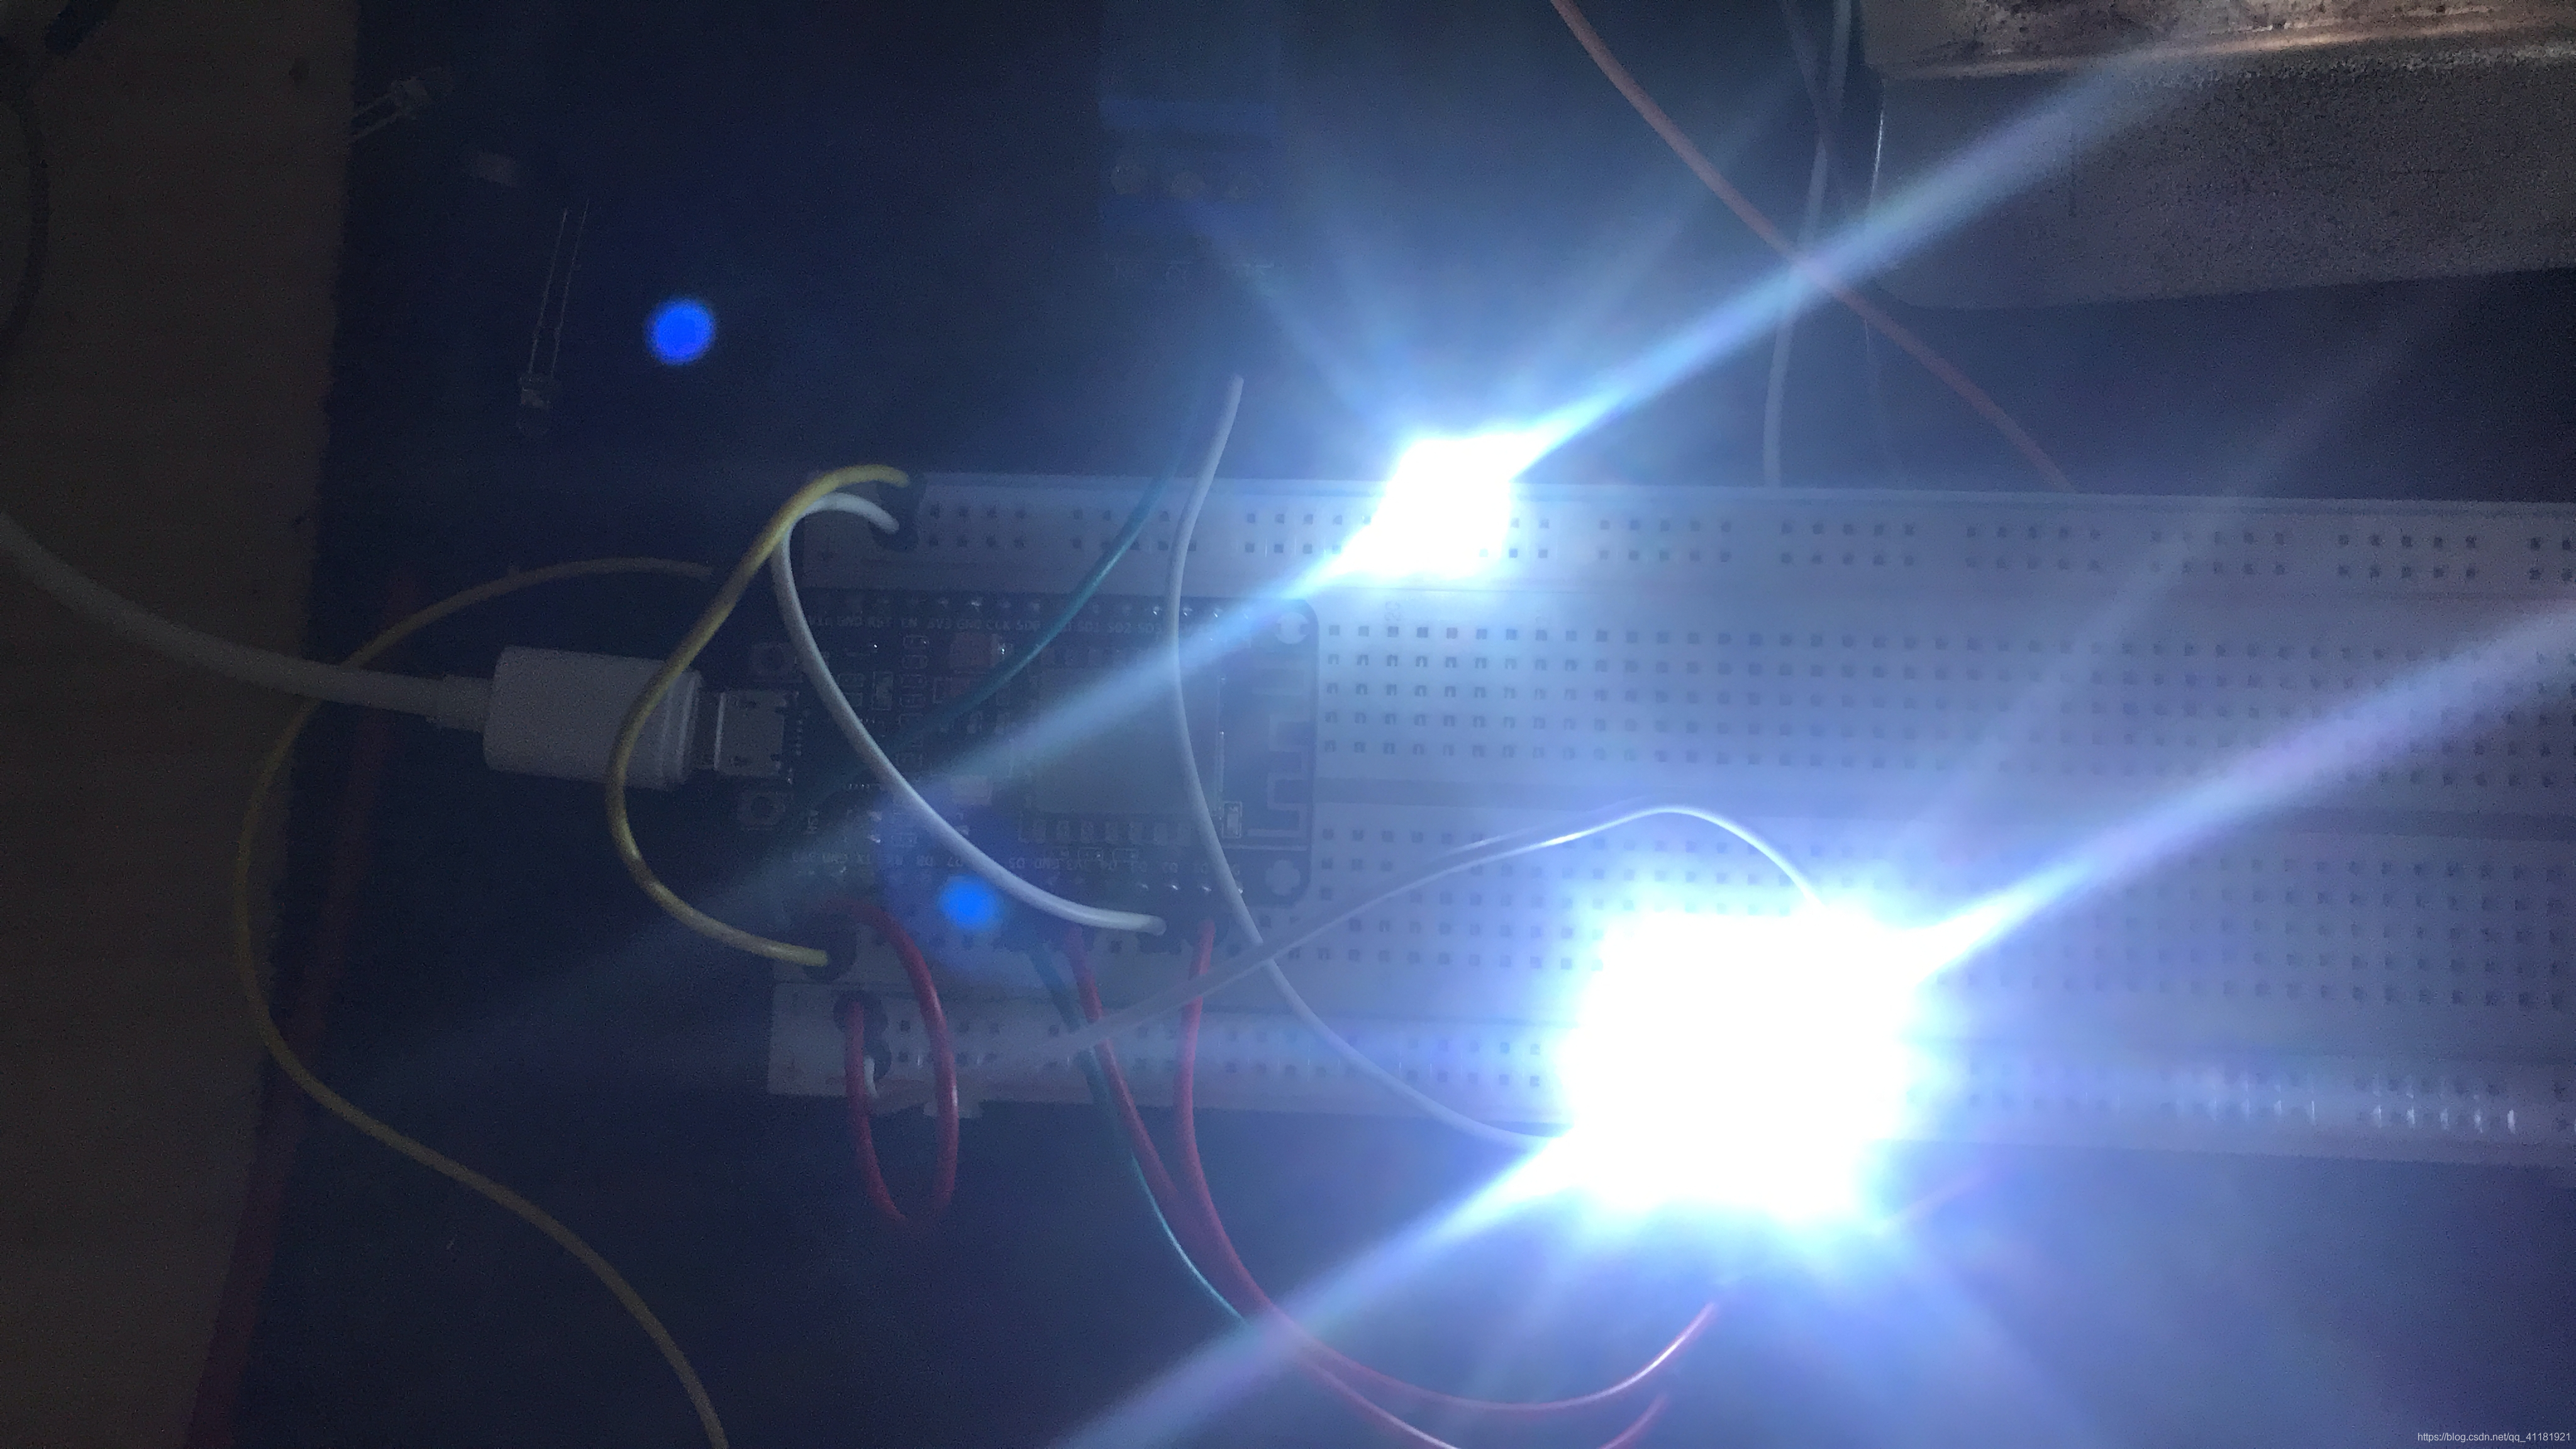
正常亮起。九,总结
本网页所有视频内容由 imoviebox边看边下-网页视频下载, iurlBox网页地址收藏管理器 下载并得到。
ImovieBox网页视频下载器 下载地址: ImovieBox网页视频下载器-最新版本下载
本文章由: imapbox邮箱云存储,邮箱网盘,ImageBox 图片批量下载器,网页图片批量下载专家,网页图片批量下载器,获取到文章图片,imoviebox网页视频批量下载器,下载视频内容,为您提供.
阅读和此文章类似的: 全球云计算
 官方软件产品操作指南 (170)


