CAS(Compare And Swap 比较并且替换)是乐观锁的一种实现方式,是一种轻量级锁。中文意思是:比较并替换。CAS需要有3个操作数:内存地址V,旧的预期值A,即将要更新的目标值B。 CAS指令执行时,当且仅当内存地址V的值与预期值A相等时,将内存地址V的值修改为B,否则就什么都不做。整个比较并替换的操作是一个原子操作。 比如:一个线程要修改数据库中的name属性,修改前会先去数据库查name的值,发现 CAS操作会造成ABA问题。所谓ABA问题,就是指: 1、线程1读取了数据A 为数据库表增加一个version版本字段。操作数据库时,根据CAS的原则我们本来只需要查询原本的值就好了,现在我们一同查出他的标志位版本字段vision。 原子操作类型,其中每个方法都是操作类型,可以保证线程安全。 结果: 1000 同步方法只会影响其他线程对当前被锁定对象的同步方法的调用,不会影响其他线程调用该对象的其他非同步方法或者调用其他锁资源的同步方法。 在定义同步代码块时,不要使用常量对象作为锁对象。即: 在多线程访问Object对象时,需要同步进行。 thread1start 锁定当前实例对象代表着,访问同一个实例对象的同步方法的线程之间会相互阻塞,但不影响执行别的实例对象的同步方法的线程运行。 比如说下面的例子,thread1和thread2属于实例对象syn_1,thread3和thread4属于实例对象syn_2。thread1和thread2在遇到锁时,会相互阻塞;但不影响thread3和thread4运行。同理,thread3和thread4遇到锁时会相互阻塞,但不影响thread1和thread2的执行。因为他们属于不同的实例对象。 同步方法只能保证当前方法的原子性,不能保证多个业务方法之间互相访问的原子性,如果多个方法要求原子操作,就需要对多个方法加锁,且锁定同一个资源。 syn_1 thread2 start syn_1 thread2 start 锁定类对象,在new这个对象的实例时,需要同步进行。(好像没人这么做) thread1 start 锁定类的静态同步方法,就是锁定了类对象,多线程new该对象时需要同步进行。 thread1 start 当同一个线程,多次调用当前对象的同步代码,并对当前对象多次加锁,就是可重入锁,即:同一个线程,多次调用同步代码,锁定同一个锁对象。 m1 start 子类同步方法覆盖父类同步方法,可以指定调用父类的同步方法,相当于锁的重入。 Sub Class m start 当同步方法中发生异常时,会自动释放锁资源,不会影响其他线程的运行。 同步代码一旦加锁后,会有一个临时的锁引用指向锁对象,和真实的引用无关联。在锁未释放之前,修改锁对象的引用,不会影响同步代码的执行。 thread1 start consumer_0 消费者进入等待 start 一次性挂多个锁,可以和锁一起使用,或替代锁的功能。在门闩未开放之前等待,当门闩完全开放后执行。可以用来控制前后顺序,避免了锁的效率低下问题。 latch count : 5 test1 method : 0 尝试去获取所资源,可以设置超时时间,如果在设置的时间内未获取到锁,则放弃获取所资源。 test1 method : 0 当线程使用 注意:只有在阻塞状态的线程才可能被打断。 阻塞状态: 包括普通阻塞,等待队列,锁池队列。 使用ReentrantLock的lock方法,获取锁标记的时候,如果需要阻塞等待锁标记,无法被打断。 等待时间最长的线程一定会获取锁资源。使用 Thread-1 : 0 consumer_0 消费者进入等待队列… 线程安全的容器,在多线程环境下使用可以不考虑同步问题。 线程安全的容器对象:Vector、HashTable,都是使用synchronized实现的。 concurrent包中的同步容器,大多数都是使用系统底层技术实现的线程安全。 ①底层都是用哈希实现的同步,效率高,线程安全。 ConcurrentHashMap:无序 暂无实现 ①写入数据时需要重复的复制集合,每次写入数据,都会创建一个新的底层数组,效率低。只有remove最后一个元素时效率高,直接返回了上一个数组,不会创建新的数组。 CopyOnWriteArrayList:(线程安全) Vector:(线程安全) ArrayList:(非线程安全) 基础链表同步队列 [thread_0 , thread_7 , thread_8 , thread_6 , thread_5 , thread_2 , thread_4 , thread_3 , thread_1 ] ①put():自动阻塞方法, 队列容量满后,自动阻塞; ①***add() 方法***:在容量不足的时候,抛出异常 延时队列。根据比较机制,实现自定义处理顺序的队列。常用于定时任务。 要求在DelayQueue队列中存放的任务是实现了 转移队列: 是一个容量为 0 的队列,且是一个特殊的 TransferQueue; 可执行接口, 类似 Runnable 接口,也是可以启动一个线程的接口。其中定义的方法是call,call 方法的作用和 Runnable 中的 run 方法完全一致,区别是call 方法有返回值。 FutureTask,实现了 可以将 thread1 : this is threadlocal! 线程池是一个进程级的重量级资源。默认的生命周期和 JVM 一致。当开启线程池后,直到 JVM 关闭为止,是线程池的默认生命周期。如果手工调用 shutdown 方法,那么线程池执行所有的任后,自动关闭。 使用 该接口提供了新的服务方法 工具类型。为 Executor 线程池提供工具方法。可以快速的提供若干种线程池。如:固定容量的,无限容量的,容量为 1 等各种线程池。类似 Arrays,Collections 等工具类型的作用。 活动状态和线程池容量是有上限的线程池。所有的线程池中,都有一个任务队列。使用的是 大多数情况下,使用的线程池,首选推荐FixedThreadPool。OS 系统和硬件是有线程支持上限,不能随意的无限制提供线程池。线程池默认的容量上限是 容量不限(默认容量为:Integer.MAX_VALUE),自动扩容。 容量管理策略:如果线程池中的线程数量不满足任务执行,创建新的线程。每次有新任务无法即时处理的时候,都会创建新的线程。当线程池中的线程空闲时长达到一定的临界值(默认 60 秒),自动释放线程。 内部应用或测试应用,有条件的内部数据瞬间处理时应用。 可以根据计划自动执行任务的线程池。 计划任务时使用。 保证任务顺序时使用。如: 游戏大厅中的公共频道聊天、秒杀。 该线程池可以递归完成复杂任务。但要求可分支合并的任务必须 ForkJoinTask 类型提供了两个抽象子类型, ForkJoinPool 没有所谓的容量,默认都是 1 个线程。会根据任务自动的分支新的子线程。当子线程任务结束后,自动合并。所谓自动是根据 fork 和 join 两个方法实现的。 主要是做科学计算或天文计算的、大数据量分析时使用。 JDK1.8 新增的线程池,当线程池中有空闲连接时,自动到等待队列中窃取未完成任务,自动执行。 除 ForkJoinPool 外,其他常用线程池底层都是使用
建议敲敲代码体验一下
菜鸟上路,有不对的地方请多多包含!
——————————— 锁——————————
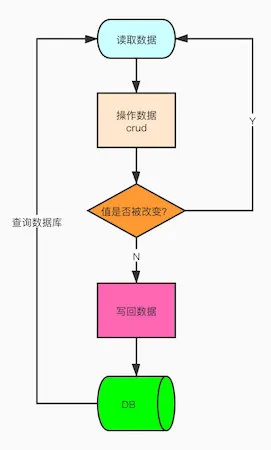
乐观锁
CAS
比如:线程在读取数据时不进行加锁,在准备写回数据时,先去查询原值,操作的时候比较原值是否修改,若未被其他线程修改则写回,若已被修改,则重新执行读取流程。
name="张三";拿到值后,准备修改为name="李四",这时,在修改前会先判断这时的name="张三"是不是依旧成立:如果不成立,则说明有其他线程修改了这个数据,就不进行操作;如果成立,则执行修改操作,将name修改为”李四”。update table_name set name="李四" where name="张三(旧)"ABA问题及解决方法
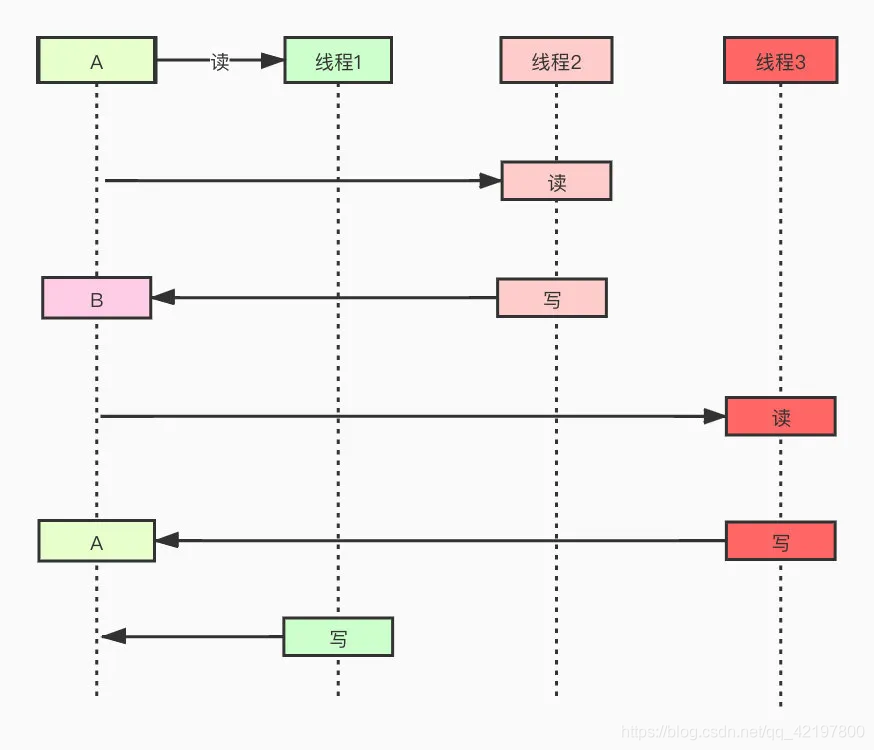
2、线程2读取了数据A
3、线程2通过CAS比较,发现值是A没错,可以把数据A改成数据B
4、线程3读取了数据B
5、线程3通过CAS比较,发现数据是B没错,可以把数据B改成了数据A
6、 线程1通过CAS比较,发现数据还是A没变,就写成了自己要改的值
在这个过程中任何线程都没做错什么,但是值被改变了,线程1却没有办法发现!
update table set value = newValue ,vision = vision + 1 where value = #{oldValue} and vision = #{vision},判断原来的值和版本号是否匹配,中间有别的线程修改,值可能相等,但是版本号100%不一样AtomicXXX类(乐观锁CAS)
public class TestAtomicXXX { AtomicInteger count = new AtomicInteger(0); public void test() { for(int i = 0; i < 100; i++) { count.incrementAndGet(); } } public static void main(String[] args) { final TestAtomicXXX ta = new TestAtomicXXX(); List<Thread> threads = new ArrayList<>(); for(int i = 0; i < 10; i++) { threads.add(new Thread(new Runnable() { @Override public void run() { ta.test(); } },"thread"+i)); } for(Thread t : threads) { t.start(); } for(Thread t : threads) { try { t.join(); } catch (InterruptedException e) { e.printStackTrace(); } } System.out.println("结果: "+ta.count.intValue()); } }
synchronized关键字(悲观锁)
为了保证在多线程环境下的操作的原子性。比如说:多个线程对count进行自增运算,为了保证不会加错,就需要加锁。String s1 = "hello";等类型定义的数据作为锁对象。
public class Test{ //同步方法:粗粒度 synchronized void m1(){ // 前置逻辑 System.out.println("同步逻辑"); // 后置逻辑 } //同步代码块:细粒度 void m2(){ // 前置逻辑 synchronized (this) { System.out.println("同步逻辑"); } // 后置逻辑 } } 锁定临界资源,同步代码块
/** * 锁临界资源 */ public class SynCriticalResource { private Object o = new Object(); public void testSyn() { //前置逻辑 System.out.println(Thread.currentThread().getName() + "start"); //锁定临界资源,同步代码块 synchronized(o) { try { System.out.println(Thread.currentThread().getName() + "正在访问Object对象,需要等待3秒"); TimeUnit.SECONDS.sleep(3); } catch (InterruptedException e) { e.printStackTrace(); } } //后置逻辑 System.out.println(Thread.currentThread().getName() + "end"); } public static void main(String[] args) { final SynCriticalResource syn = new SynCriticalResource(); //thread1 new Thread(new Runnable() { @Override public void run() { syn.testSyn(); } }, "thread1").start(); //thread2 new Thread(new Runnable() { @Override public void run() { syn.testSyn(); } }, "thread2").start(); } }
thread1正在访问Object对象,需要等待3秒
thread2start
thread1end
thread2正在访问Object对象,需要等待3秒
thread2end
锁定当前的实例对象(注意和类对象进行区分)
方法一:同步方法
public class SynMethod { public synchronized void testSyn() { System.out.println(Thread.currentThread().getName() + " start"); try { System.out.println(Thread.currentThread().getName() + " 睡眠3秒钟"); TimeUnit.SECONDS.sleep(3); } catch (InterruptedException e) { e.printStackTrace(); } System.out.println(Thread.currentThread().getName() + " end"); } public static void main(String[] args) { final SynMethod syn_1 = new SynMethod(); final SynMethod syn_2 = new SynMethod(); //syn_1 thread1 new Thread(new Runnable() { @Override public void run() { syn_1.testSyn(); } },"syn_1 thread1").start(); //syn_1 thread2 new Thread(new Runnable() { @Override public void run() { syn_1.testSyn(); } },"syn_1 thread2").start(); //syn_2 thread3 new Thread(new Runnable() { @Override public void run() { syn_2.testSyn(); } },"syn_2 thread3").start(); //syn_2 thread4 new Thread(new Runnable() { @Override public void run() { syn_2.testSyn(); } },"syn_2 thread4").start(); } }
syn_1 thread2 睡眠3秒钟
syn_2 thread3 start
syn_2 thread3 睡眠3秒钟
syn_1 thread2 end
syn_1 thread1 start
syn_1 thread1 睡眠3秒钟
syn_2 thread3 end
syn_2 thread4 start
syn_2 thread4 睡眠3秒钟
syn_1 thread1 end
syn_2 thread4 end方法二:锁定this
public class SynThis { public void testSyn() { synchronized(this) { System.out.println(Thread.currentThread().getName() + " start"); try { System.out.println(Thread.currentThread().getName() + " 睡眠3秒钟"); TimeUnit.SECONDS.sleep(3); } catch (InterruptedException e) { e.printStackTrace(); } System.out.println(Thread.currentThread().getName() + " end"); } } public static void main(String[] args) { final SynThis syn_1 = new SynThis(); final SynThis syn_2 = new SynThis(); //syn_1 thread1 new Thread(new Runnable() { @Override public void run() { syn_1.testSyn(); } },"syn_1 thread1").start(); //syn_1 thread2 new Thread(new Runnable() { @Override public void run() { syn_1.testSyn(); } },"syn_1 thread2").start(); //syn_2 thread3 new Thread(new Runnable() { @Override public void run() { syn_2.testSyn(); } },"syn_2 thread3").start(); //syn_2 thread4 new Thread(new Runnable() { @Override public void run() { syn_2.testSyn(); } },"syn_2 thread4").start(); } }
syn_1 thread2 睡眠3秒钟
syn_2 thread4 start
syn_2 thread4 睡眠3秒钟
syn_1 thread2 end
syn_1 thread1 start
syn_1 thread1 睡眠3秒钟
syn_2 thread4 end
syn_2 thread3 start
syn_2 thread3 睡眠3秒钟
syn_1 thread1 end
syn_2 thread3 end
锁定类对象(.class对象)
方法一:直接锁类对象
public class SynClass { public void testSyn() { synchronized(A.class) { A a = new A(); a.show(); } } public static void main(String[] args) { final SynClass syn = new SynClass(); new Thread(new Runnable() { @Override public void run() { syn.testSyn(); } }, "thread1").start(); new Thread(new Runnable() { @Override public void run() { syn.testSyn(); } }, "thread2").start(); } } class A{ public void show() { System.out.println(Thread.currentThread().getName() + " start"); try { System.out.println(Thread.currentThread().getName() + " 睡眠3秒"); TimeUnit.SECONDS.sleep(3); } catch (InterruptedException e) { e.printStackTrace(); } System.out.println(Thread.currentThread().getName() + " end"); } }
thread1 睡眠3秒
thread1 end
thread2 start
thread2 睡眠3秒
thread2 end方法二:锁定类的静态同步方法
public class SynStaticMethod { public void testSyn() { B b = new B(); b.show(); } public static void main(String[] args) { final SynStaticMethod syn = new SynStaticMethod(); //thread1 new Thread(new Runnable() { @Override public void run() { syn.testSyn(); } },"thread1").start(); //thread2 new Thread(new Runnable() { @Override public void run() { syn.testSyn(); } },"thread2").start(); } } class B { public static synchronized void show() { System.out.println(Thread.currentThread().getName() + " start"); try { System.out.println(Thread.currentThread().getName() + " 睡眠3秒"); TimeUnit.SECONDS.sleep(3); } catch (InterruptedException e) { e.printStackTrace(); } System.out.println(Thread.currentThread().getName() + " end"); } }
thread1 睡眠3秒
thread1 end
thread2 start
thread2 睡眠3秒
thread2 end
可重入锁
方法一:同步方法互相调用
public class TestRLock{ synchronized void m1(){ // 锁this System.out.println("m1 start"); try { TimeUnit.SECONDS.sleep(2); } catch (InterruptedException e) { e.printStackTrace(); } m2(); System.out.println("m1 end"); } synchronized void m2(){ // 锁this System.out.println("m2 start"); try { TimeUnit.SECONDS.sleep(1); } catch (InterruptedException e) { e.printStackTrace(); } System.out.println("m2 end"); } public static void main(String[] args) { TestRLock t = new TestRLocl(); t.m1(); } }
m2 start
m2 end
m1 end方法二:继承
public class TestRLock{ synchronized void m(){ System.out.println("Super Class m start"); try { TimeUnit.SECONDS.sleep(1); } catch (InterruptedException e) { e.printStackTrace(); } System.out.println("Super Class m end"); } public static void main(String[] args) { new Sub_TestRLock().m(); } } class Sub_TestRLock extends TestRLock{ synchronized void m(){ System.out.println("Sub Class m start"); super.m(); System.out.println("Sub Class m end"); } }
Super Class m start
Super Class m end
Sub Class m end
锁与异常
public class TestException { int i = 0; synchronized void m(){ //锁定当前实例对象 System.out.println(Thread.currentThread().getName() + " - start"); while(true){ i++; System.out.println(Thread.currentThread().getName() + " - " + i); try { TimeUnit.SECONDS.sleep(1); } catch (InterruptedException e) { e.printStackTrace(); } //当i等于5时抛出异常,thread2自动释放锁资源,不会影响thread1的执行 if(i == 5){ i = 1/0; } } } public static void main(String[] args) { final TestException t = new TestException(); new Thread(new Runnable() { @Override public void run() { t.m(); } }, "thread1").start(); new Thread(new Runnable() { @Override public void run() { t.m(); } }, "thread2").start(); } }

锁对象变更问题
public class SynChangeObj { Object o = new Object(); public void test() { System.out.println(Thread.currentThread().getName() + " start"); synchronized(o) { while(true) { try { TimeUnit.SECONDS.sleep(1); } catch (InterruptedException e) { // TODO Auto-generated catch block e.printStackTrace(); } System.out.println(Thread.currentThread().getName() + " - " + o); } } } public static void main(String[] args) { final SynChangeObj sco = new SynChangeObj(); //thread1 new Thread(new Runnable() { @Override public void run() { sco.test(); } }, "thread1").start(); try { TimeUnit.SECONDS.sleep(3); } catch (InterruptedException e) { e.printStackTrace(); } //thread2 Thread thread2 = new Thread(new Runnable() { @Override public void run() { sco.test(); } }, "thread2"); //改变锁对象的引用,这时thread2可以正常启动,因为thread1和thread2锁的对象不是同一个 sco.o = new Object(); thread2.start(); } }
thread1 – java.lang.Object@348bae10
thread1 – java.lang.Object@348bae10
thread2 start
thread1 – java.lang.Object@3a4c56f1
thread2 – java.lang.Object@3a4c56f1
thread1 – java.lang.Object@3a4c56f1
thread2 – java.lang.Object@3a4c56f1
thread1 – java.lang.Object@3a4c56f1
从运行结果可以看到,thread2正常运行,说明thread1和thread2锁的对象不是同一个。但是,thread1和thread2输出的Object的地址却是同一个,这是为什么呢?
这是因为,起初,当我们new SynChangeObj 和new Objcet时,JVM会在堆中分配两个空间,一个是SynChangeObj,另一个是Objcet(记作:o1),其中,SynChangeObj的o引用会指向o1,当thread1锁定o1时,会在栈帧中生成一个临时变量指向这个o1。
接着,当我们为o重新赋值new Objcet时,会在堆中重新分配一个空间,为Objcet(记作:o2),这时SynChangeObj的o引用会重新指向o2,当我们启动thread2并锁定o时,其实锁定的就是o2这个对象了,与thread1锁的不是同一个对象,也就不存在同步问题。
那么为什么thread1和thread2输出的o的地址是同一个呢? 这个是因为,当我们输出o,System.out.println(Thread.currentThread().getName() + " - " + o);时,其实是调用this.o的toString方法,即当前实例对象的o所引用的那个Object对象,因为当我们重新new Objcet后,该实例对象o的引用指向了o2,所以无论是thread1还是thread2,它们输出的o都会是o2所在的地址。

生产者-消费者
public class Test_Synchronized_Producer_Consumer { /** * 自定义同步容器,容量上限为10 * 定义2个生产者,往容器中添加对象 * 定义5个消费者,从容器中取出对象 */ //自定义容器 private final LinkedList<Object> list = new LinkedList<>(); //定义容量上限 private final int MAX = 10; //生产者放入Obejct public synchronized void put(Object o) { while(list.size() == MAX) { try { //容器容量达到上限,生产者进入等待队列 System.out.println(Thread.currentThread().getName() + " 生产者进入等待..."); this.wait(); } catch (InterruptedException e) { e.printStackTrace(); } } //添加Object到容器中 System.out.println(Thread.currentThread().getName() + " 生产者放入Object!"); list.add(o); //唤醒其他线程 this.notifyAll(); } //消费者取出Object public synchronized Object get() { while(list.size() == 0) { //容器为空,消费者进入等待队列 try { System.out.println(Thread.currentThread().getName() + " 消费者进入等待"); this.wait(); } catch (InterruptedException e) { e.printStackTrace(); } } //取出Object Object o_remove = list.remove(); //唤醒其他线程 this.notifyAll(); return o_remove; } public static void main(String[] args) { final Test_Synchronized_Producer_Consumer tspc = new Test_Synchronized_Producer_Consumer(); //定义10个消费者 for(int i = 0; i < 10; i++) { new Thread(new Runnable() { @Override public void run() { //每个消费者取5个Object for(int j = 0; j < 5; j++) { System.out.println(Thread.currentThread().getName() + " 消费者取出了Object: " + tspc.get()); } } }, "consumer_"+i).start(); } //睡眠2秒后,定义2个生产者 try { TimeUnit.SECONDS.sleep(2); } catch (InterruptedException e) { e.printStackTrace(); } //定义2个生产者 for(int i = 0; i < 2; i++) { new Thread(new Runnable() { @Override public void run() { //每个生产者放入25个Object for(int j = 0; j < 25; j++) { tspc.put(new Object()); } } }, "producer_"+i).start(); } } }
consumer_8 消费者进入等待
consumer_7 消费者进入等待
consumer_6 消费者进入等待
consumer_5 消费者进入等待
consumer_4 消费者进入等待
consumer_3 消费者进入等待
consumer_2 消费者进入等待
consumer_1 消费者进入等待
consumer_9 消费者进入等待
producer_0 生产者放入Object!
producer_0 生产者放入Object!
consumer_9 消费者取出了Object: java.lang.Object@538a0699
consumer_9 消费者进入等待
consumer_0 消费者取出了Object: java.lang.Object@468c61f7
…(不列举)
volatile关键字与内存可见性
通知OS操作系统底层,在CPU计算过程中,都要检查内存中数据的有效性,保证最新的内存数据被使用。
告诉cpu在读取变量值时,最好去内存查找最新数据,而不是继续读缓存,也就是内存可见性,保证了多线程之间的数据可见性。
volatile关键字只能保证可见性,不能保证原子性,因为不是加锁,只是数据的内存可见性。public class TestVolatile { volatile boolean b = true; void test() { System.out.println("start"); while(b) { System.out.println("while条件符合!"); } System.out.println("end"); } public static void main(String[] args) { final TestVolatile v = new TestVolatile(); new Thread(new Runnable() { @Override public void run() { v.test(); } }).start(); try { TimeUnit.MILLISECONDS.sleep(1); } catch (InterruptedException e) { // TODO Auto-generated catch block e.printStackTrace(); } v.b = false; } }
while条件符合!
。。。
while条件符合!
end
CountDownLatch类(门闩)
public class CountDownLatchTest { //一次性上5把锁 CountDownLatch latch = new CountDownLatch(5); //thread2等待门闩开放 public void test1() { try { //等待门闩开放 latch.await(); } catch (InterruptedException e) { e.printStackTrace(); } System.out.println("test1() method..."); } //thread1进行解锁 public void test2() { for(int i = 0; i < 10; i++) { if(latch.getCount() != 0) { System.out.println("latch count : " + latch.getCount()); //减门闩上的锁 latch.countDown(); } try { TimeUnit.MILLISECONDS.sleep(500); } catch (InterruptedException e) { e.printStackTrace(); } System.out.println("test2()执行 : " + i); } } public static void main(String[] args) { final CountDownLatchTest cdlt = new CountDownLatchTest(); new Thread(new Runnable() { @Override public void run() { cdlt.test1(); } }, "thread1").start(); new Thread(new Runnable() { @Override public void run() { cdlt.test2(); } }, "thread1").start(); } }
test2()执行 : 0
latch count : 4
test2()执行 : 1
latch count : 3
test2()执行 : 2
latch count : 2
test2()执行 : 3
latch count : 1
test1() method…
test2()执行 : 4
test2()执行 : 5
test2()执行 : 6
test2()执行 : 7
test2()执行 : 8
test2()执行 : 9
ReentrantLock类
重入锁
lock.lock();方法之后的代码都被加锁,直到遇到lock.unlock();方法才会解锁。public class Test_ReentrantLock_01 { Lock lock = new ReentrantLock(); public void test1() { try { //加锁 lock.lock(); for(int i = 0; i < 10; i++) { TimeUnit.SECONDS.sleep(1); System.out.println("test1 method : " + i); } }catch(Exception e) { e.printStackTrace(); }finally { //解锁 lock.unlock(); } } public void test2() { try { //加锁 lock.lock(); System.out.println("test2 method"); }catch(Exception e) { e.printStackTrace(); }finally { //解锁 lock.unlock(); } } public static void main(String[] args) { final Test_ReentrantLock_01 t = new Test_ReentrantLock_01(); //thread1 new Thread(new Runnable() { @Override public void run() { t.test1(); } },"thread1").start(); //睡眠2秒 try { TimeUnit.SECONDS.sleep(2); } catch (InterruptedException e) { e.printStackTrace(); } //thread2 new Thread(new Runnable() { @Override public void run() { t.test2(); } },"thread2").start(); } }
test1 method : 1
test1 method : 2
test1 method : 3
test1 method : 4
test1 method : 5
test1 method : 6
test1 method : 7
test1 method : 8
test1 method : 9
test2 method
尝试锁
lock.tryLock();成功返回true,失败返回false。
注意:在释放锁标记时,一定要判断是否获取到锁标记。public class Test_ReentrantLock_02 { Lock lock = new ReentrantLock(); public void test1() { try { //加锁 lock.lock(); for(int i = 0; i < 10; i++) { TimeUnit.SECONDS.sleep(1); System.out.println("test1 method : " + i); } }catch(Exception e) { e.printStackTrace(); }finally { //解锁 lock.unlock(); } } public void test2() { boolean isLocked = false; try { //尝获取锁,不限时,成功返回true // isLocked = lock.tryLock(); //尝试在2秒内获得锁,若超时则放弃 isLocked = lock.tryLock(2, TimeUnit.SECONDS); if(isLocked) { //加锁成功 System.out.println("test2 locked"); }else { System.out.println("test2 unlocked"); } }catch(Exception e) { e.printStackTrace(); }finally { //解锁 if(isLocked) { lock.unlock(); } } } public static void main(String[] args) { final Test_ReentrantLock_02 t = new Test_ReentrantLock_02(); //thread1 new Thread(new Runnable() { @Override public void run() { t.test1(); } },"thread1").start(); //睡眠2秒 try { TimeUnit.SECONDS.sleep(2); } catch (InterruptedException e) { e.printStackTrace(); } //thread2 new Thread(new Runnable() { @Override public void run() { t.test2(); } },"thread2").start(); } }
test1 method : 1
test1 method : 2
test1 method : 3
test2 unlocked
test1 method : 4
test1 method : 5
test1 method : 6
test1 method : 7
test1 method : 8
test1 method : 9
可打断锁
lock.lockInterruptibly();阻塞等待锁资源时,可以被其他线程打断,会抛出java.lang.IllegalMonitorStateException错误,因为被打断的线程是非正常结束的。
普通阻塞: sleep(10000), 可以被打断。调用thread.interrupt()方法,可以打断阻塞状态,抛出异常。
等待队列: wait()方法被调用,也是一种阻塞状态,只能由notify唤醒,无法被打断
锁池队列: 无法获取锁标记。不是所有的锁池队列都可被打断。
使用ReentrantLock的lockInterruptibly方法,获取锁标记的时候,如果需要阻塞等待,可以被打断。public class Test_ReentrantLock_03 { Lock lock = new ReentrantLock(); public void test1() { try { //加锁 lock.lock(); for(int i = 0; i < 10; i++) { TimeUnit.SECONDS.sleep(1); System.out.println("test1 method : " + i); } }catch(Exception e) { e.printStackTrace(); }finally { //解锁 lock.unlock(); } } public void test2() { try { //阻塞等待锁资源,在阻塞过程中可以被其他线程打断 lock.lockInterruptibly(); System.out.println("test2 method"); }catch(InterruptedException e) { System.out.println("test2 interrupted"); }finally { //解锁 lock.unlock(); } } public static void main(String[] args) { final Test_ReentrantLock_03 t = new Test_ReentrantLock_03(); //thread1 new Thread(new Runnable() { @Override public void run() { t.test1(); } },"thread1").start(); //睡眠2秒 try { TimeUnit.SECONDS.sleep(2); } catch (InterruptedException e) { e.printStackTrace(); } //thread2 Thread t2 = new Thread(new Runnable() { @Override public void run() { t.test2(); } },"thread2"); t2.start(); //睡眠1秒 try { TimeUnit.SECONDS.sleep(1); } catch (InterruptedException e) { e.printStackTrace(); } //由主线程打断thread2,非正常结束阻塞状态的线程,都会抛出异常 t2.interrupt(); } }

公平锁
new ReentrantLock(true);方法定义一个公平锁,去掉true后为非公平锁,synchronized就是非公平锁,由线程自由竞争锁资源。public class Test_ReentrantLock_04 { public static void main(String[] args) { A a = new A(); Thread t1 = new Thread(a); Thread t2 = new Thread(a); t1.start(); t2.start(); } } class A extends Thread { //定义公平锁 private static ReentrantLock lock = new ReentrantLock(true); @Override public void run() { for(int i = 0; i < 3; i++) { try { //加锁 lock.lock(); System.out.println(Thread.currentThread().getName() + " : " + i); TimeUnit.SECONDS.sleep(1); } catch (Exception e) { e.printStackTrace(); }finally { //解锁 lock.unlock(); } } } }
Thread-2 : 0
Thread-1 : 1
Thread-2 : 1
Thread-1 : 2
Thread-2 : 2
ReentrantLock条件锁(生产者-消费者模式)
public class Test_ReentrantLock_ConditionLock { /** * 自定义同步容器,容量上限为10 * 定义2个生产者,往容器中添加对象 * 定义5个消费者,从容器中取出对象 */ //自定义容器 private final LinkedList<Object> list = new LinkedList<>(); //容器上限 private final int MAX = 10; //创建锁 private Lock lock = new ReentrantLock(); //给锁添加条件 private Condition producer = lock.newCondition();//生产者 private Condition consumer = lock.newCondition();//消费者 //生产者放入Object public void put(Object o) { lock.lock(); try { while(list.size() == MAX) { //容器满了,借助条件,生产者进入等待队列 System.out.println(Thread.currentThread().getName()+" 生产者进入等待..."); producer.await(); } //容器有空位,生产者放入Object System.out.println(Thread.currentThread().getName()+" 生产者put Object!"); list.add(o); //借助条件,唤醒所有的消费者 consumer.signalAll(); } catch(Exception e){ e.printStackTrace(); } finally { lock.unlock(); } } //消费者取出Object public Object get() { lock.lock(); Object o_remove = null; try { while(list.size() == 0) { //容器为空,借助条件,消费者进入等待队列 System.out.println(Thread.currentThread().getName()+" 消费者进入等待队列..."); consumer.await(); } //消费者取出Object System.out.println(Thread.currentThread().getName() + " 消费者remove Object!"); o_remove = list.remove(); //借助条件,唤醒生产者 producer.signalAll(); } catch(Exception e) { e.printStackTrace(); } finally { lock.unlock(); } return o_remove; } public static void main(String[] args) { final Test_ReentrantLock_ConditionLock trc = new Test_ReentrantLock_ConditionLock(); //创建10个消费者 for(int i = 0; i < 10; i++) { new Thread(new Runnable() { @Override public void run() { //一个消费者取5次 for(int j = 0; j < 5; j++) { System.out.println(Thread.currentThread().getName() + " : " +trc.get()); } } },"consumer_"+i).start(); } //休眠2秒后,创建生产者 try { TimeUnit.SECONDS.sleep(2); } catch (InterruptedException e) { e.printStackTrace(); } //创建2个生产者 for(int i = 0; i < 2; i++) { new Thread(new Runnable() { @Override public void run() { //每个生产者放入25个Object for(int j = 0; j < 25; j++) { trc.put(new Object()); } } },"producer_"+i).start(); } } }
consumer_8 消费者进入等待队列…
consumer_9 消费者进入等待队列…
consumer_7 消费者进入等待队列…
consumer_6 消费者进入等待队列…
consumer_5 消费者进入等待队列…
consumer_3 消费者进入等待队列…
consumer_4 消费者进入等待队列…
consumer_2 消费者进入等待队列…
consumer_1 消费者进入等待队列…
producer_0 生产者put Object!
consumer_0 消费者remove Object!
consumer_8 消费者进入等待队列…
consumer_0 : java.lang.Object@5cb59237
consumer_9 消费者进入等待队列…
consumer_7 消费者进入等待队列…
consumer_6 消费者进入等待队列…
consumer_5 消费者进入等待队列…
producer_1 生产者put Object!
producer_1 生产者put Object!
producer_1 生产者put Object!
producer_1 生产者put Object!
producer_1 生产者put Object!
producer_1 生产者put Object!
consumer_3 消费者remove Object!
consumer_3 : java.lang.Object@39f9feb7
consumer_3 消费者remove Object!
consumer_3 : java.lang.Object@373e07f8
consumer_3 消费者remove Object!
consumer_3 : java.lang.Object@330195c7
…(不列举)
————————同步容器————————
Map/Set
ConcurrentHashMap/ConcurrentSkipListMap
②使用系统底层技术实现线程安全,量级较 synchronized 低。
③key 和 value 不能为 null。
ConcurrentSkipListMap:有序,效率比 ConcurrentHashMap 稍低public class Test_ConcurrentHashMap { /** * 比较Hashtable、ConcurrentHashMap、ConcurrentSkipListMap的效率 * @param args */ public static void main(String[] args) { //使用Hashtable // final Map<String, String> map = new Hashtable<>(); //使用ConcurrentHashMap final Map<String, String> map = new ConcurrentHashMap<>(); //使用ConcurrentSkipListMap // final Map<String, String> map = new ConcurrentSkipListMap<>(); //定义100个线程 Thread[] threads = new Thread[100]; //生成随机数,用来减少map的key的冲突 final Random r = new Random(); //使用门闩,保证同步 final CountDownLatch latch = new CountDownLatch(threads.length); //记录开始时间 long startTime = System.currentTimeMillis(); //创建100个线程任务 for(int i = 0; i < 100; i++) { //添加线程任务到数组 threads[i] = new Thread(new Runnable() { @Override public void run() { //每个线程任务往map中添加10000条数据 //这里的随机数范围越大,冲突越小 for(int j = 0; j < 10000; j++) { map.put("key_"+r.nextInt(100000), "value_"+r.nextInt(100000)); } //减少门闩 latch.countDown(); } }); } //启动着100个线程 for(Thread t : threads) { t.start(); } //等待门闩开放 try { latch.await(); //记录结束时间 long endTime = System.currentTimeMillis(); //输出前后花费的时间 System.out.println(endTime - startTime); } catch (InterruptedException e) { e.printStackTrace(); } } } ConcurrentHashSet/ConcurrentSkipListSet
List
CopyOnWriteArrayList
②读取效率高。
③适合写少读多的情况。public class Test_CopyOnWriteList { public static void main(String[] args) { // final List<String> list = new ArrayList<>(); // final List<String> list = new Vector<>(); final List<String> list = new CopyOnWriteArrayList<>(); final Random r = new Random(); Thread[] array = new Thread[100]; final CountDownLatch latch = new CountDownLatch(array.length); long begin = System.currentTimeMillis(); for(int i = 0; i < array.length; i++){ array[i] = new Thread(new Runnable() { @Override public void run() { for(int j = 0; j < 1000; j++){ list.add("value" + r.nextInt(100000)); } latch.countDown(); } }); } for(Thread t : array){ t.start(); } try { latch.await(); } catch (InterruptedException e) { e.printStackTrace(); } long end = System.currentTimeMillis(); System.out.println("执行时间为 : " + (end-begin) + "毫秒!"); System.out.println("List.size() : " + list.size()); } }
执行时间为 : 9265毫秒!
List.size() : 100000
执行时间为 : 167毫秒!
List.size() : 100000
执行时间为 : 233毫秒!
List.size() : 97198Queue
ConcurrentLinkedQueue
public class Test_ConcurrentLinkedQueue { public static void main(String[] args) { Queue<String> queue = new ConcurrentLinkedQueue<>(); //定义9个线程 for(int i = 0; i < 9; i++) { new Thread(new Runnable() { @Override public void run() { //阻塞添加数据 queue.offer(Thread.currentThread().getName()+" "); } }, "thread_"+i).start(); } //需要将主线程阻塞1秒,否则可能出现其他线程还没来得及添加数据,主线程就已经开始打印的情况 try { TimeUnit.SECONDS.sleep(1); } catch (InterruptedException e) { e.printStackTrace(); } //查看队列数据 System.out.println(queue); System.out.println("size : " + queue.size()); // peek() -> 查看queue中的首数据,不移除 System.out.println("peek() : " + queue.peek()); System.out.println("peek() size : " + queue.size()); // poll() -> 获取queue中的首数据,移除 System.out.println("poll() : " + queue.poll()); System.out.println("poll() size : " + queue.size()); } }
size : 9
peek() : thread_0
peek() size : 9
poll() : thread_0
poll() size : 8LinkedBlockingQueue
②take():自动阻塞方法,队列容量空后,自动阻塞;public class Test_LinkedBlockingQueue { //定义容量为3的LinkedBlockingQueue private final BlockingQueue<String> queue = new LinkedBlockingQueue<>(3); private Random r = new Random(); public static void main(String[] args) { final Test_LinkedBlockingQueue t = new Test_LinkedBlockingQueue(); //定义线程,添加数据 new Thread(new Runnable() { @Override public void run() { while(true) { try { t.queue.put("queue_"+t.r.nextInt(100)); System.out.println(Thread.currentThread().getName() + "放入了数据!"); } catch (InterruptedException e) { e.printStackTrace(); } try { TimeUnit.SECONDS.sleep(1); } catch (InterruptedException e) { e.printStackTrace(); } } } }, "put_thread").start(); //定义3个线程,取出数据 for(int i = 0; i < 3; i++) { new Thread(new Runnable() { @Override public void run() { while(true) { try { System.out.println(Thread.currentThread().getName() + " 取出了 " + t.queue.take()); } catch (InterruptedException e) { e.printStackTrace(); } } } }, "take_thread_" + i).start(); } } } ArrayBlockingQueue
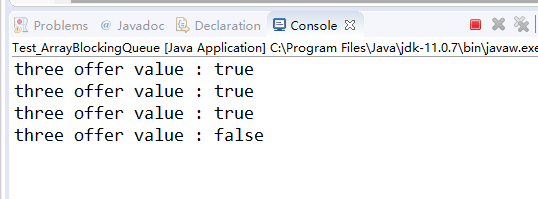
②***put() 方法***:在容量不足的时候,阻塞等待
③***offer() 方法***:
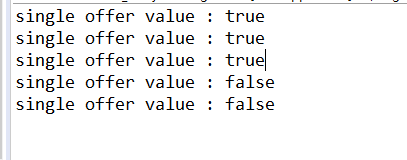
Ⅰ :单参数 offer ()方法,不阻塞,当容量不足的时候,返回 false,并且当前新增数据的操作会被放弃。
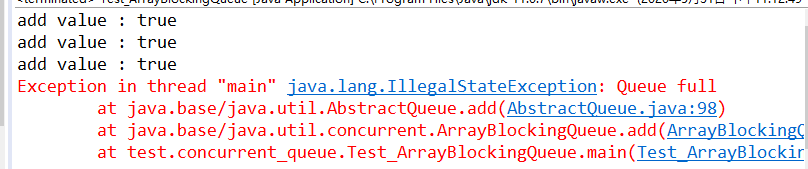
Ⅱ:三参数 offer() 方法【offer(value, times, timeunit)】,容量不足的时候,阻塞 times 时长(单位为 timeunit)。如果在阻塞时间内,有容量空闲,新增数据返回 true;如果在阻塞时间内,无容量空闲,放弃新增数据,返回 false。public class Test_ArrayBlockingQueue { final BlockingQueue<String> queue = new ArrayBlockingQueue<>(3); public static void main(String[] args) { final Test_ArrayBlockingQueue t = new Test_ArrayBlockingQueue(); for(int i = 0; i < 5; i++) { //add()方法 // System.out.println("add value : " + t.queue.add("add value : "+ i)); //put()方法 // try { // System.out.println("put value : " + i); // t.queue.put("put value : " + i); // } catch (InterruptedException e) { // e.printStackTrace(); // } //单参数offer()方法 // System.out.println("single offer value : " + // t.queue.offer("offer value : " + i)); //三参数offer()方法 try { System.out.println("three offer value : " + t.queue.offer("offer value " + i, 3, TimeUnit.SECONDS)); } catch (InterruptedException e) { e.printStackTrace(); } } } }

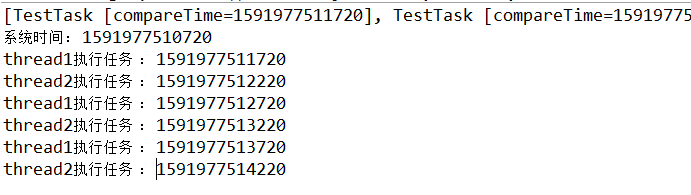
DelayQueue
Delayed接口的任务类–即:class TestTask implements Delayed。
public class TestTask implements Delayed{ private long compareTime; public TestTask(long compareTime) { this.compareTime = compareTime; } // 任务方法 public void show() { System.out.println(Thread.currentThread().getName() + "执行任务 : " + this.compareTime); } // 以下是Delayed接口定义的方法 /** * 比较大小,自动实现升序 * 如果DelayQueue是需要按时间完成的计划任务,必须配合getDelay方法完成。 */ @Override public int compareTo(Delayed o) { return (int) (this.getDelay(TimeUnit.MILLISECONDS) - o.getDelay(TimeUnit.MILLISECONDS)); } /** * 获取计划时长的方法。 * 根据参数TimeUnit来决定如何返回结果值。 */ @Override public long getDelay(TimeUnit unit) { return unit.convert(compareTime - System.currentTimeMillis(), TimeUnit.MILLISECONDS); } @Override public String toString() { return "TestTask [compareTime=" + compareTime + "]"; } }
public class Test_DelayQueue { private static final BlockingQueue<TestTask> queue = new DelayQueue<>(); private volatile static Integer i = 0; public static void main(String[] args) throws InterruptedException { long time = System.currentTimeMillis(); // 在当前系统时间的基础上延时执行 TestTask task1 = new TestTask(time + 2000); TestTask task2 = new TestTask(time + 1000); TestTask task3 = new TestTask(time + 2500); TestTask task4 = new TestTask(time + 3500); TestTask task5 = new TestTask(time + 1500); TestTask task6 = new TestTask(time + 3000); queue.put(task1); queue.put(task2); queue.put(task3); queue.put(task4); queue.put(task5); queue.put(task6); System.out.println(queue); System.out.println("系统时间: "+ time); new Thread(new Runnable() { @Override public void run() { while(i < 6) { synchronized(i) { i++; try { queue.take().show(); } catch (InterruptedException e) { e.printStackTrace(); } } } } }, "thread1").start(); new Thread(new Runnable() { @Override public void run() { while(i < 6) { synchronized(i) { i++; try { queue.take().show(); } catch (InterruptedException e) { e.printStackTrace(); } } } } }, "thread2").start(); } }
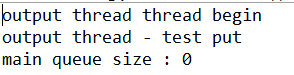
LinkedTransferQueue
使用 transfer 方法,实现数据的即时处理。发送消息时,会阻塞,直到有线程接受消息;接收消息时,会阻塞,直到有线程发送消息。但要注意transfer和add的区别,add是不会阻塞的。
public class Test_LinkedTransferQueue { private TransferQueue<String> queue = new LinkedTransferQueue<>(); public static void main(String[] args) { Test_LinkedTransferQueue t = new Test_LinkedTransferQueue(); // 接受消息 new Thread(new Runnable() { @Override public void run() { System.out.println(Thread.currentThread().getName() + " begin"); try { System.out.println("transfer message is " + t.queue.take()); } catch (InterruptedException e) { e.printStackTrace(); } } }, "output thread").start(); // 睡眠 try { TimeUnit.SECONDS.sleep(2); } catch (InterruptedException e) { e.printStackTrace(); } // 发送消息 new Thread(new Runnable() { @Override public void run() { System.out.println(Thread.currentThread().getName() + " begin"); try { t.queue.transfer("test transfer..."); } catch (InterruptedException e) { e.printStackTrace(); } } }, "input thread").start(); } }

SynchronusQueue
必须现有消费线程等待,才能使用;
注意:
add 方法,无阻塞。若没有消费线程阻塞等待数据,则抛出异常。
put 方法,有阻塞。若没有消费线程阻塞等待数据,阻塞等待。
public class Test_SynchronousQueue { private BlockingQueue<String> queue = new SynchronousQueue<String>(); public static void main(String[] args) { Test_SynchronousQueue t = new Test_SynchronousQueue(); // 接收消息 new Thread(new Runnable() { @Override public void run() { try { System.out.println(Thread.currentThread().getName() + " thread begin " ); try { TimeUnit.SECONDS.sleep(2); } catch (InterruptedException e) { e.printStackTrace(); } System.out.println(Thread.currentThread().getName() + " - " + t.queue.take()); } catch (InterruptedException e) { e.printStackTrace(); } } }, "output thread").start(); try { TimeUnit.SECONDS.sleep(3); } catch (InterruptedException e) { e.printStackTrace(); } // 发送消息 try { t.queue.put("test put"); } catch (InterruptedException e) { e.printStackTrace(); } System.out.println(Thread.currentThread().getName() + " queue size : " + t.queue.size()); } }
————————线 程 池————————
创建线程的方式
继承
Thread类public class Test_Thread { public static void main(String[] args) { MyThread t1 = new MyThread(); MyThread t2 = new MyThread(); t1.start(); t2.start(); } } // 线程类 class MyThread extends Thread{ @Override public void run() { System.out.println(Thread.currentThread().getName() + "running..."); } } 实现
Runnable接口(无返回值)public class Test_Runnable { public static void main(String[] args) { MyRunnable r1 = new MyRunnable(); MyRunnable r2 = new MyRunnable(); Thread t1 = new Thread(r1); Thread t2 = new Thread(r2); t1.start(); t2.start(); } } // 线程类 class MyRunnable implements Runnable{ @Override public void run() { System.out.println(Thread.currentThread().getName() + "running..."); } } 实现
Callable接口(有返回值),使用FutureTask获取结果RunnableFuture接口,存放未来结果,代表线程任务执行结束后的结果。获取线程执行结果的方式是通过 get 方法获取的。
① get 无参形式,阻塞等待线程执行结束,并得到结果。
② get 有参形式,参数是阻塞固定时长。会等待线程执行结束后得到结果,但是如果在阻塞时长范围内,线程未执行结束,则会抛出异常。public class Test_Callable { public static void main(String[] args) throws InterruptedException, ExecutionException { MyCallable c1 = new MyCallable(); MyCallable c2 = new MyCallable(); FutureTask<String> f1 = new FutureTask<String>(c1); FutureTask<String> f2 = new FutureTask<String>(c2); Thread t1 = new Thread(f1); Thread t2 = new Thread(f2); t1.start(); t2.start(); // 阻塞等待获取返回结果 String result1 = f1.get(); String result2 = f2.get(); System.out.println("result1 : " + result1); System.out.println("result2 : " + result2); } } // 线程类 class MyCallable implements Callable<String>{ @Override public String call() throws Exception { String result = Thread.currentThread().getName() + "running..."; return result; } }
ThredLock类(线程辅助工具)
ThreadLock类简单的看作一个Map,是多线程的辅助工具,可以为多线程环境中的每个线程保存一份数据,它的key:Thread.getCurrentThread()、value:线程需要保存的数据。但是,在使用ThreadLock的时候,一定注意回收资源问题,每个线程结束之前,将当前线程保存的线程变量一定要删除,使用ThreadLocal.remove();,否则可能造成内存溢出或者内存泄漏。public class Test_Threadlocal { volatile static String str = "this is threadlocal!"; static ThreadLocal<String> tl = new ThreadLocal<>(); public static void main(String[] args) { //创建thread1 new Thread(new Runnable() { @Override public void run() { //给thread1设置数据 tl.set(str); //睡眠2秒 try { TimeUnit.SECONDS.sleep(2); } catch (InterruptedException e) { e.printStackTrace(); } //取出thread1存储的数据 System.out.println(Thread.currentThread().getName() + " : " + tl.get()); //清除数据 tl.remove(); //取出thread1存储的数据 System.out.println(Thread.currentThread().getName() + " :(清除) " + tl.get()); } }, "thread1").start(); //睡眠3秒,保证thread1和thread2前后顺序,否则thread1的数据可能是thread2修改后的 try { TimeUnit.SECONDS.sleep(3); } catch (InterruptedException e) { e.printStackTrace(); } //创建thread2 new Thread(new Runnable() { @Override public void run() { //给thread2设置数据 str = "this is thread2"; tl.set(str); //睡眠1秒 try { TimeUnit.SECONDS.sleep(1); } catch (InterruptedException e) { e.printStackTrace(); } //取出thread2存储的数据 System.out.println(Thread.currentThread().getName() + " : " + tl.get()); //清除数据 tl.remove(); //取出thread2存储的数据 System.out.println(Thread.currentThread().getName() + " :(清除) " + tl.get()); } }, "thread2").start(); //睡眠2秒 try { TimeUnit.SECONDS.sleep(2); } catch (InterruptedException e) { e.printStackTrace(); } //取main线程存储的数据 System.out.println(Thread.currentThread().getName() + " : " + tl.get()); } }
thread1 :(清除) null
thread2 : this is thread2
thread2 :(清除) null
main : null
线程池使用
Executor(线程池顶级接口)void execute(Runnable)方法处理线程任务,调用者提供Runnable的实现类,线程池通过线程执行这个 Runnable,但是无返回值,因为Runnable的run方法无返回值。//线程池类 public class Test_Executor implements Executor{ public static void main(String[] args) { Test_Executor te = new Test_Executor(); MyRunnable r1 = new MyRunnable(); MyRunnable r2 = new MyRunnable(); te.execute(r1); te.execute(r2); } // 处理Runnable任务 @Override public void execute(Runnable r) { new Thread(r).start(); } } // Runnable任务 class MyRunnable implements Runnable{ @Override public void run() { System.out.println(Thread.currentThread().getName() + " running..."); } } ExecutorService (Executor接口的子接口)& Future & Executorssubmit(),有返回值Future类型。
①其参数类型可以为为 Runnable 的,不需要提供返回值的;
②参数类型还可以为 Callable,可以提供线程执行后的返回值。
public class Test_ExecutorService { public static void main(String[] args) throws InterruptedException, ExecutionException { ExecutorService es = Executors.newFixedThreadPool(1); // Runnable任务 MyRun r1 = new MyRun(); es.submit(r1); // Callable任务 MyCall c1 = new MyCall(); Future<String> submit = es.submit(c1); String result = submit.get(); System.out.println("result : " + result); } } // Runnable接口 class MyRun implements Runnable{ @Override public void run() { System.out.println("Runnable running..."); } } // Callable接口 class MyCall implements Callable<String>{ @Override public String call() throws Exception { String result = "Callable running..."; return result; } } FixedThreadPool(容量固定的线程池)BlockingQueue<Runnable>作为任务的载体。当任务数量大于线程池容量的时候,没有运行的任务保存在任务队列中,当线程有空闲的,自动从队列中取出任务执行。
Integer.MAX_VALUE。
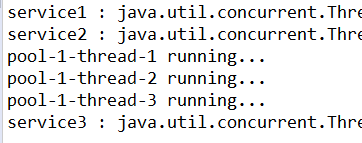
public class Test_FixedThreadPool { public static void main(String[] args) { // 创建一个容量为3的线程池 ExecutorService service = Executors.newFixedThreadPool(3); // 线程池执行6个线程 for(int i = 0; i < 6; i++) { service.execute(new Runnable() { @Override public void run() { System.out.println(Thread.currentThread().getName() + " running..."); try { TimeUnit.SECONDS.sleep(2); } catch (InterruptedException e) { e.printStackTrace(); } } }); } // 判断线程池状态 // 是否已经结束, 相当于回收了资源。 System.out.println(service.isTerminated()); // 是否已经关闭, 是否调用过shutdown方法 System.out.println(service.isShutdown()); // 关闭线程池 service.shutdown(); // 是否已经结束, 相当于回收了资源。 System.out.println(service.isTerminated()); // 是否已经关闭, 是否调用过shutdown方法 System.out.println(service.isShutdown()); } } CachedThreadPool(缓存的线程池)
public class Test_CachedThreadPool { public static void main(String[] args) { // 创建一个缓存线程池 ExecutorService service = Executors.newCachedThreadPool(); // 查看线程池 System.out.println("service1 : "+service); // 添加3个线程任务 for(int i = 0; i < 3; i++) { service.execute(new Runnable() { @Override public void run() { System.out.println(Thread.currentThread().getName() + " running..."); } }); } // 查看线程池 System.out.println("service2 : "+service); //休眠61秒 try { TimeUnit.SECONDS.sleep(65); } catch (InterruptedException e) { e.printStackTrace(); } // 查看线程池 System.out.println("service3 : "+service); } }

ScheduledThreadPool(计划任务线程池)
执行方式:
service.scheduleAtFixedRate(Runnable command, long initialDelay, long period, TimeUnit unit);
Runnable – 要执行的任务;
initialDelay- 第一次执行的时间,0代表立即执行;
period- 多次执行的间隔;
TimeUnit – 时间单位;
public class Test_ScheduledThreadPool { public static void main(String[] args) { // 创建容量为1的计划任务线程池 ScheduledExecutorService service = Executors.newScheduledThreadPool(1); // 添加定时任务 service.scheduleAtFixedRate(new Runnable() { @Override public void run() { System.out.println(Thread.currentThread().getName() + " running..."); } }, 0, 1, TimeUnit.SECONDS); } }
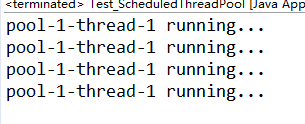
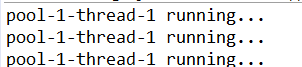
SingleThreadExceutor(单一容量的线程池)
public class Test_SingleThreadExecutor { public static void main(String[] args) { // 创建线程池 ExecutorService service = Executors.newSingleThreadExecutor(); // 提供3个线程,并睡眠500毫秒,查看执行顺序 for(int i = 0; i < 3; i++) { service.execute(new Runnable() { @Override public void run() { try { TimeUnit.MILLISECONDS.sleep(500); } catch (InterruptedException e) { e.printStackTrace(); } System.out.println(Thread.currentThread().getName() + " running..."); } }); } } }
ForkJoinPool(分支合并线程池)
是 ForkJoinTask 类型的子类型,其中提供了分支和合并的能力。RecursiveTask 是有返回结果的分支合并任务;RecursiveAction 是无返回结果的分支合并任务。compute 方法:就是任务的执行逻辑。类似于递归!!!
public class Test_ForkJoinPool { // 控制分支次数为1次 private static volatile int i = 1; // RecursiveTask任务 static class MyRecursiveTask extends RecursiveTask<String>{ private static final long serialVersionUID = 1L; private String taskName; public MyRecursiveTask(String taskName) { this.taskName = taskName; } public String getTaskName() { return taskName; } @Override protected String compute() { // 根据i的值来决定返回的结果 // 因为i=1,所以执行的时second_task分支,而不是主分支 if(i == 1) { // 返回第二层分支的结果 MyRecursiveTask mr1 = new MyRecursiveTask("second_task_1"); MyRecursiveTask mr2 = new MyRecursiveTask("second_task_2"); mr1.fork(); mr2.fork(); i--; return mr1.join() + mr2.join(); }else { // 返回当前分支的结果 return this.getTaskName(); } } } public static void main(String[] args) throws InterruptedException, ExecutionException { // 分支任务 MyRecursiveTask mr = new MyRecursiveTask("first_task"); // 创建分支线程池 ForkJoinPool pool = new ForkJoinPool(); // 执行任务 ForkJoinTask<String> task = pool.submit(mr); // 获取结果 String result = task.get(); System.out.println("result : " + result); } }

WorkStealingPool(工作窃取线程池,基于ForkJoinPool扩展)
初始化线程容量与 CPU 核心数相关。此线程池中维护的是精灵线程。
public class Test_WorkStealingPool { public static void main(String[] args) { // 创建线程 ExecutorService service = Executors.newWorkStealingPool(); for(int i = 0; i < 3; i++) { service.submit(new Runnable() { @Override public void run() { try { TimeUnit.SECONDS.sleep(1); } catch (InterruptedException e) { e.printStackTrace(); } } }); } System.out.println(service); try { TimeUnit.SECONDS.sleep(5); } catch (InterruptedException e) { e.printStackTrace(); } System.out.println(service); } }

ThreadPoolExecutor(线程池底层实现类)ThreadPoolExecutor实现的。
FixedThreadPool:
 – 模拟
– 模拟FixedThreadPool:public class Test_ThreadPoolExecutor { public static void main(String[] args) { // 核心线程数3,最大线程数5,生命周期无限(当线程空闲多久后,自动回收) ExecutorService service = new ThreadPoolExecutor(3, 5, 0L, TimeUnit.MILLISECONDS, new LinkedBlockingDeque<Runnable>()); System.out.println(service); // 添加6个线程 for(int i = 0; i < 6; i++) { service.submit(new Runnable() { @Override public void run() { System.out.println(Thread.currentThread().getName() + " running..."); } }); } try { TimeUnit.SECONDS.sleep(1); } catch (InterruptedException e) { e.printStackTrace(); } System.out.println(service); } }

本网页所有视频内容由 imoviebox边看边下-网页视频下载, iurlBox网页地址收藏管理器 下载并得到。
ImovieBox网页视频下载器 下载地址: ImovieBox网页视频下载器-最新版本下载
本文章由: imapbox邮箱云存储,邮箱网盘,ImageBox 图片批量下载器,网页图片批量下载专家,网页图片批量下载器,获取到文章图片,imoviebox网页视频批量下载器,下载视频内容,为您提供.
阅读和此文章类似的: 全球云计算
 官方软件产品操作指南 (170)


 1688
1688