论文:《Rethinking the Inception Architecture for Computer Vision》 tensorflow.keras.applications模块内置了许多模型,包括Xception、MobileNet、VGG等,我们可以使用内置的InceptionV3模型,只需修改最后的全连接层输出类别即可。 链接:https://pan.baidu.com/s/17HsGlsIB2xP8oeUywuwf3A 图片样本 执行结果: 训练集一共有1098张图片,验证集一共有272张图片,总共10个类别 执行结果: 由于大部分层被冻结了,所以可训练的参数很少,只有1,955,850个参数 执行结果: 从结果可以看出,使用迁移学习的时候模型收敛的速度很快,当训练第13个epoch时训练集准确率为97.78%,验证集的准确率为97.66%
1.InceptionV3网络结构
论文链接:https://arxiv.org/abs/1512.00567
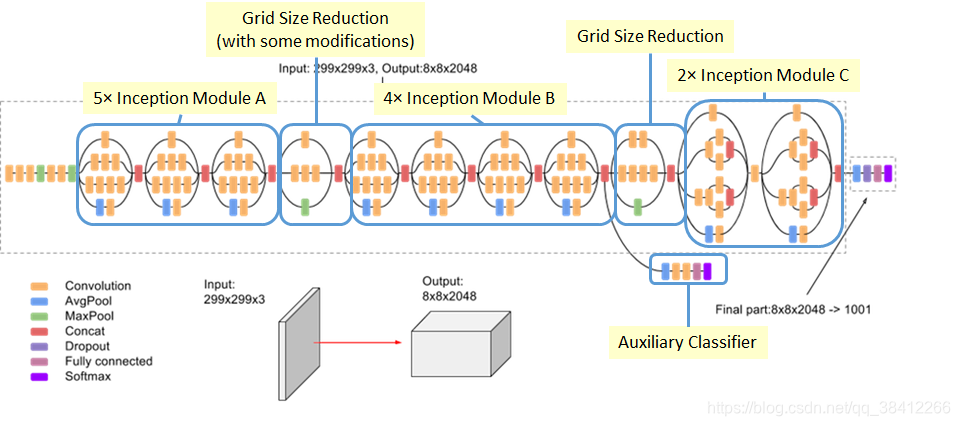
在2015年,谷歌发布了Inception V3版本,Inception V3 的创新点是将大的卷积分解成小卷积,即 5×5 卷积可以用两个 3×3 卷积代替(Inception 模块 A),3×3 卷积可以用 3×1 卷积后接一个 1×3 卷积代替(Inception 模块 B),作者还提出了一种使用非对称分解的卷积模块(Inception 模块 C),如下图所示:
Inception 模块 A:
Inception 模块 B:
Inception 模块 C:
Inception 整体结构:
图源 : medium

除此之外,Inception V3 还用了RMSProp优化器,标签平滑(防止过度拟合),辅助分类器中加入了BatchNorm,可以提高大网络的收敛速度。2.数据集
提取码:kl0h
采用kaggle上的猴子数据集,包含两个文件:训练集和验证集。每个文件夹包含10个标记为n0-n9的猴子。图像尺寸为400×300像素或更大,并且为JPEG格式(近1400张图像)。
图片类别标签,训练集,验证集划分说明:
3.代码
3.1 数据读取
#导入相应的库 from tensorflow.keras.preprocessing.image import ImageDataGenerator from sklearn.metrics import confusion_matrix import matplotlib.pyplot as plt import tensorflow as tf import pandas as pd import numpy as np import itertools import os #设置图片的高和宽,一次训练所选取的样本数,迭代次数 im_height = 224 im_width = 224 batch_size = 64 epochs = 13 image_path = "../input/10-monkey-species/" # monkey数据集路径 train_dir = image_path + "training/training" #训练集路径 validation_dir = image_path + "validation/validation" #验证集路径 # 定义训练集图像生成器,并进行图像增强 train_image_generator = ImageDataGenerator( rescale=1./255, # 归一化 rotation_range=40, #旋转范围 width_shift_range=0.2, #水平平移范围 height_shift_range=0.2, #垂直平移范围 shear_range=0.2, #剪切变换的程度 zoom_range=0.2, #剪切变换的程度 horizontal_flip=True, #水平翻转 fill_mode='nearest') # 使用图像生成器从文件夹train_dir中读取样本,对标签进行one-hot编码 train_data_gen = train_image_generator.flow_from_directory(directory=train_dir, #从训练集路径读取图片 batch_size=batch_size, #一次训练所选取的样本数 shuffle=True, #打乱标签 target_size=(im_height, im_width), #图片resize到224x224大小 class_mode='categorical') #one-hot编码 # 训练集样本数 total_train = train_data_gen.n # 定义验证集图像生成器,并对图像进行预处理 validation_image_generator = ImageDataGenerator(rescale=1./255) # 归一化 # 使用图像生成器从验证集validation_dir中读取样本 val_data_gen = validation_image_generator.flow_from_directory(directory=validation_dir,#从验证集路径读取图片 batch_size=batch_size, #一次训练所选取的样本数 shuffle=False, #不打乱标签 target_size=(im_height, im_width), #图片resize到224x224大小 class_mode='categorical') #one-hot编码 # 验证集样本数 total_val = val_data_gen.n Found 1098 images belonging to 10 classes. Found 272 images belonging to 10 classes. 3.2 构建模型
#使用tf.keras.applications中的InceptionV3网络,并且使用官方的预训练模型 covn_base = tf.keras.applications.InceptionV3(weights='imagenet',include_top=False,input_shape=(224,224,3)) covn_base.trainable = True #冻结前面的层,训练最后20层 for layers in covn_base.layers[:-20]: layers.trainable = False #构建模型 model = tf.keras.Sequential() model.add(covn_base) model.add(tf.keras.layers.GlobalAveragePooling2D()) #加入全局平均池化层 model.add(tf.keras.layers.Dense(10,activation='softmax')) #加入输出层(10分类) model.summary() # 打印每层参数信息 #编译模型 model.compile(optimizer=tf.keras.optimizers.Adam(learning_rate=0.0001), #使用adam优化器,学习率为0.0001 loss=tf.keras.losses.CategoricalCrossentropy(from_logits=False), #交叉熵损失函数 metrics=["accuracy"]) #评价函数 Downloading data from https://storage.googleapis.com/tensorflow/keras-applications/inception_v3/inception_v3_weights_tf_dim_ordering_tf_kernels_notop.h5 87916544/87910968 [==============================] - 1s 0us/step: 311 Model: "sequential" _________________________________________________________________ Layer (type) Output Shape Param # ================================================================= inception_v3 (Model) (None, 5, 5, 2048) 21802784 _________________________________________________________________ global_average_pooling2d (Gl (None, 2048) 0 _________________________________________________________________ dense (Dense) (None, 10) 20490 ================================================================= Total params: 21,823,274 Trainable params: 1,955,850 Non-trainable params: 19,867,424 _________________________________________________________________ 3.3 训练模型
history = model.fit(x=train_data_gen, #输入训练集 steps_per_epoch=total_train // batch_size, #一个epoch包含的训练步数 epochs=epochs, #训练模型迭代次数 validation_data=val_data_gen, #输入验证集 validation_steps=total_val // batch_size) #一个epoch包含的训练步数 # 记录训练集和验证集的准确率和损失值 history_dict = history.history train_loss = history_dict["loss"] #训练集损失值 train_accuracy = history_dict["accuracy"] #训练集准确率 val_loss = history_dict["val_loss"] #验证集损失值 val_accuracy = history_dict["val_accuracy"] #验证集准确率 Epoch 1/13 17/17 [==============================] - 91s 5s/step - loss: 1.4246 - accuracy: 0.6267 - val_loss: 0.4937 - val_accuracy: 0.8945 Epoch 2/13 17/17 [==============================] - 88s 5s/step - loss: 0.4829 - accuracy: 0.9188 - val_loss: 0.2047 - val_accuracy: 0.9531 Epoch 3/13 17/17 [==============================] - 87s 5s/step - loss: 0.2874 - accuracy: 0.9420 - val_loss: 0.1497 - val_accuracy: 0.9648 Epoch 4/13 17/17 [==============================] - 87s 5s/step - loss: 0.2041 - accuracy: 0.9662 - val_loss: 0.1212 - val_accuracy: 0.9727 Epoch 5/13 17/17 [==============================] - 89s 5s/step - loss: 0.2079 - accuracy: 0.9565 - val_loss: 0.1061 - val_accuracy: 0.9766 Epoch 6/13 17/17 [==============================] - 86s 5s/step - loss: 0.1675 - accuracy: 0.9594 - val_loss: 0.1078 - val_accuracy: 0.9766 Epoch 7/13 17/17 [==============================] - 88s 5s/step - loss: 0.1500 - accuracy: 0.9652 - val_loss: 0.0957 - val_accuracy: 0.9688 Epoch 8/13 17/17 [==============================] - 87s 5s/step - loss: 0.1330 - accuracy: 0.9671 - val_loss: 0.0938 - val_accuracy: 0.9727 Epoch 9/13 17/17 [==============================] - 87s 5s/step - loss: 0.1228 - accuracy: 0.9778 - val_loss: 0.0875 - val_accuracy: 0.9805 Epoch 10/13 17/17 [==============================] - 86s 5s/step - loss: 0.1320 - accuracy: 0.9710 - val_loss: 0.0848 - val_accuracy: 0.9766 Epoch 11/13 17/17 [==============================] - 87s 5s/step - loss: 0.1122 - accuracy: 0.9758 - val_loss: 0.0798 - val_accuracy: 0.9727 Epoch 12/13 17/17 [==============================] - 86s 5s/step - loss: 0.1206 - accuracy: 0.9681 - val_loss: 0.0755 - val_accuracy: 0.9766 Epoch 13/13 17/17 [==============================] - 85s 5s/step - loss: 0.1056 - accuracy: 0.9778 - val_loss: 0.0796 - val_accuracy: 0.9766 3.4 评估模型
3.4.1 绘制损失值曲线
plt.figure() plt.plot(range(epochs), train_loss, label='train_loss') plt.plot(range(epochs), val_loss, label='val_loss') plt.legend() plt.xlabel('epochs') plt.ylabel('loss')
记录每个epoch的训练集和验证集损失值并绘制出来进行对比,可以看到从第4个epoch开始逐渐趋于稳定3.4.2 绘制准确率曲线
plt.figure() plt.plot(range(epochs), train_accuracy, label='train_accuracy') plt.plot(range(epochs), val_accuracy, label='val_accuracy') plt.legend() plt.xlabel('epochs') plt.ylabel('accuracy') plt.show()
记录每个epoch的训练集和验证集准确率并绘制出来进行对比,同样从第4个epoch开始逐渐趋于稳定3.4.3 绘制混淆矩阵
def plot_confusion_matrix(cm, target_names,title='Confusion matrix',cmap=None,normalize=False): accuracy = np.trace(cm) / float(np.sum(cm)) #计算准确率 misclass = 1 - accuracy #计算错误率 if cmap is None: cmap = plt.get_cmap('Blues') #颜色设置成蓝色 plt.figure(figsize=(10, 8)) #设置窗口尺寸 plt.imshow(cm, interpolation='nearest', cmap=cmap) #显示图片 plt.title(title) #显示标题 plt.colorbar() #绘制颜色条 if target_names is not None: tick_marks = np.arange(len(target_names)) plt.xticks(tick_marks, target_names, rotation=45) #x坐标标签旋转45度 plt.yticks(tick_marks, target_names) #y坐标 if normalize: cm = cm.astype('float32') / cm.sum(axis=1) cm = np.round(cm,2) #对数字保留两位小数 thresh = cm.max() / 1.5 if normalize else cm.max() / 2 for i, j in itertools.product(range(cm.shape[0]), range(cm.shape[1])): #将cm.shape[0]、cm.shape[1]中的元素组成元组,遍历元组中每一个数字 if normalize: #标准化 plt.text(j, i, "{:0.2f}".format(cm[i, j]), #保留两位小数 horizontalalignment="center", #数字在方框中间 color="white" if cm[i, j] > thresh else "black") #设置字体颜色 else: #非标准化 plt.text(j, i, "{:,}".format(cm[i, j]), horizontalalignment="center", #数字在方框中间 color="white" if cm[i, j] > thresh else "black") #设置字体颜色 plt.tight_layout() #自动调整子图参数,使之填充整个图像区域 plt.ylabel('True label') #y方向上的标签 plt.xlabel("Predicted labelnaccuracy={:0.4f}n misclass={:0.4f}".format(accuracy, misclass)) #x方向上的标签 plt.show() #显示图片 #读取'Common Name'列的猴子类别,并存入到labels中 cols = ['Label','Latin Name', 'Common Name','Train Images', 'Validation Images'] labels = pd.read_csv("../input/10-monkey-species/monkey_labels.txt", names=cols, skiprows=1) labels = labels['Common Name'] # 预测验证集数据整体准确率 Y_pred = model.predict_generator(val_data_gen, total_val // batch_size + 1) # 将预测的结果转化为one hit向量 Y_pred_classes = np.argmax(Y_pred, axis = 1) # 计算混淆矩阵 confusion_mtx = confusion_matrix(y_true = val_data_gen.classes,y_pred = Y_pred_classes) # 绘制混淆矩阵 plot_confusion_matrix(confusion_mtx, normalize=True, target_names=labels)
可以看出,验证集中有五类猴子预测的准确率为百分之百,剩下的五类猴子预测的准确率在百分之90以上,整体预测的准确率为97.79%,说明效果还是不错的
本网页所有视频内容由 imoviebox边看边下-网页视频下载, iurlBox网页地址收藏管理器 下载并得到。
ImovieBox网页视频下载器 下载地址: ImovieBox网页视频下载器-最新版本下载
本文章由: imapbox邮箱云存储,邮箱网盘,ImageBox 图片批量下载器,网页图片批量下载专家,网页图片批量下载器,获取到文章图片,imoviebox网页视频批量下载器,下载视频内容,为您提供.
阅读和此文章类似的: 全球云计算
 官方软件产品操作指南 (170)